Beste andere Belgen
Venera en ik hebben een bébé gemaakt. Hij is Troi en naar het schijnt lijkt hij erg op mij.
Hier is een fotooke van hem en zijn mama. Troi is uiteraard heel erg schattig:

Beste andere Belgen
Venera en ik hebben een bébé gemaakt. Hij is Troi en naar het schijnt lijkt hij erg op mij.
Hier is een fotooke van hem en zijn mama. Troi is uiteraard heel erg schattig:
A while ago I wrote a article comparing Waterloo with Bakhmut. That was in August 2023. We are in February 2024 and I predict that soon I will have to say the same about Avdiivka.
The city is about to be encircled the coming month and is in fact already ~ technically encircled (all of its supply roads are within fire range of Russians). I think that Avdiivka has already surpassed many times the death toll of Bakhmut.
The amounts of deaths are now also becoming comparable to the WWII Operation Bagration which had about 400000 German and 180000 Red Army kills.
The Soviet operation was named after the Georgian prince Pyotr Bagration (1765–1812), a general of the Imperial Russian Army during the Napoleonic Wars.
Wikipedia
Today my rooster August(us) was not standing well on its legs. Because it’s getting winter and more importantly because my woman is pregnant I decided that this time we wouldn’t try to save the animal ..
Last time one of our chickens (Livia, our white chicken) fell ill we took it inside (somewhere in the basement where the temperature is constant) to save it from the other chickens (who were also picking on her – because that’s what healthy chickens do to a sick one) and give it the yolk of the other chickens’ eggs for extra strength.
It was a mess all the time. Outside the chickens take care of themselves. But petting it inside of the house you kinda have to do all that for the chicken. Chickens shit a lot. The outcome isn’t very hygienic. I was not planning to go through this ordeal with our rooster August.
Anyway. I had already bought a restraining cone for chicken slaughter a few months ago. A sharp knife I had in the kitchen. August was very relax and not very defensive because well, he was feeling sick and all that. It was not hard to put him head first in the cone. I also petted him and calmed him before all this.
That’s all very bad news. But the good news is that this new year’s eve we will be doing Coq au vin!
Afterwards in warm water we plucked the feathers, then opened up the body and took the intestines out (carefully not cutting open the gallblatter and urineblatter to make sure we don’t spoil any meat).
Meanwhile Livia, Julia and the newest of the flock Gwendolyn (that name because she’s a Aarschot’s breed of chicken – I always use political figures for chicken’s names) are still alive and happily laying eggs for us.
It’s ~ decided that Julia must go too. Because our new year’s eve family gathering will count five attendants and we need enough chickenmeat. Plus, the nice people of Hagelandsneerhof organize the Neerhofdieren show every year around the end of Januari at O-Green in Rillaar. I plan to start with a new flock of chickens and buy a new entire group there.
Poor chickens.
They had a good life. I don’t know yet what I’ll do with Gwendolyn and Livia. Especially Livia is very special: she’s always the first to arrive when we bring food. Fiercely fighting for it with Gwendolyn.
Poor August. He was so strong and defensive for his chickens. He cut me several times during one of his attacks (before I learned how to tame him).
But I couldn’t let him be in agony of sickness.
With my Youtube addiction I learned from channels where they rebuild cars, how to renovate your car’s leather seats.
From there I started wondering: can’t I do this with shoes too?
I’m a big fan of Mephisto shoes. Each time I wore them down, I bought a new pair and I kept the old ones for getting the eggs from my chickens and other dirty gardening things.
Any other kind of shoes I owned really didn’t last long but no matter what I did, the Mephisto shoes simply wouldn’t break.
Then from what I learned I used a heat gun to get most of the wrinkles out of the leather. Put a cloth tightly inside the shoe so that it is shaped right in the front. Don’t use your hands for that: you’ll get burned.
Then with a leather repear kit I repainted them.
Then I applied beeswax on the leather. You let the beeswax melt into the pores of the leather by heating it a little bit with the heat gun.
My old Mephisto pairs look almost as good as my new pairs.
Incredible. I have too many pairs of shoes now.
I don’t have pictures from before. But you can trust me that these shoes had basically no more color at all.
You can see that while I was getting the wrinkles out of the leather, I burned the laces with my heat gun accidentally. Guess I’ll need to buy new laces now. The shoe had a lot of wrinkles where it typically bends.
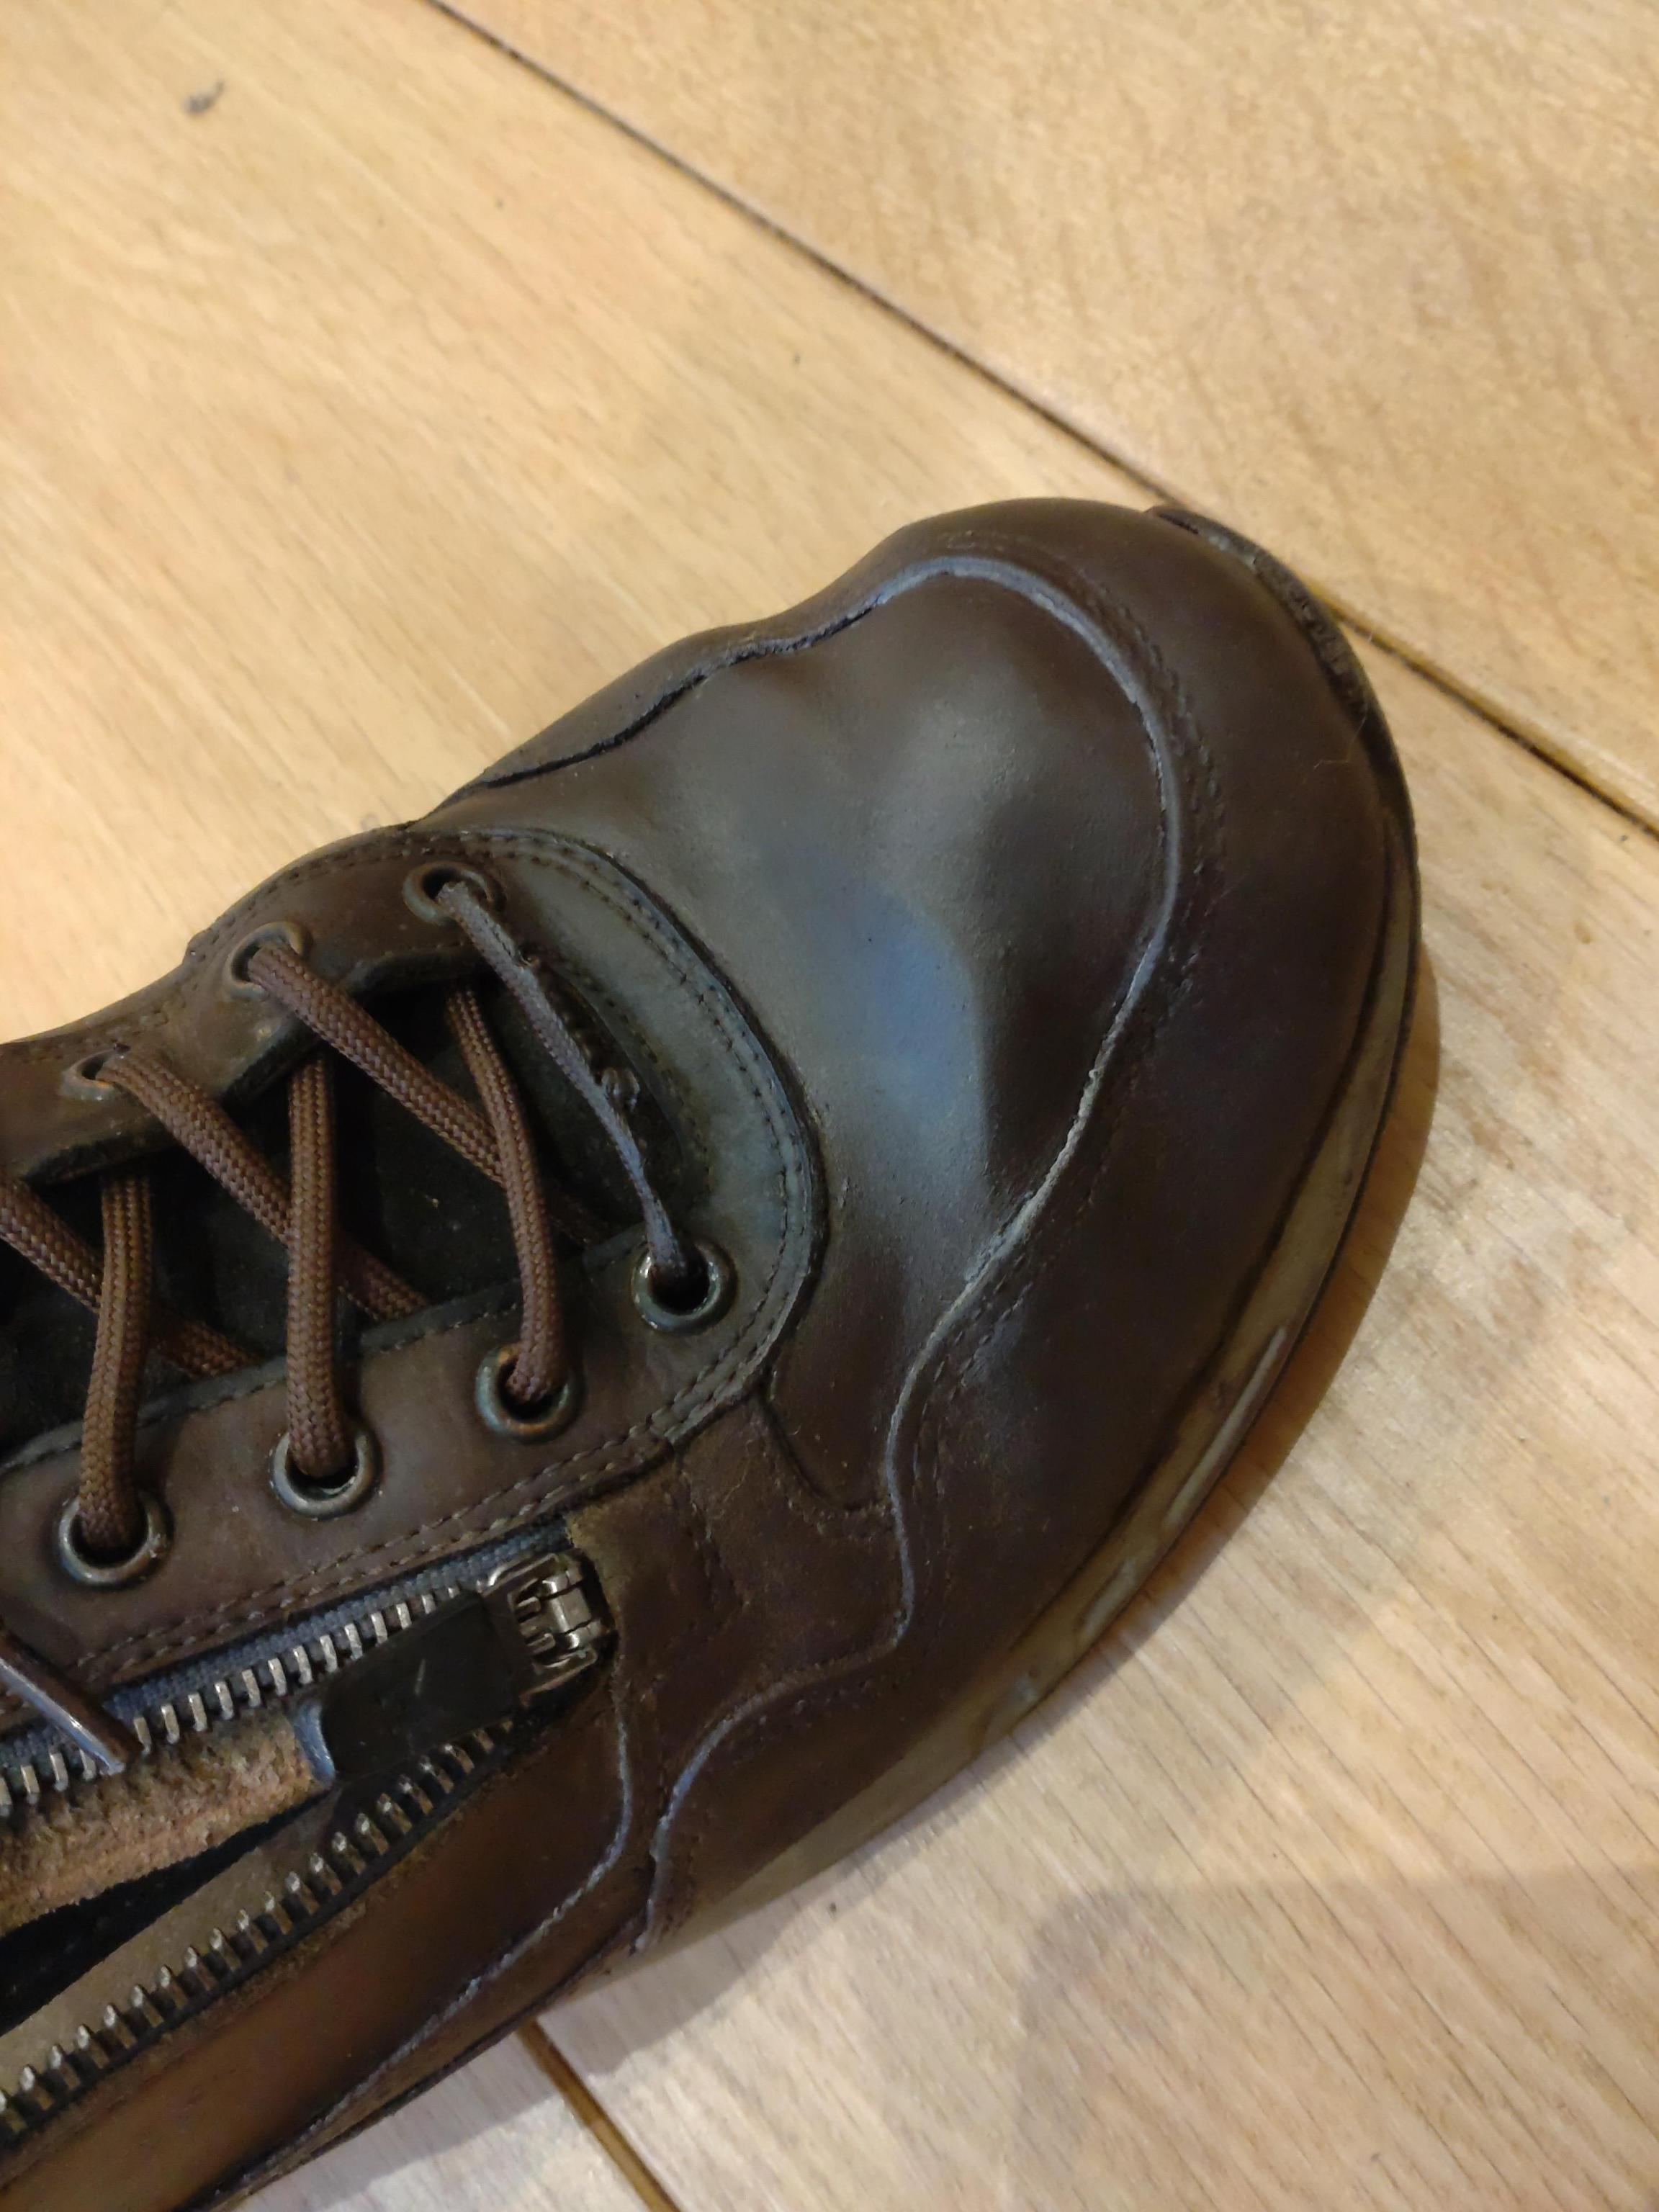
The leather repair kit came with different colors, so I used four different colors on the shoe (as I remembered the original shoe came with different colors there too).
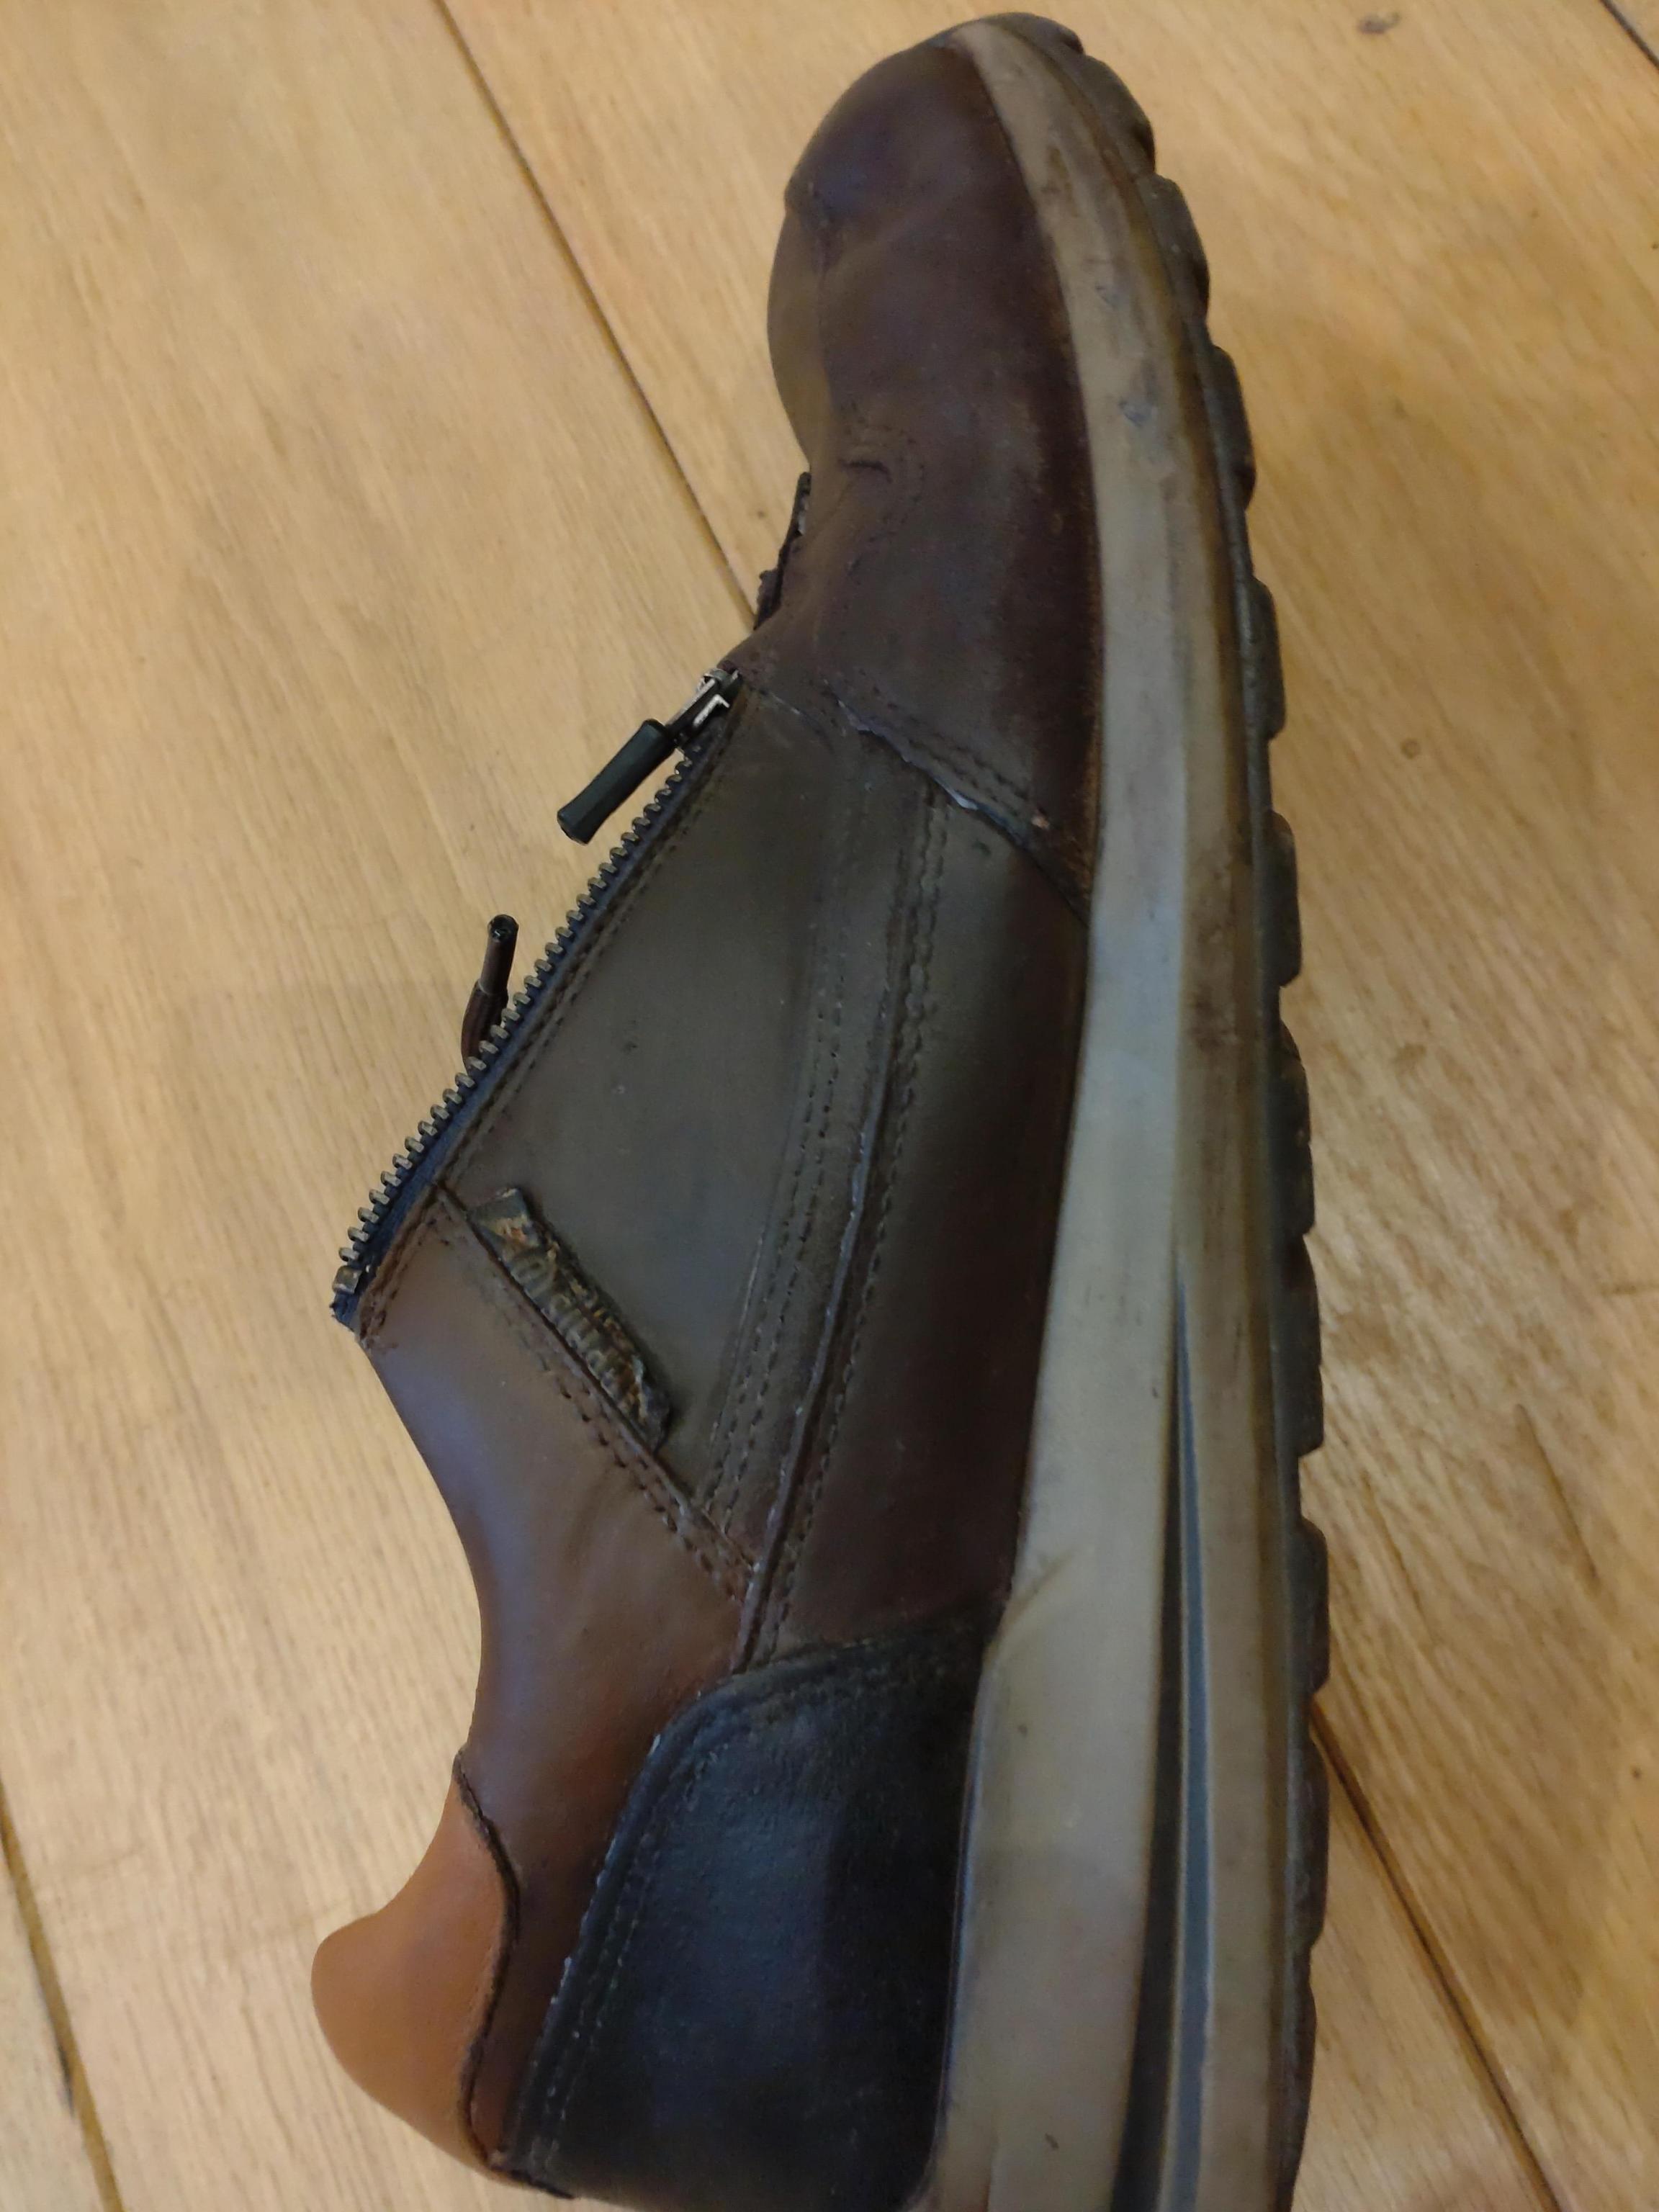
To apply the leather repair paint is about the same as applying shoe polish. It just stays on permanently. Afterwards beeswax. And you’re done.
ps. I wouldn’t try the heat gun trick on shoes of which you are not sure that all of its areas are real leather. Look at my laces: it melts stuff. Heat tends to do that. Ehm, it’s probably a good idea to remove the laces too.
ps. I recommend to tryout on old shoes first.
The combined number of men killed or wounded reached nearly 50,000, with close to 25,000 casualties on the French side and approximately 23,000 for the Allied army.
Western estimate: 60,000+ casualties (20,000+ killed) Per Ukraine: 100,000+ killed or wounded (20,000–30,000 killed)
Bypassing paywalls is a sport for some. And it ain’t hard for Desktop Browsers. Just install a addon in your favorite Desktop Browser.
Unfortunately this didn’t work on a Android or iPhone phone. Nor on Sailfish OS with its Android emulation. Because over there browsers like Chrome and Chromium don’t allow extensions to be installed. Firefox does have some limited support for addons, but it can’t open local XPI files. Its addon menu doesn’t contain the addon and the addon website for it sees the running browser as incompatible.
Luckily you have Kiwi Browser, which is a Chrome based browser that did not disable extensions to be installed.
Once Kiwi is installed you can go to either chrome://extensions or kiwi://extensions, enable Developer mode and then open the zip file as explained in the Readme.md.
ps. For Sailfish I had to install an older version of Kiwi Browser, as the most recent version doesn’t seem to work.
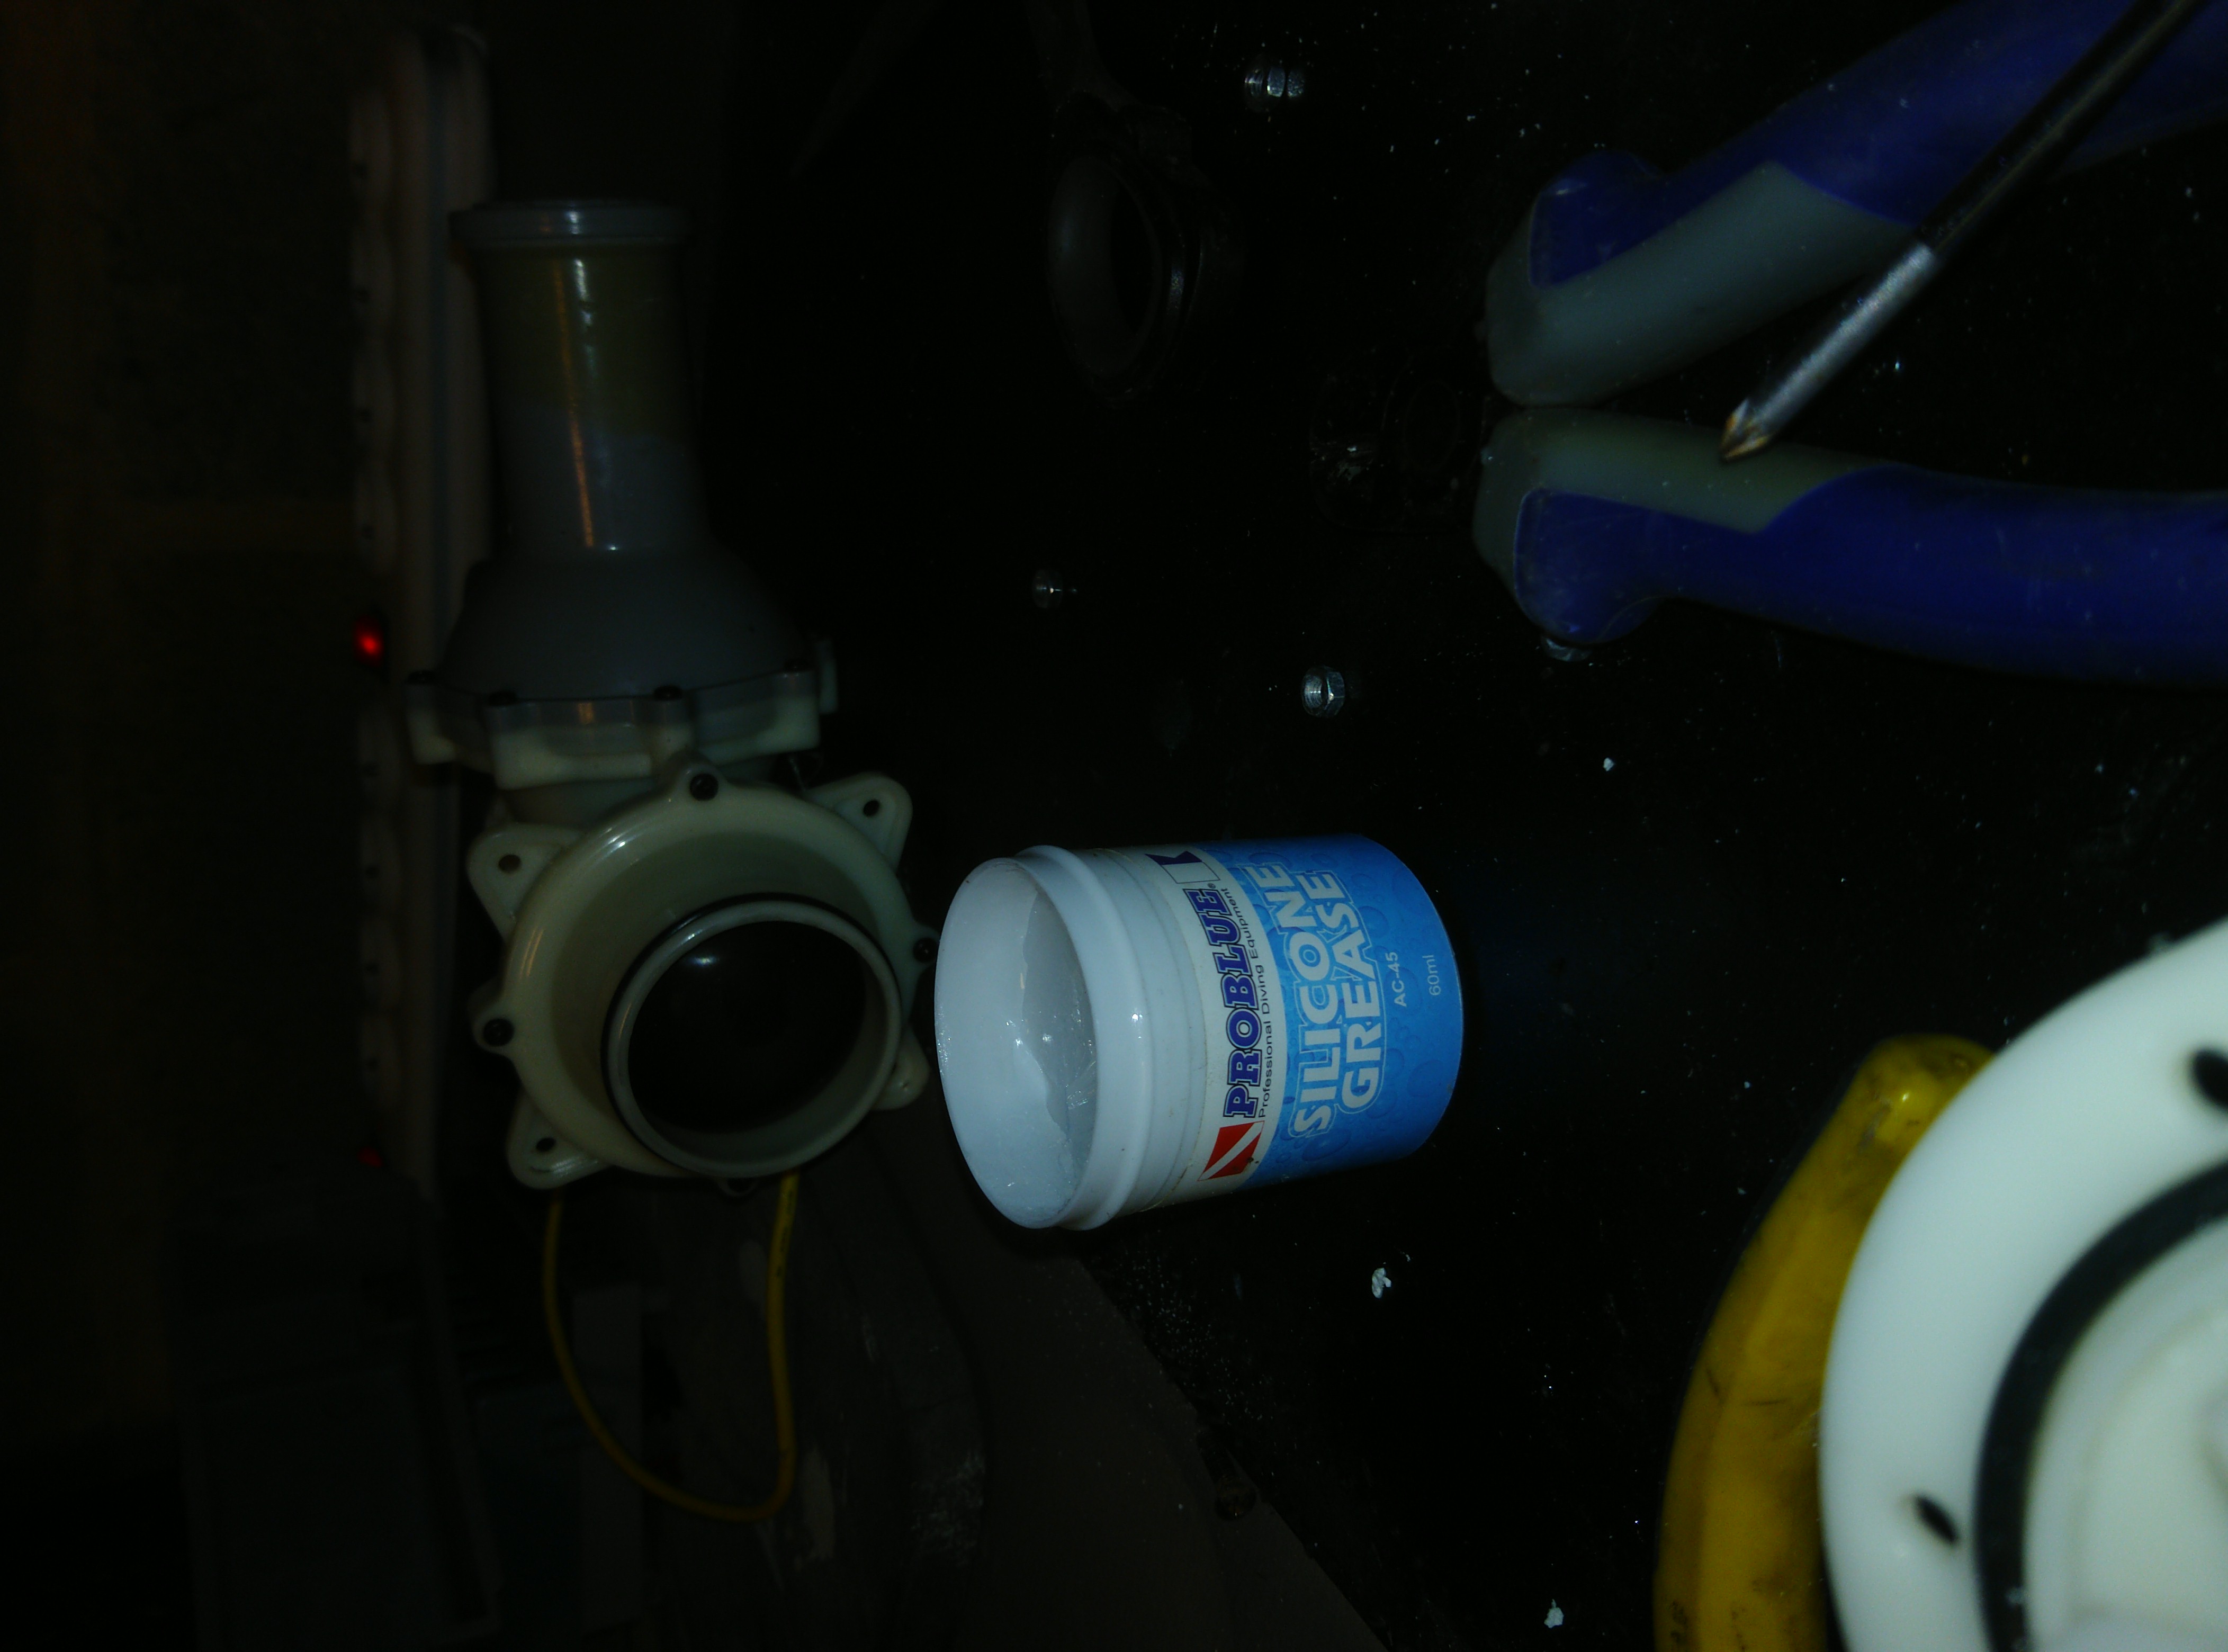
The Bestway hottub’s water pump must regularly be descaled. It’s not easy to add huge amounts of chemicals to your pool water to have a meaningful effect when you have serious calcium buildup in your water pump unit. So I made myself a contraption.
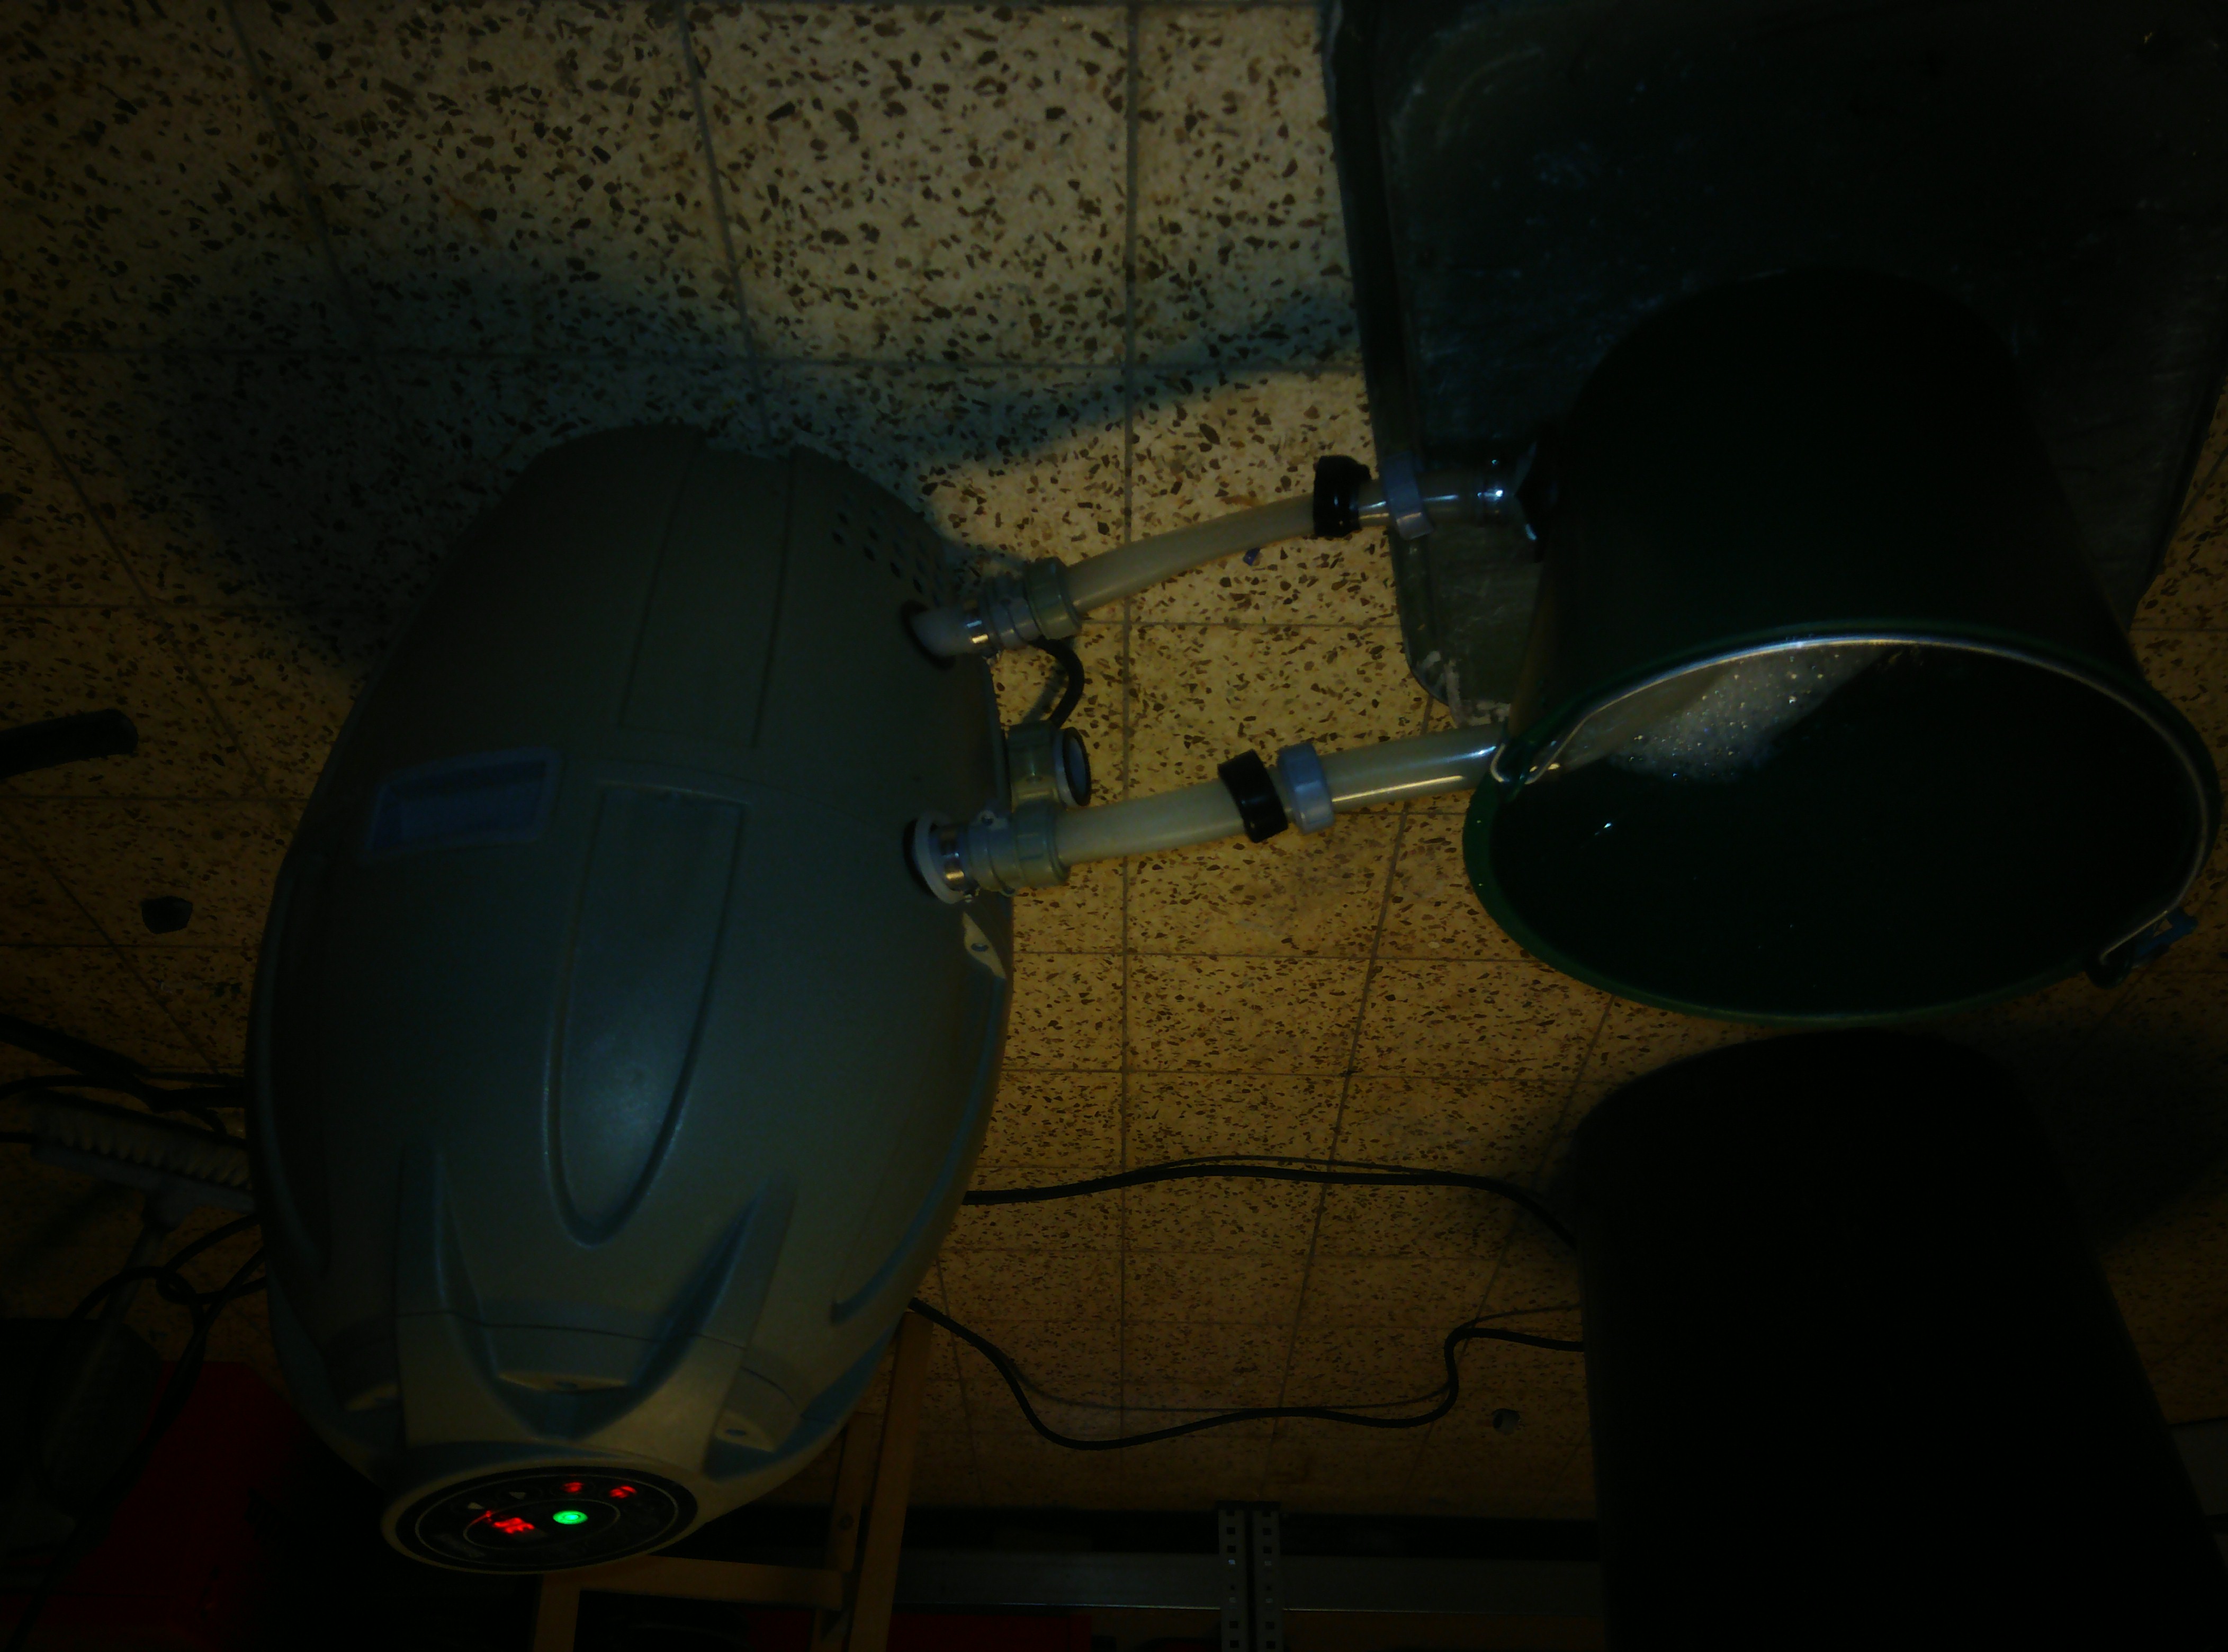
I remember that somebody made something for this himself too. His contraption inspired me a little bit of course.
I used the tubes from a old Bestway hottub. I just cut them out of the inflatable pool before I disposed myself of the rest. Then I made two holes in a cheap water bucket and I attached the tubes with some rubber and other things to seal them to the holes.
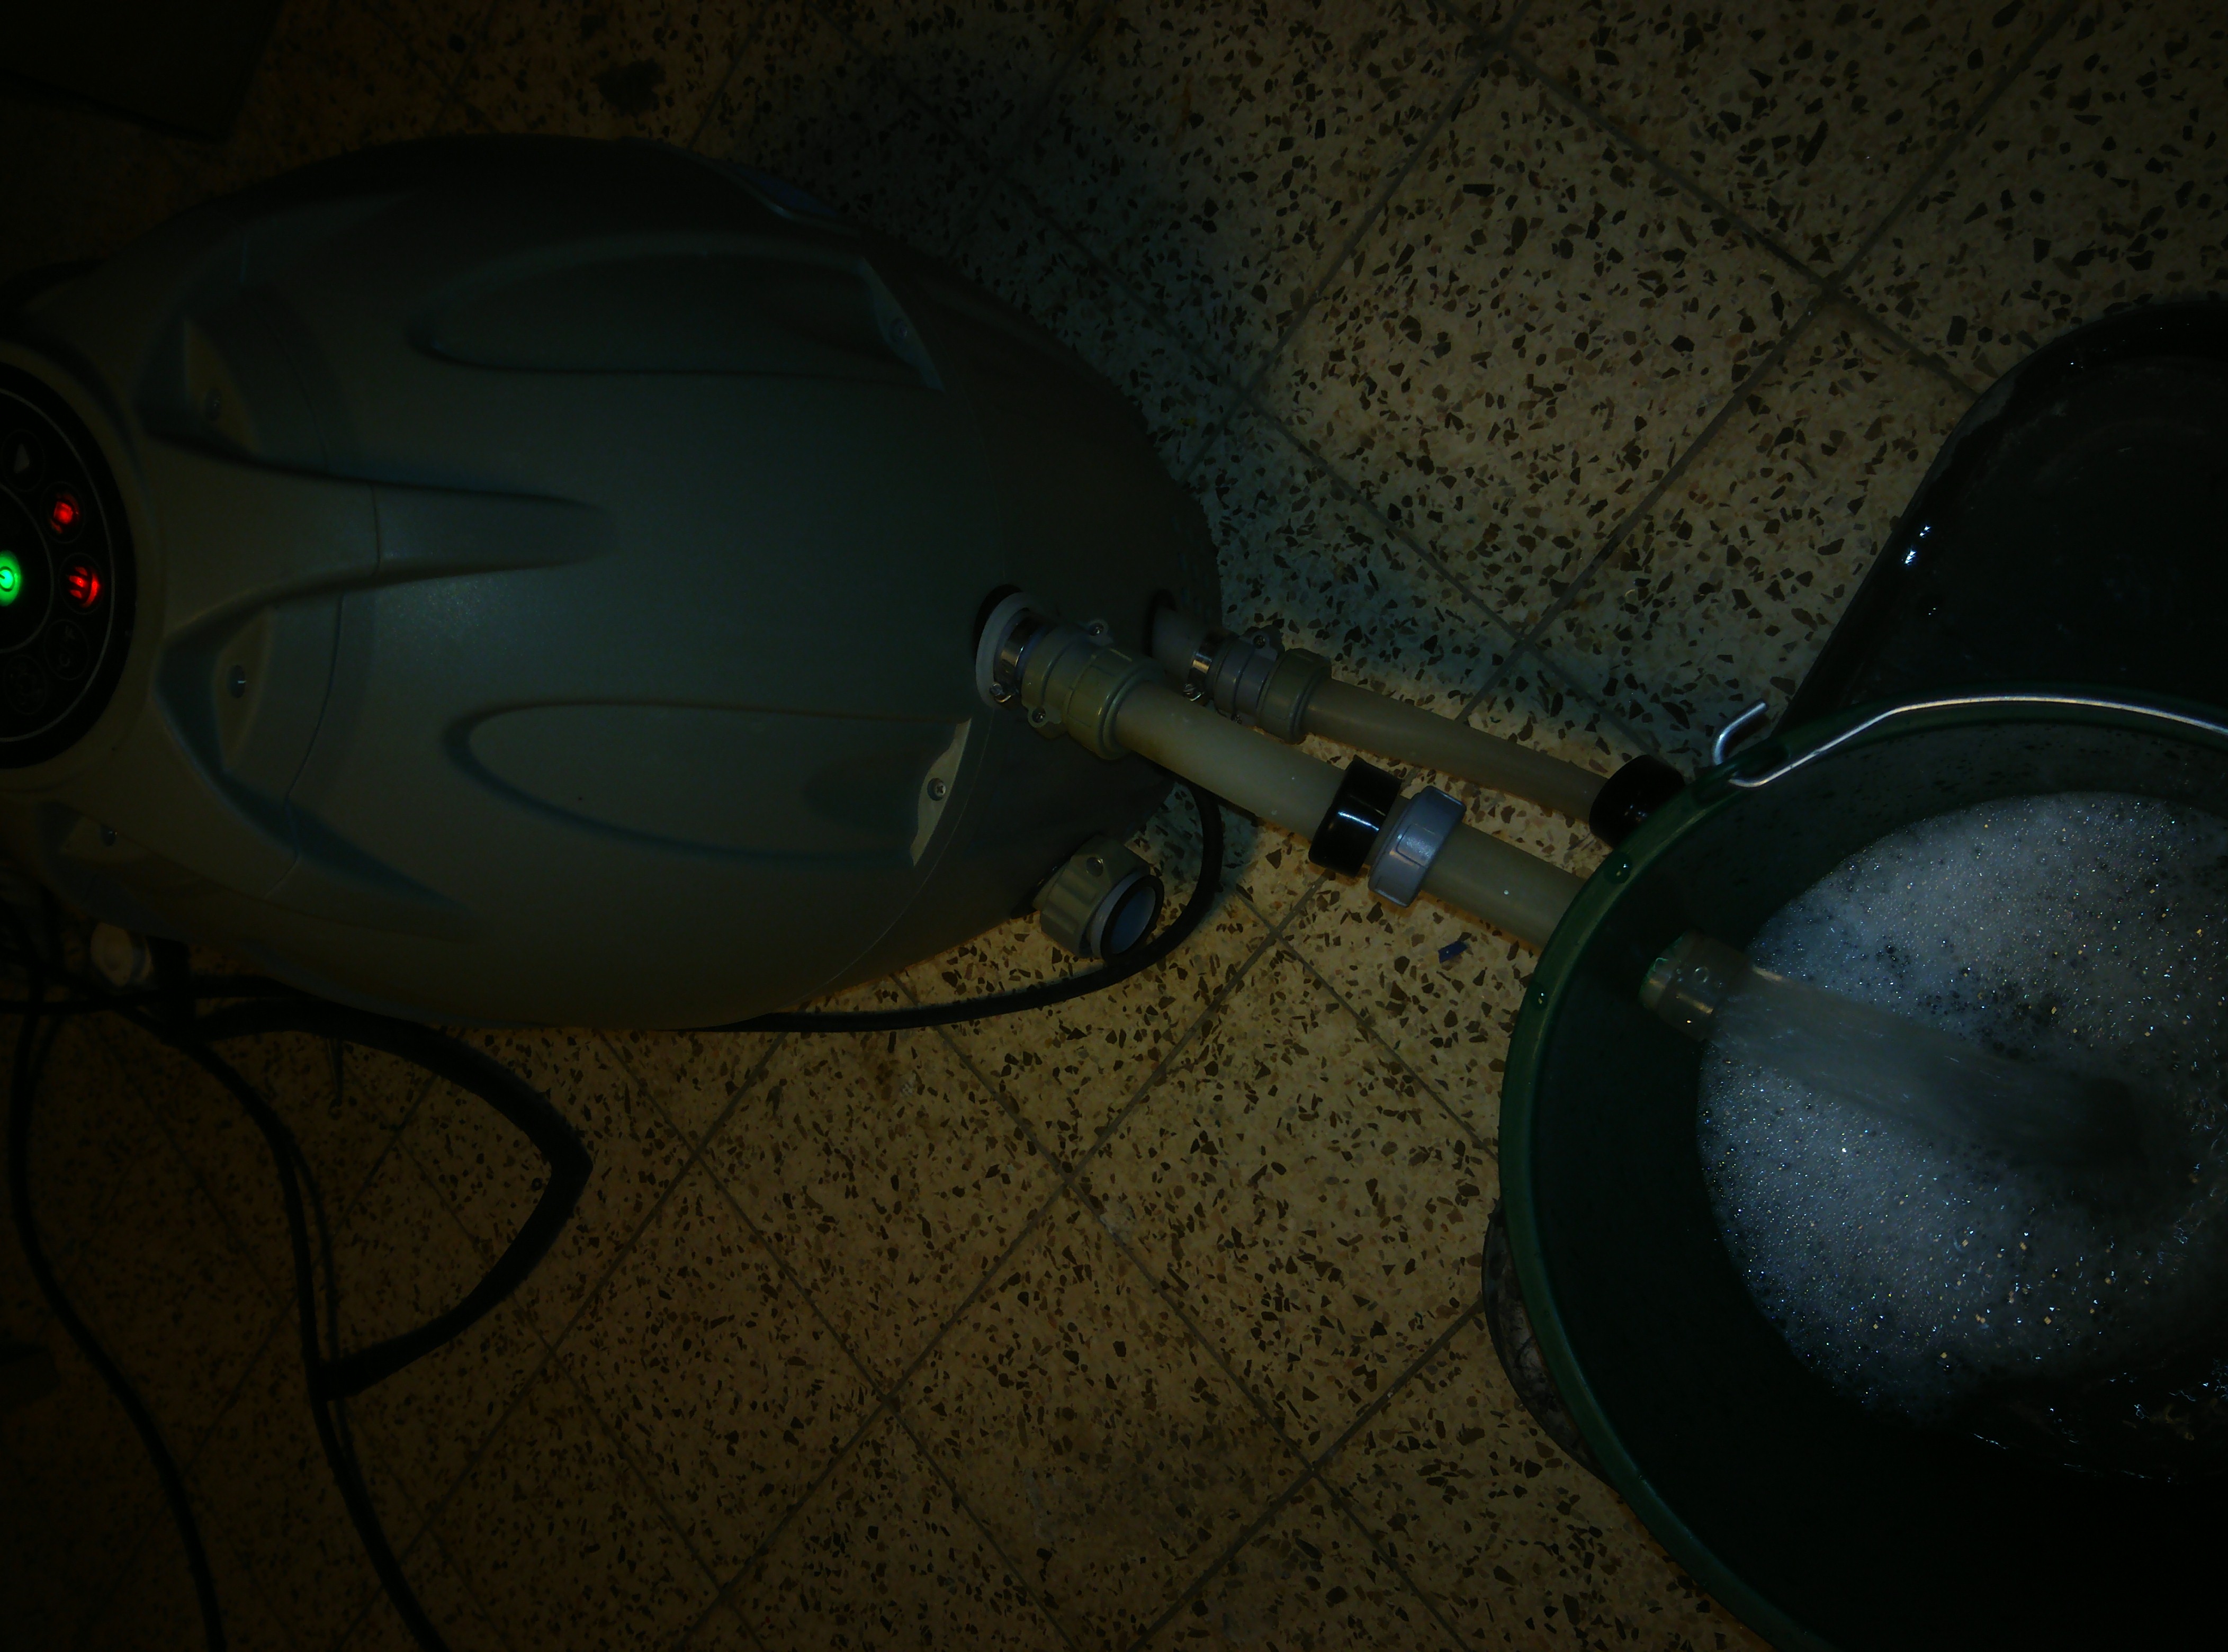
Now I can descale my Bestway water pump unit like how the professionals do it!
A lot of people have or are buying those cheap inflatable Bestway hottubs.
A lot of people have in the past realized after about half a year of continuous running that the water pump unit is of very low quality.
I have been running my Bestway hottub for about five or six years now. Because of this low quality I had to enroll myself into the world of Bestway parts and repairs. I regularly had and have to repair various things about my Bestway hottub. Usually something about the water pump unit.
Last time, in 2019, it was the water flow sensor. Being a good engineer, I of course hacked it. I have also bought one time a second hand infamous #58113 motor (the number is already infamous and known in the Bestway parts community).
Today I had the ER02 error back. No water flow. But after some testing I knew that it was not the water flow sensor this time. Then it’s probably the motor itself. These #58113 motors often have it that their impeller comes loose inside of the motor.
Instead of ordering either a new impeller or a new motor, I decided to investigate it this time. And try to figure out what the engineering mistake is that the person who designed this motor made.
Getting the motor out is probably already plenty challenging for most owners of a Lay-Z-Spa. It’s not too complicated though: turn the motor pump upside down. Take off the bottom panel. Loosen two screws of the motor. Disconnect the electric cable. Pull the motor out. For the motor you don’t need to open the top of the water pump unit. If your problem is the water flow sensor, then you do need to open the top instead.
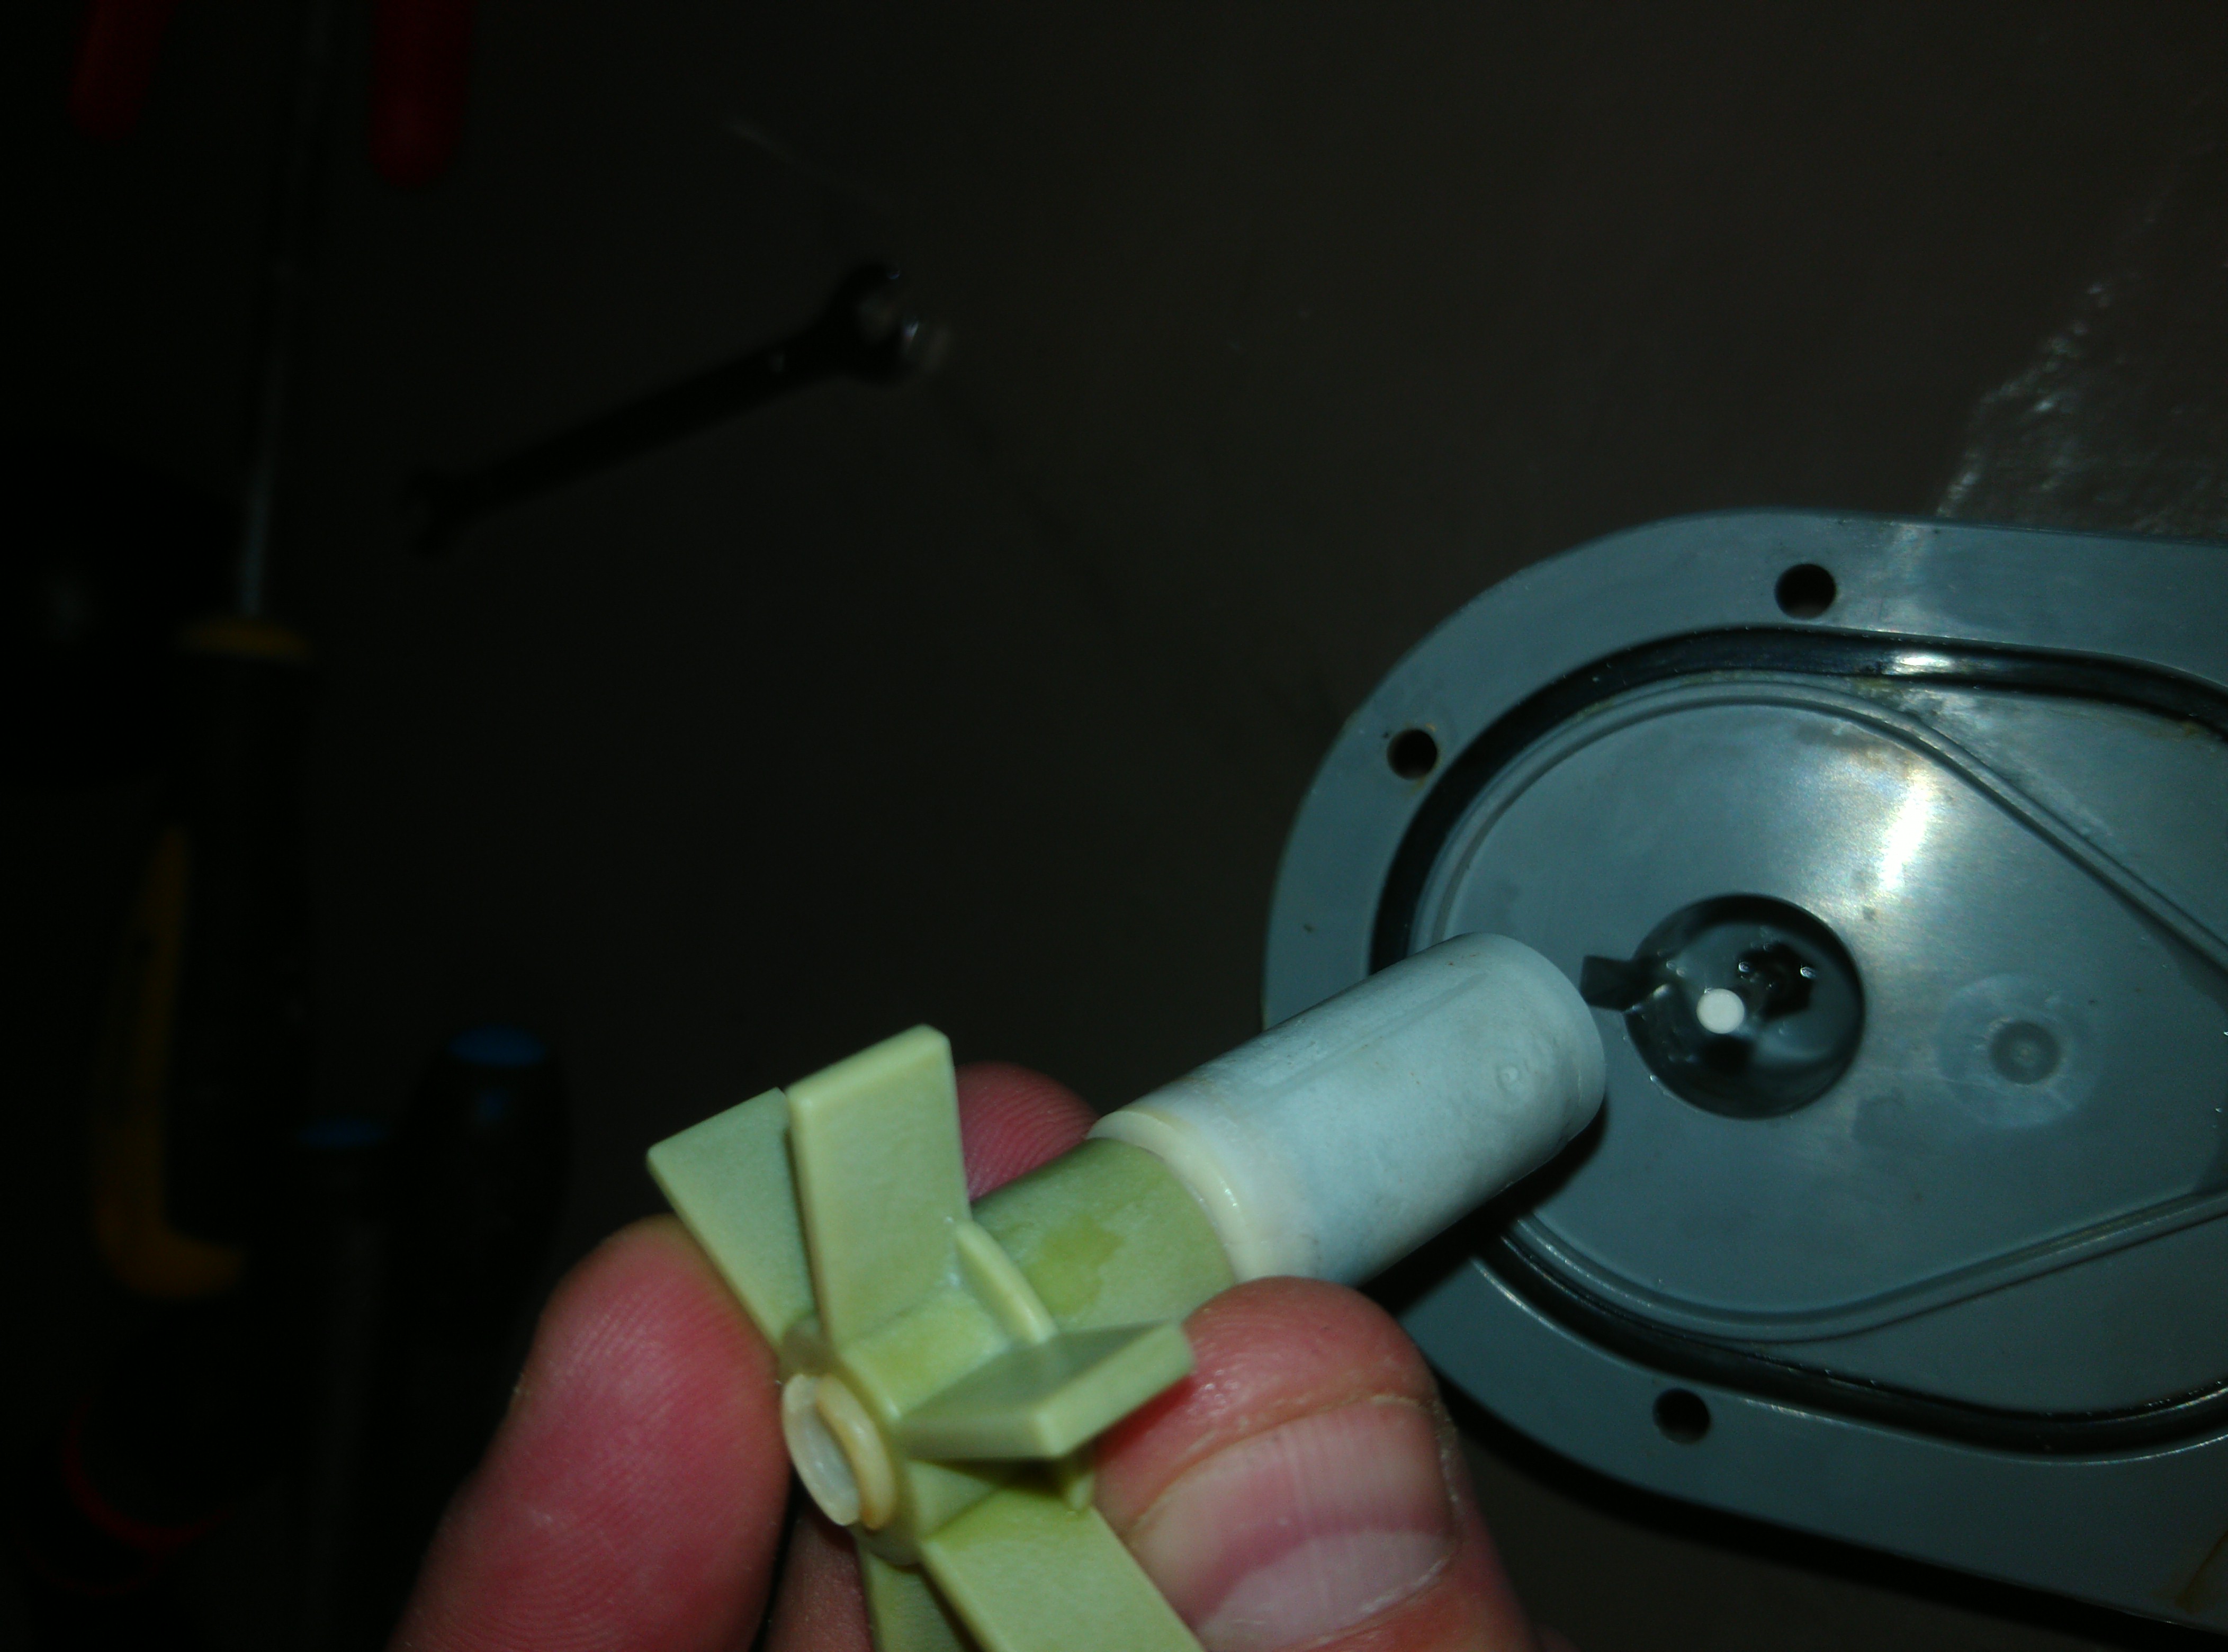
I found out what is wrong about the motor (the rubber bearings are just cheap) and I will now present a hack that you can do to salvage your Bestway #58113 motor with four cheap washers that will keep the impeller better in place.
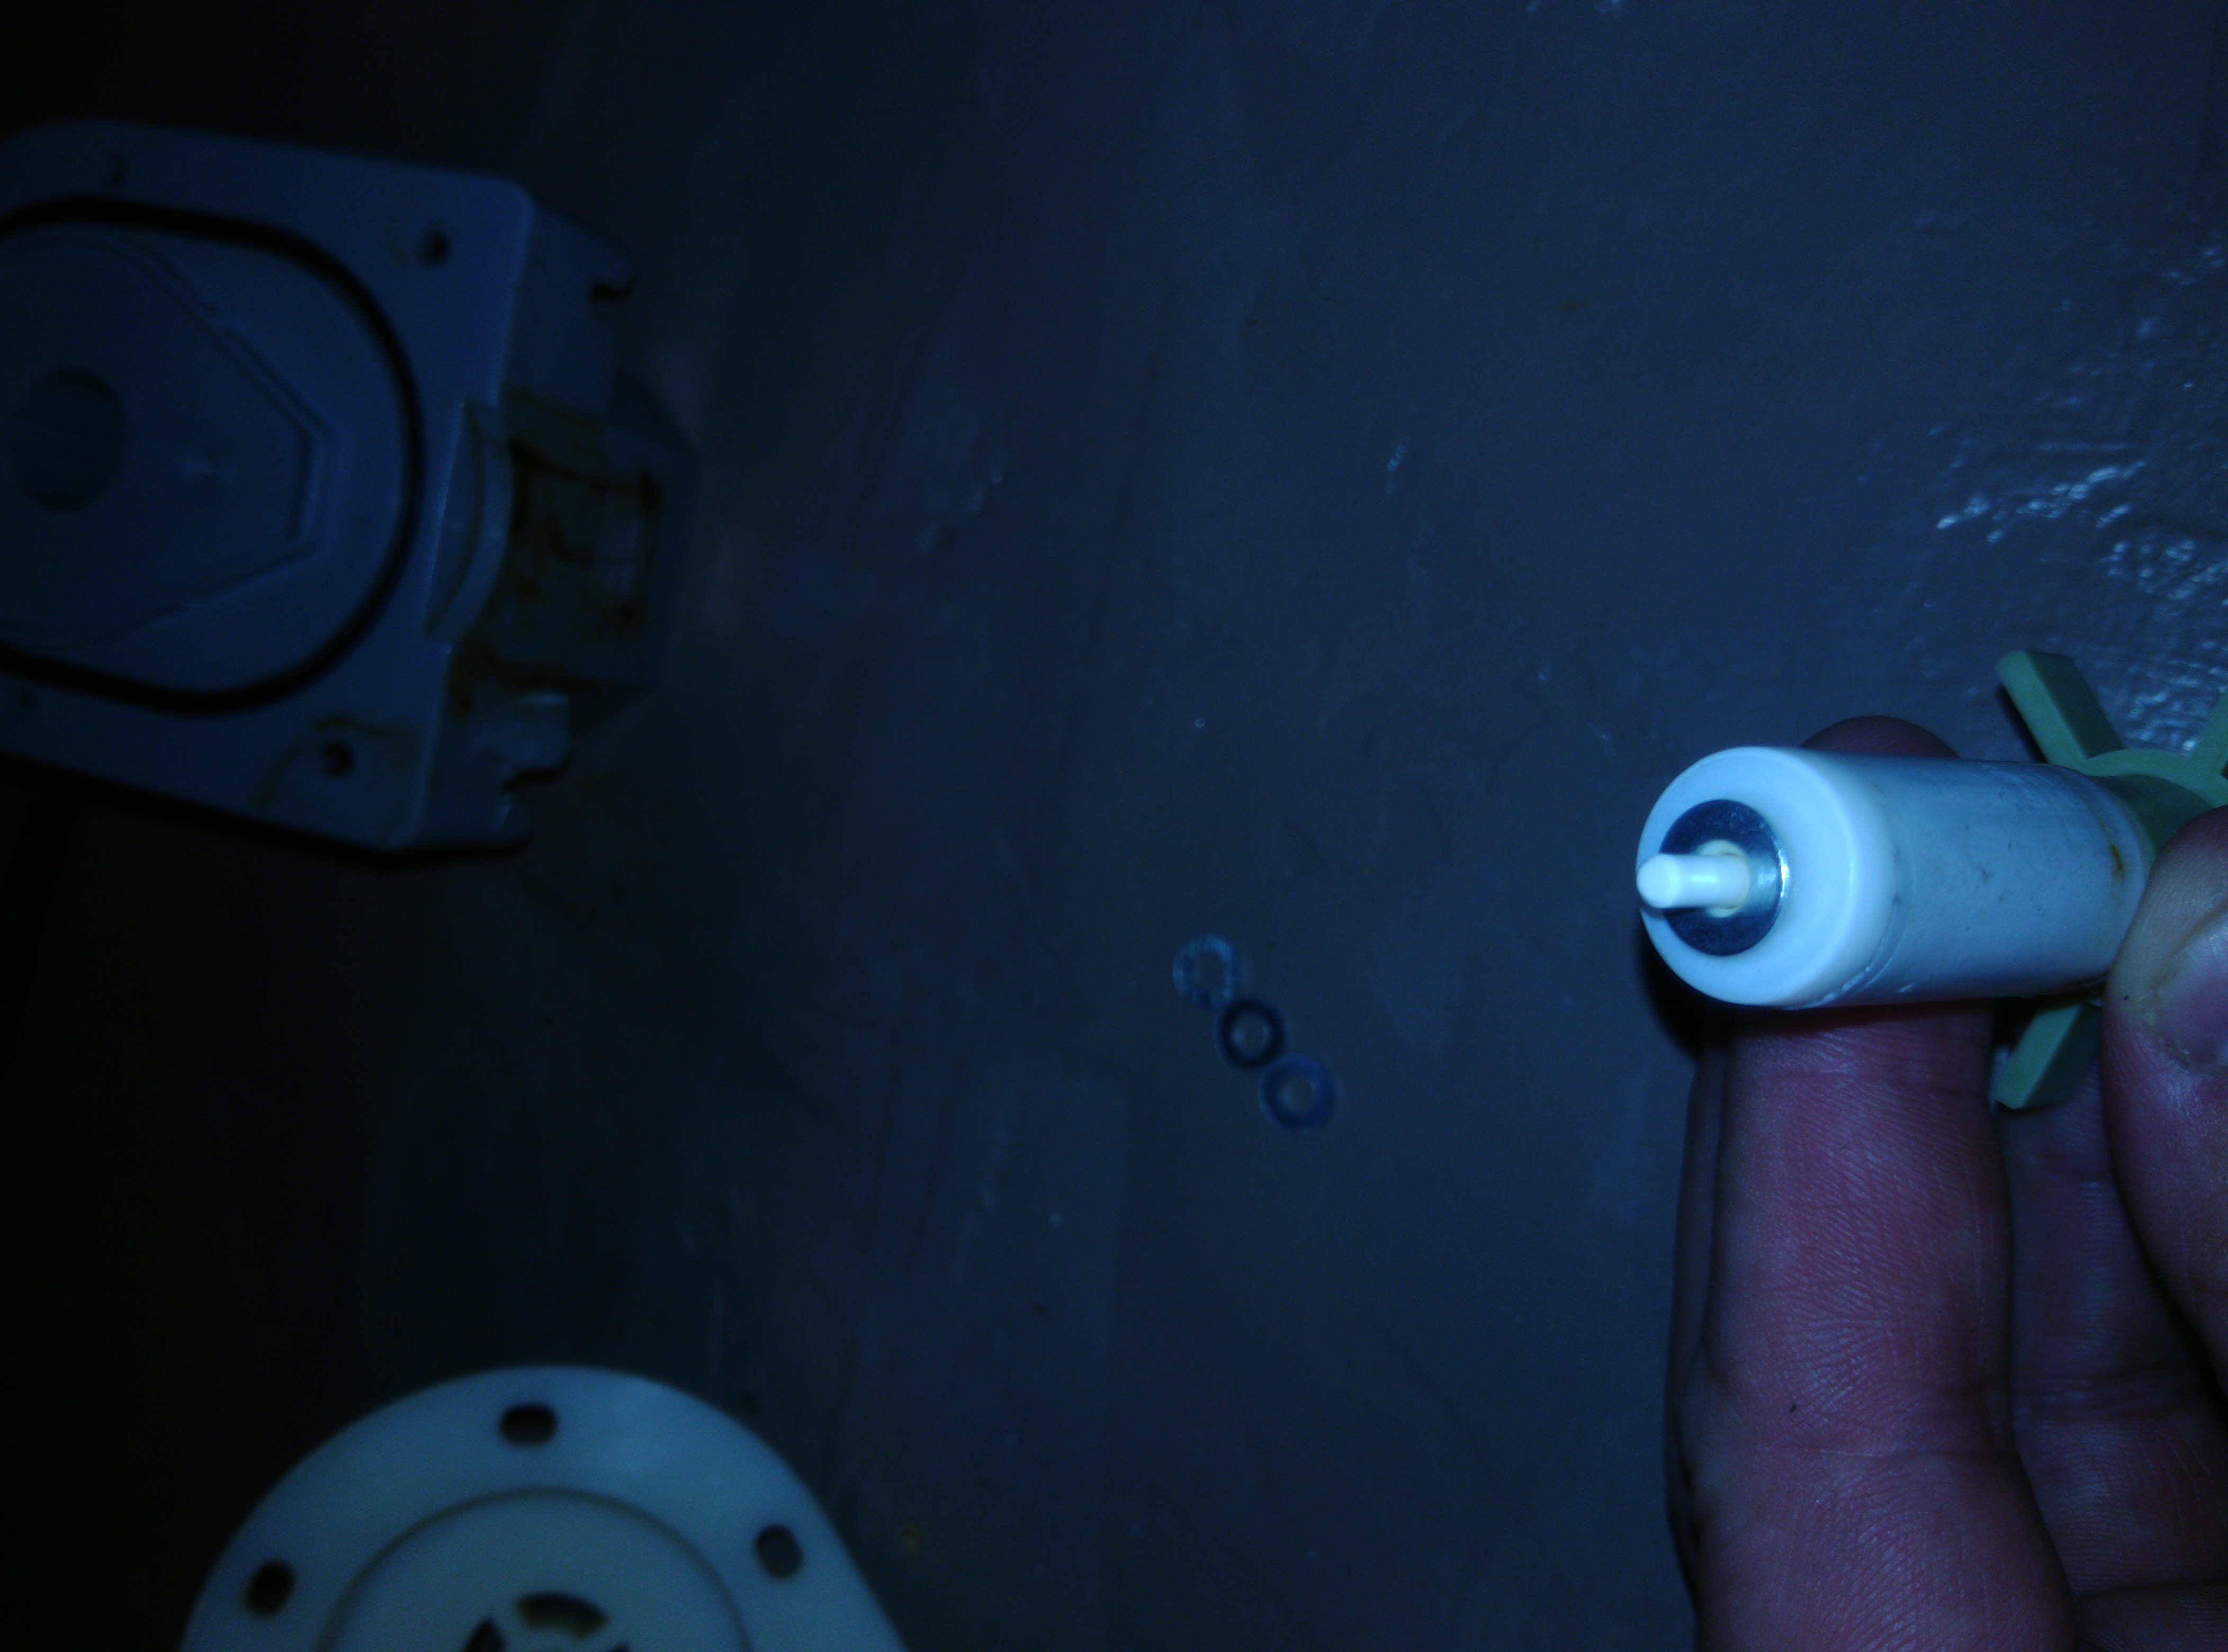
Here you have the impeller (or/plus commutator) and the rubber “bearing” for it (in background the disassembled stator):
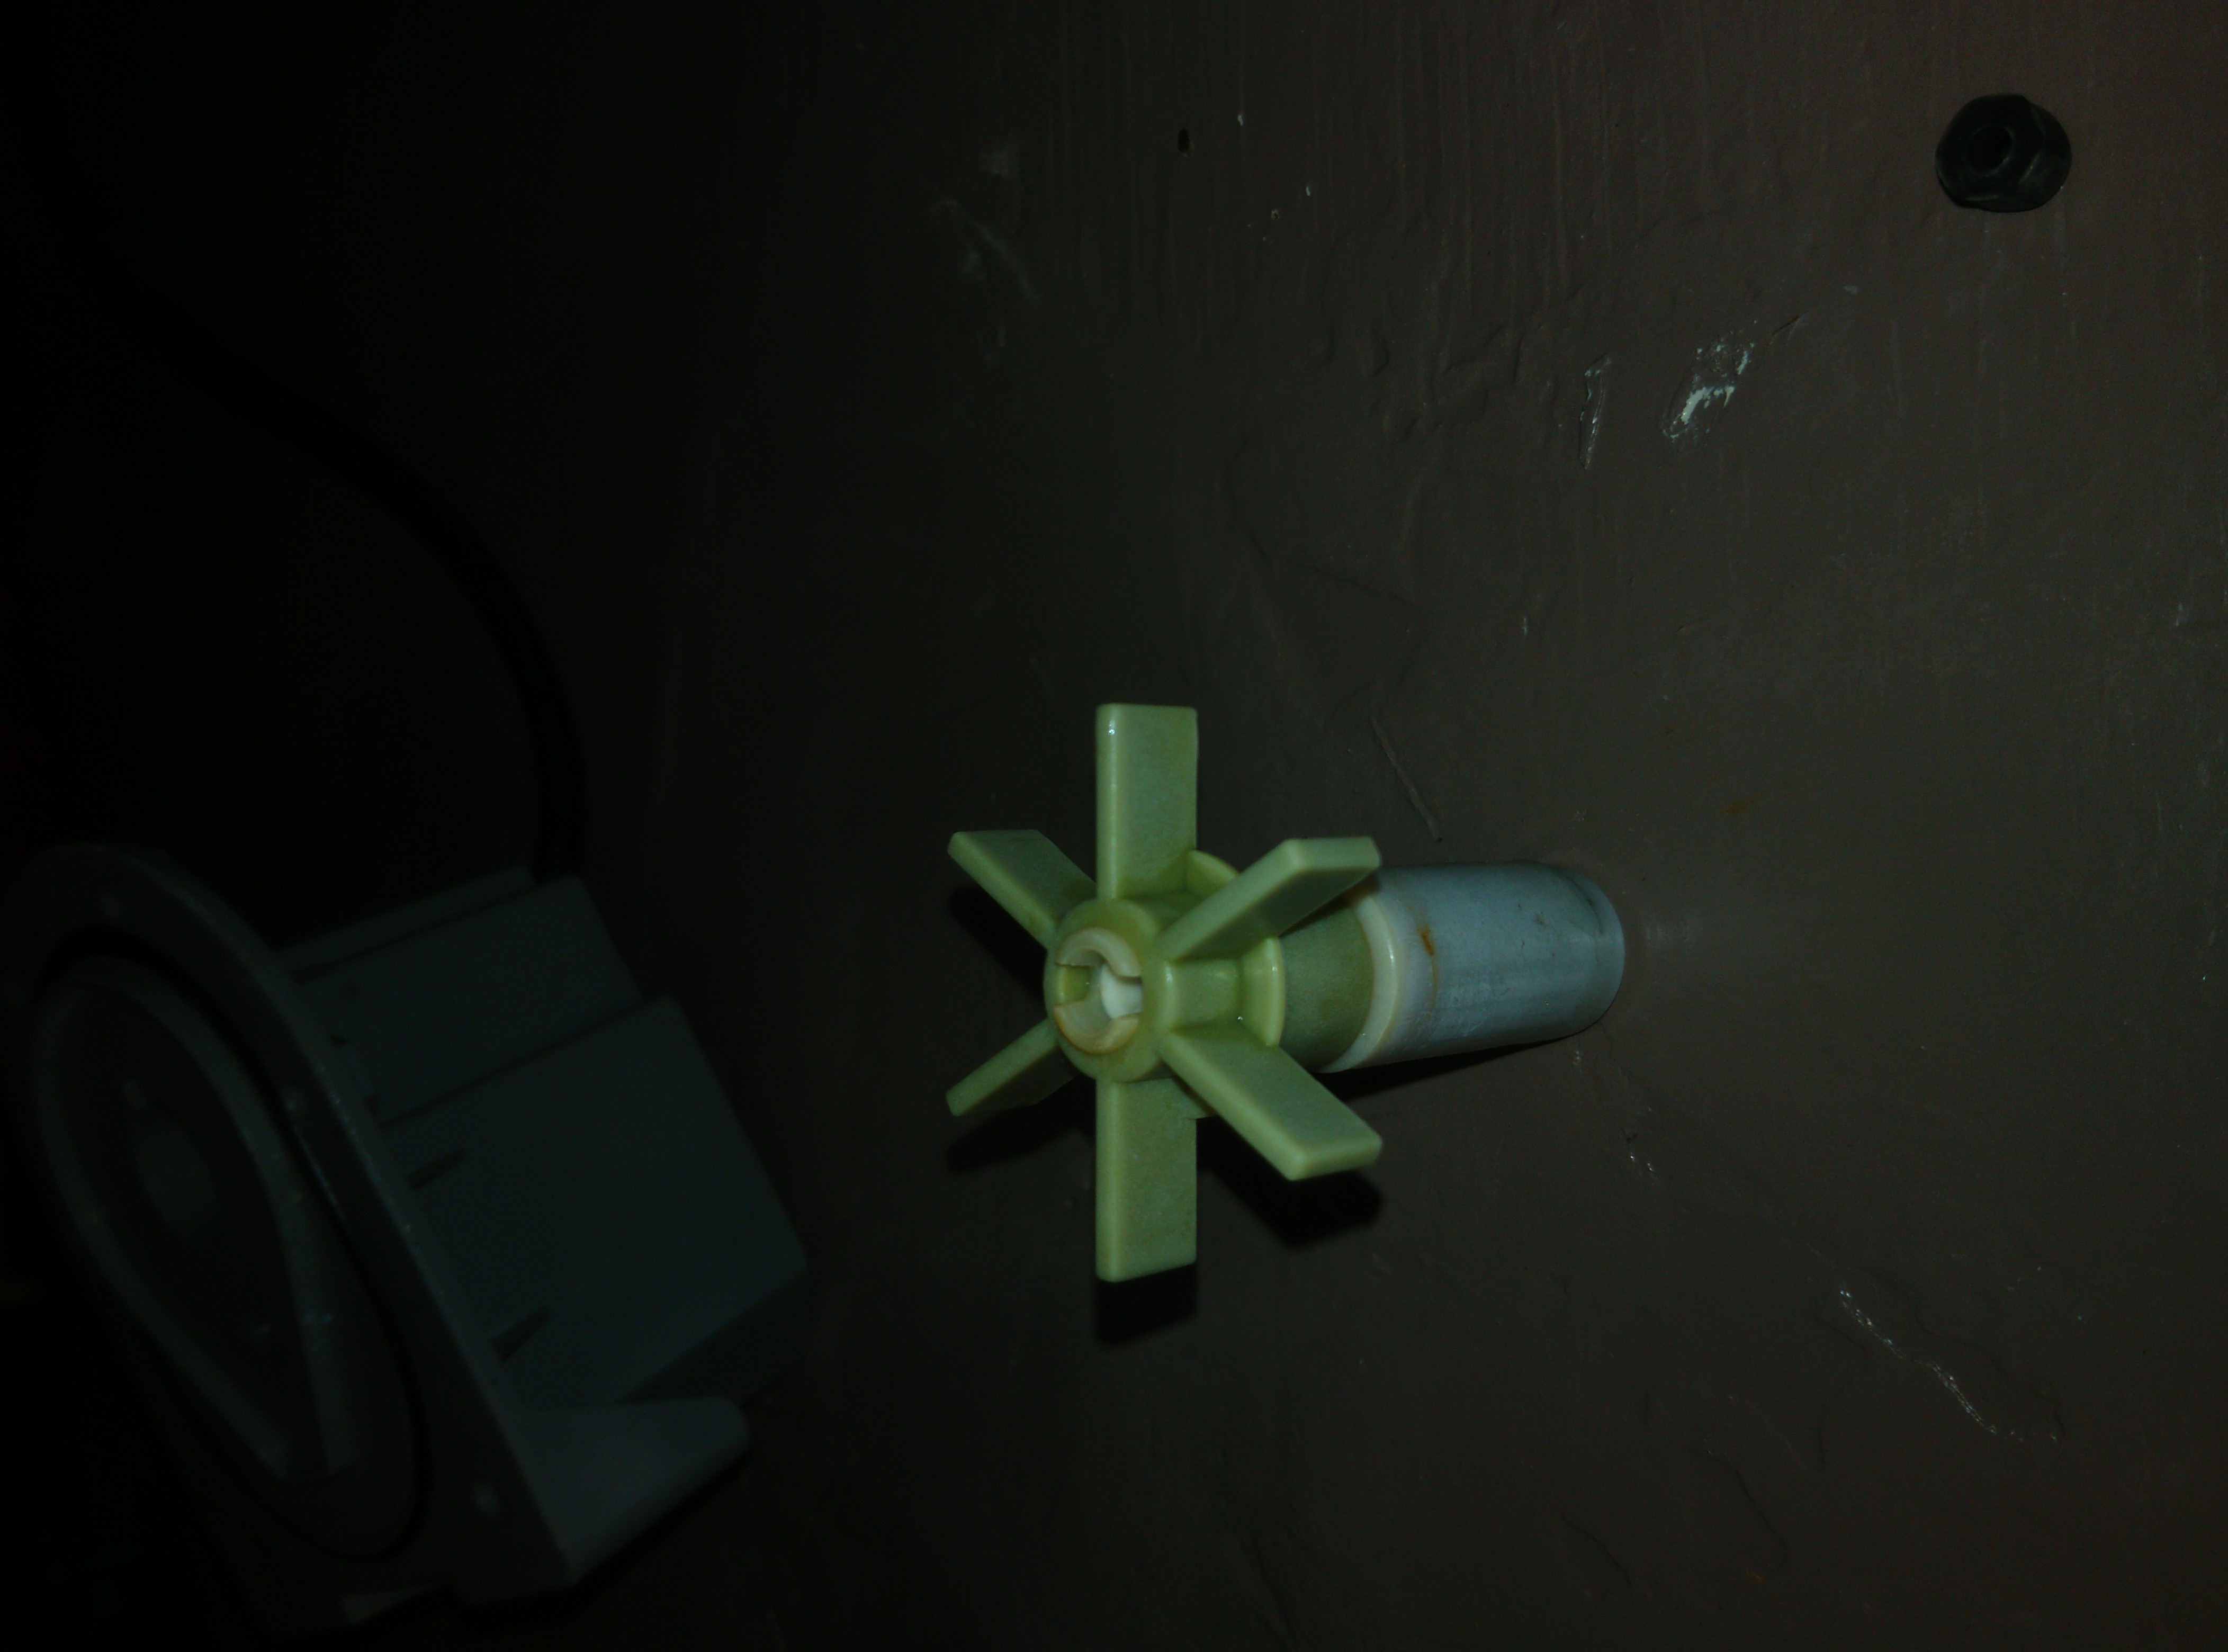
And this is the shaft and again that rubber “bearing”. The shaft will go through the middle of the impeller (plus commutator) and at the ends two of those rubber bearings go to keep the shaft nicely centered. All this is plastic. Super low quality. Almost guaranteed to fail after a few months of operation.

This is the stator. One of those rubber bearings must go in the middle of it. And then the shaft in the bearing. Keep the rubber seal good. Else when reassembling the motor water will splash all over the place. This is not good.
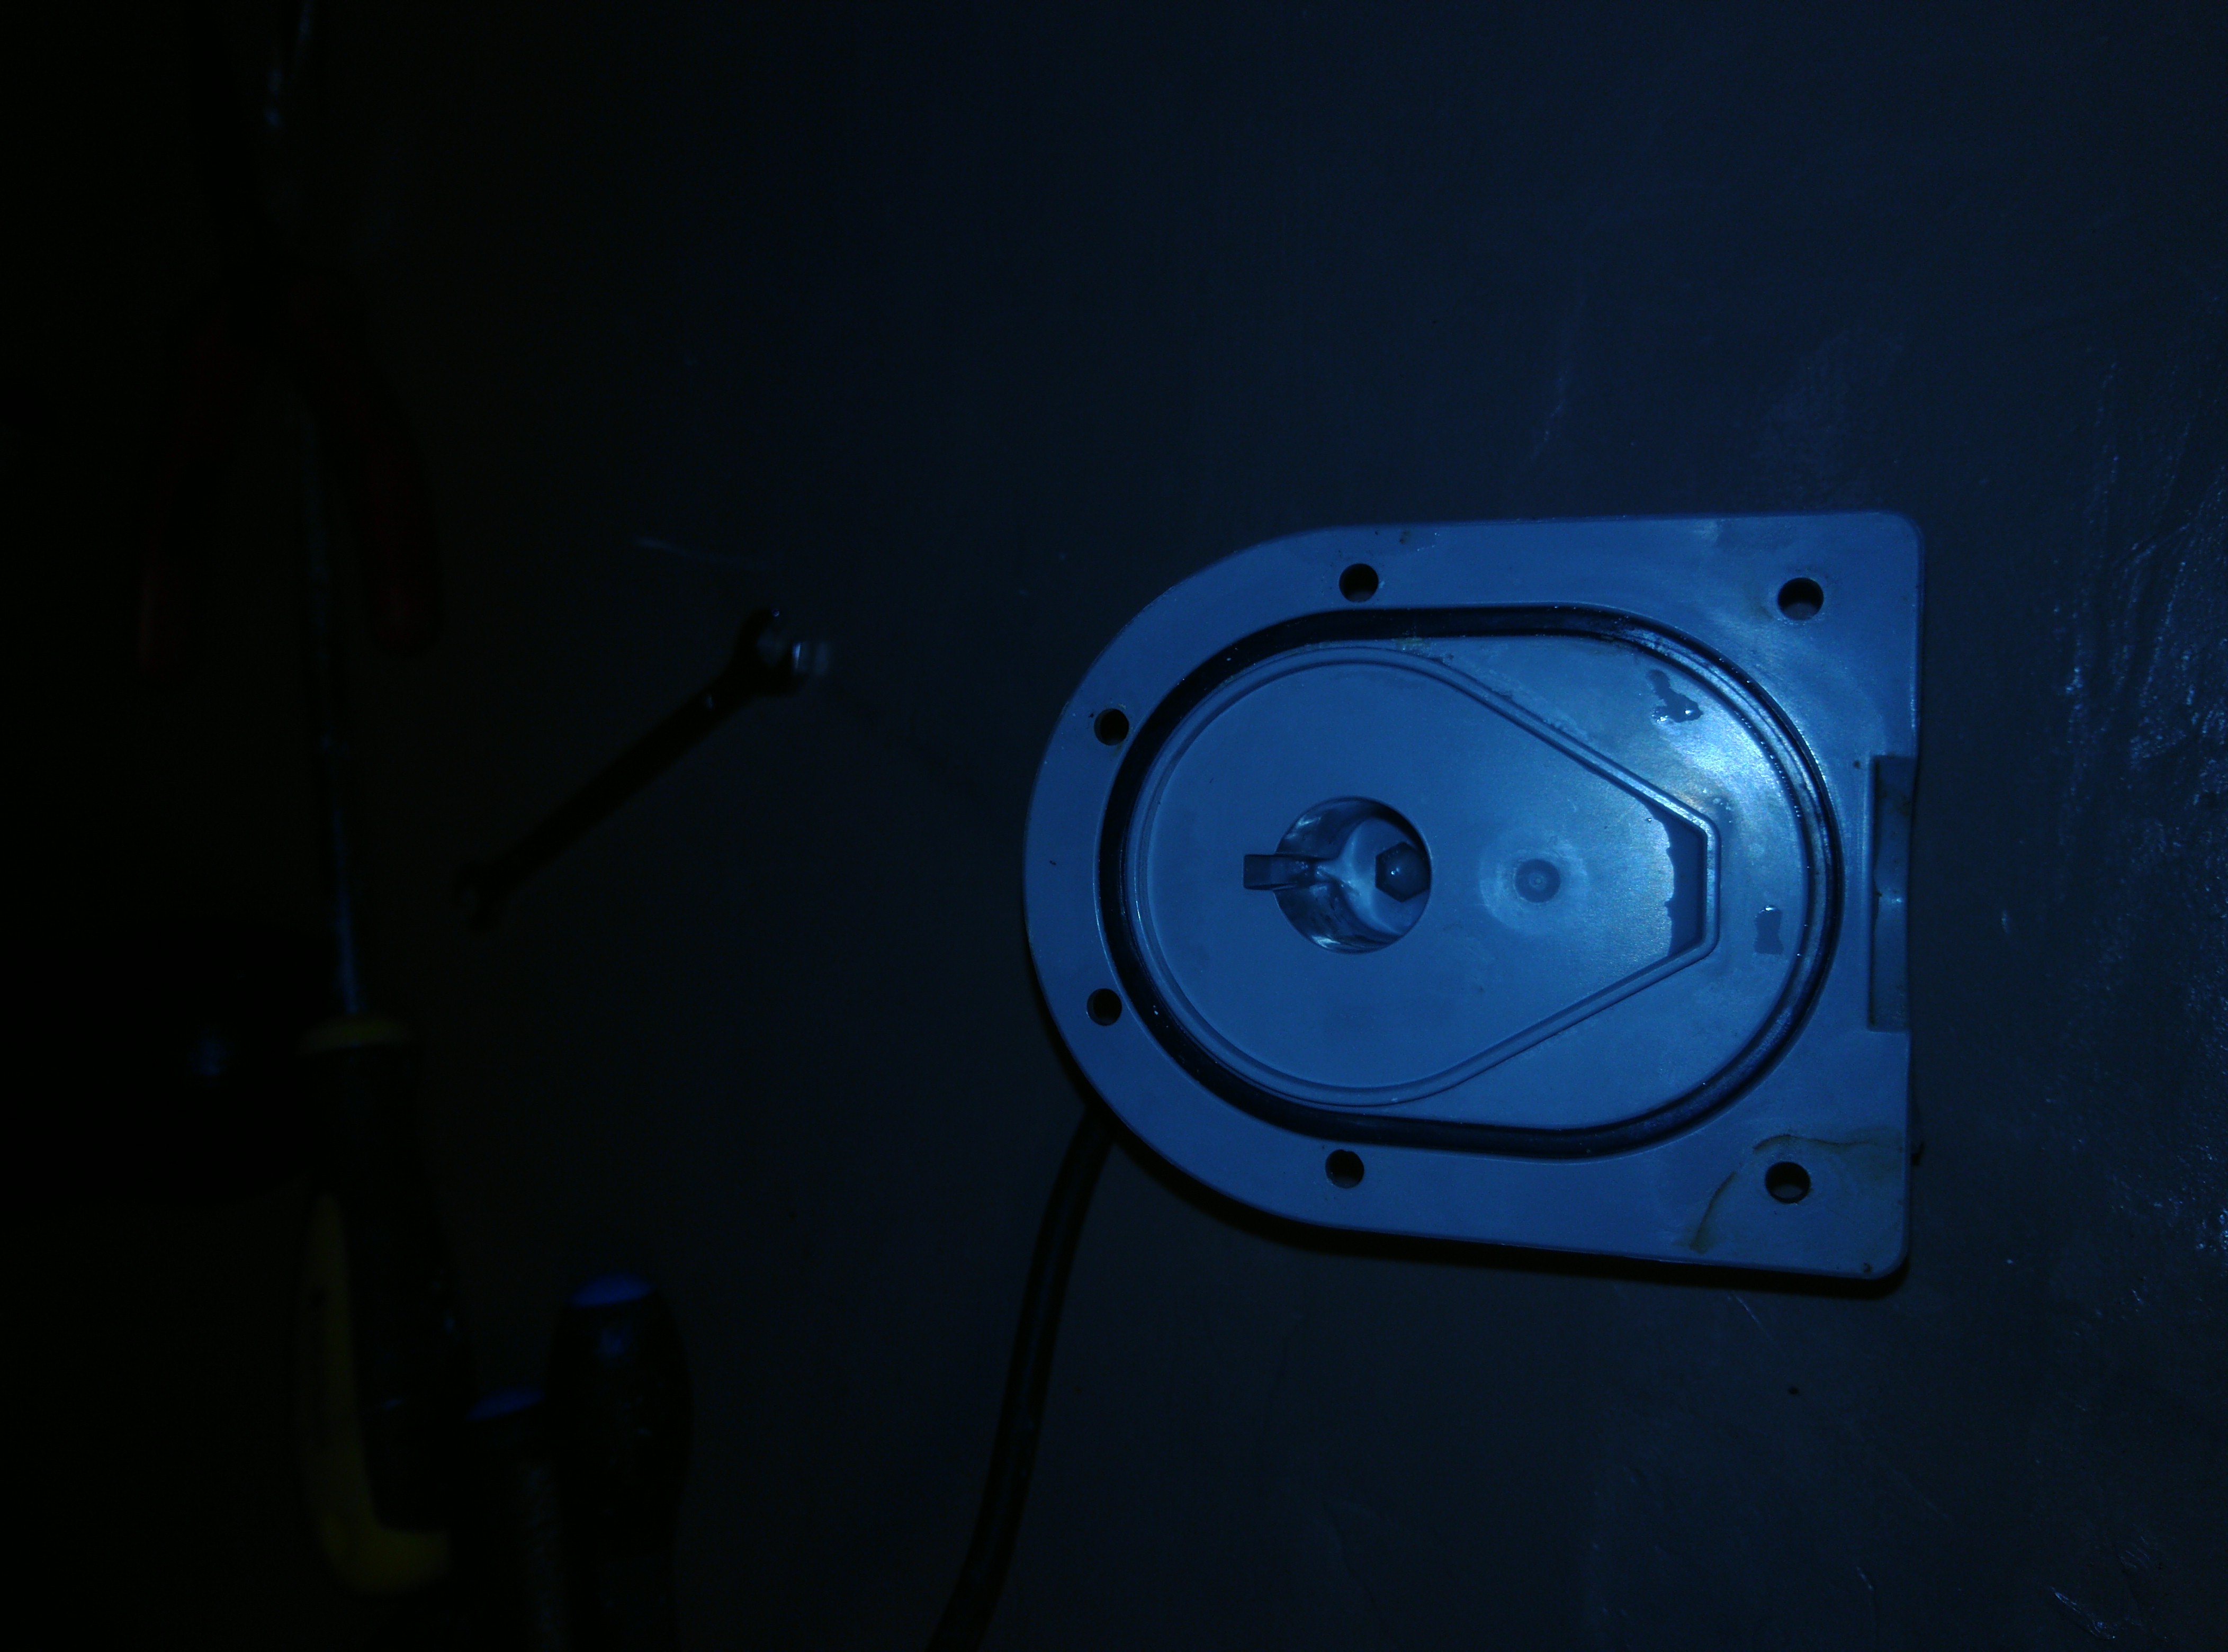
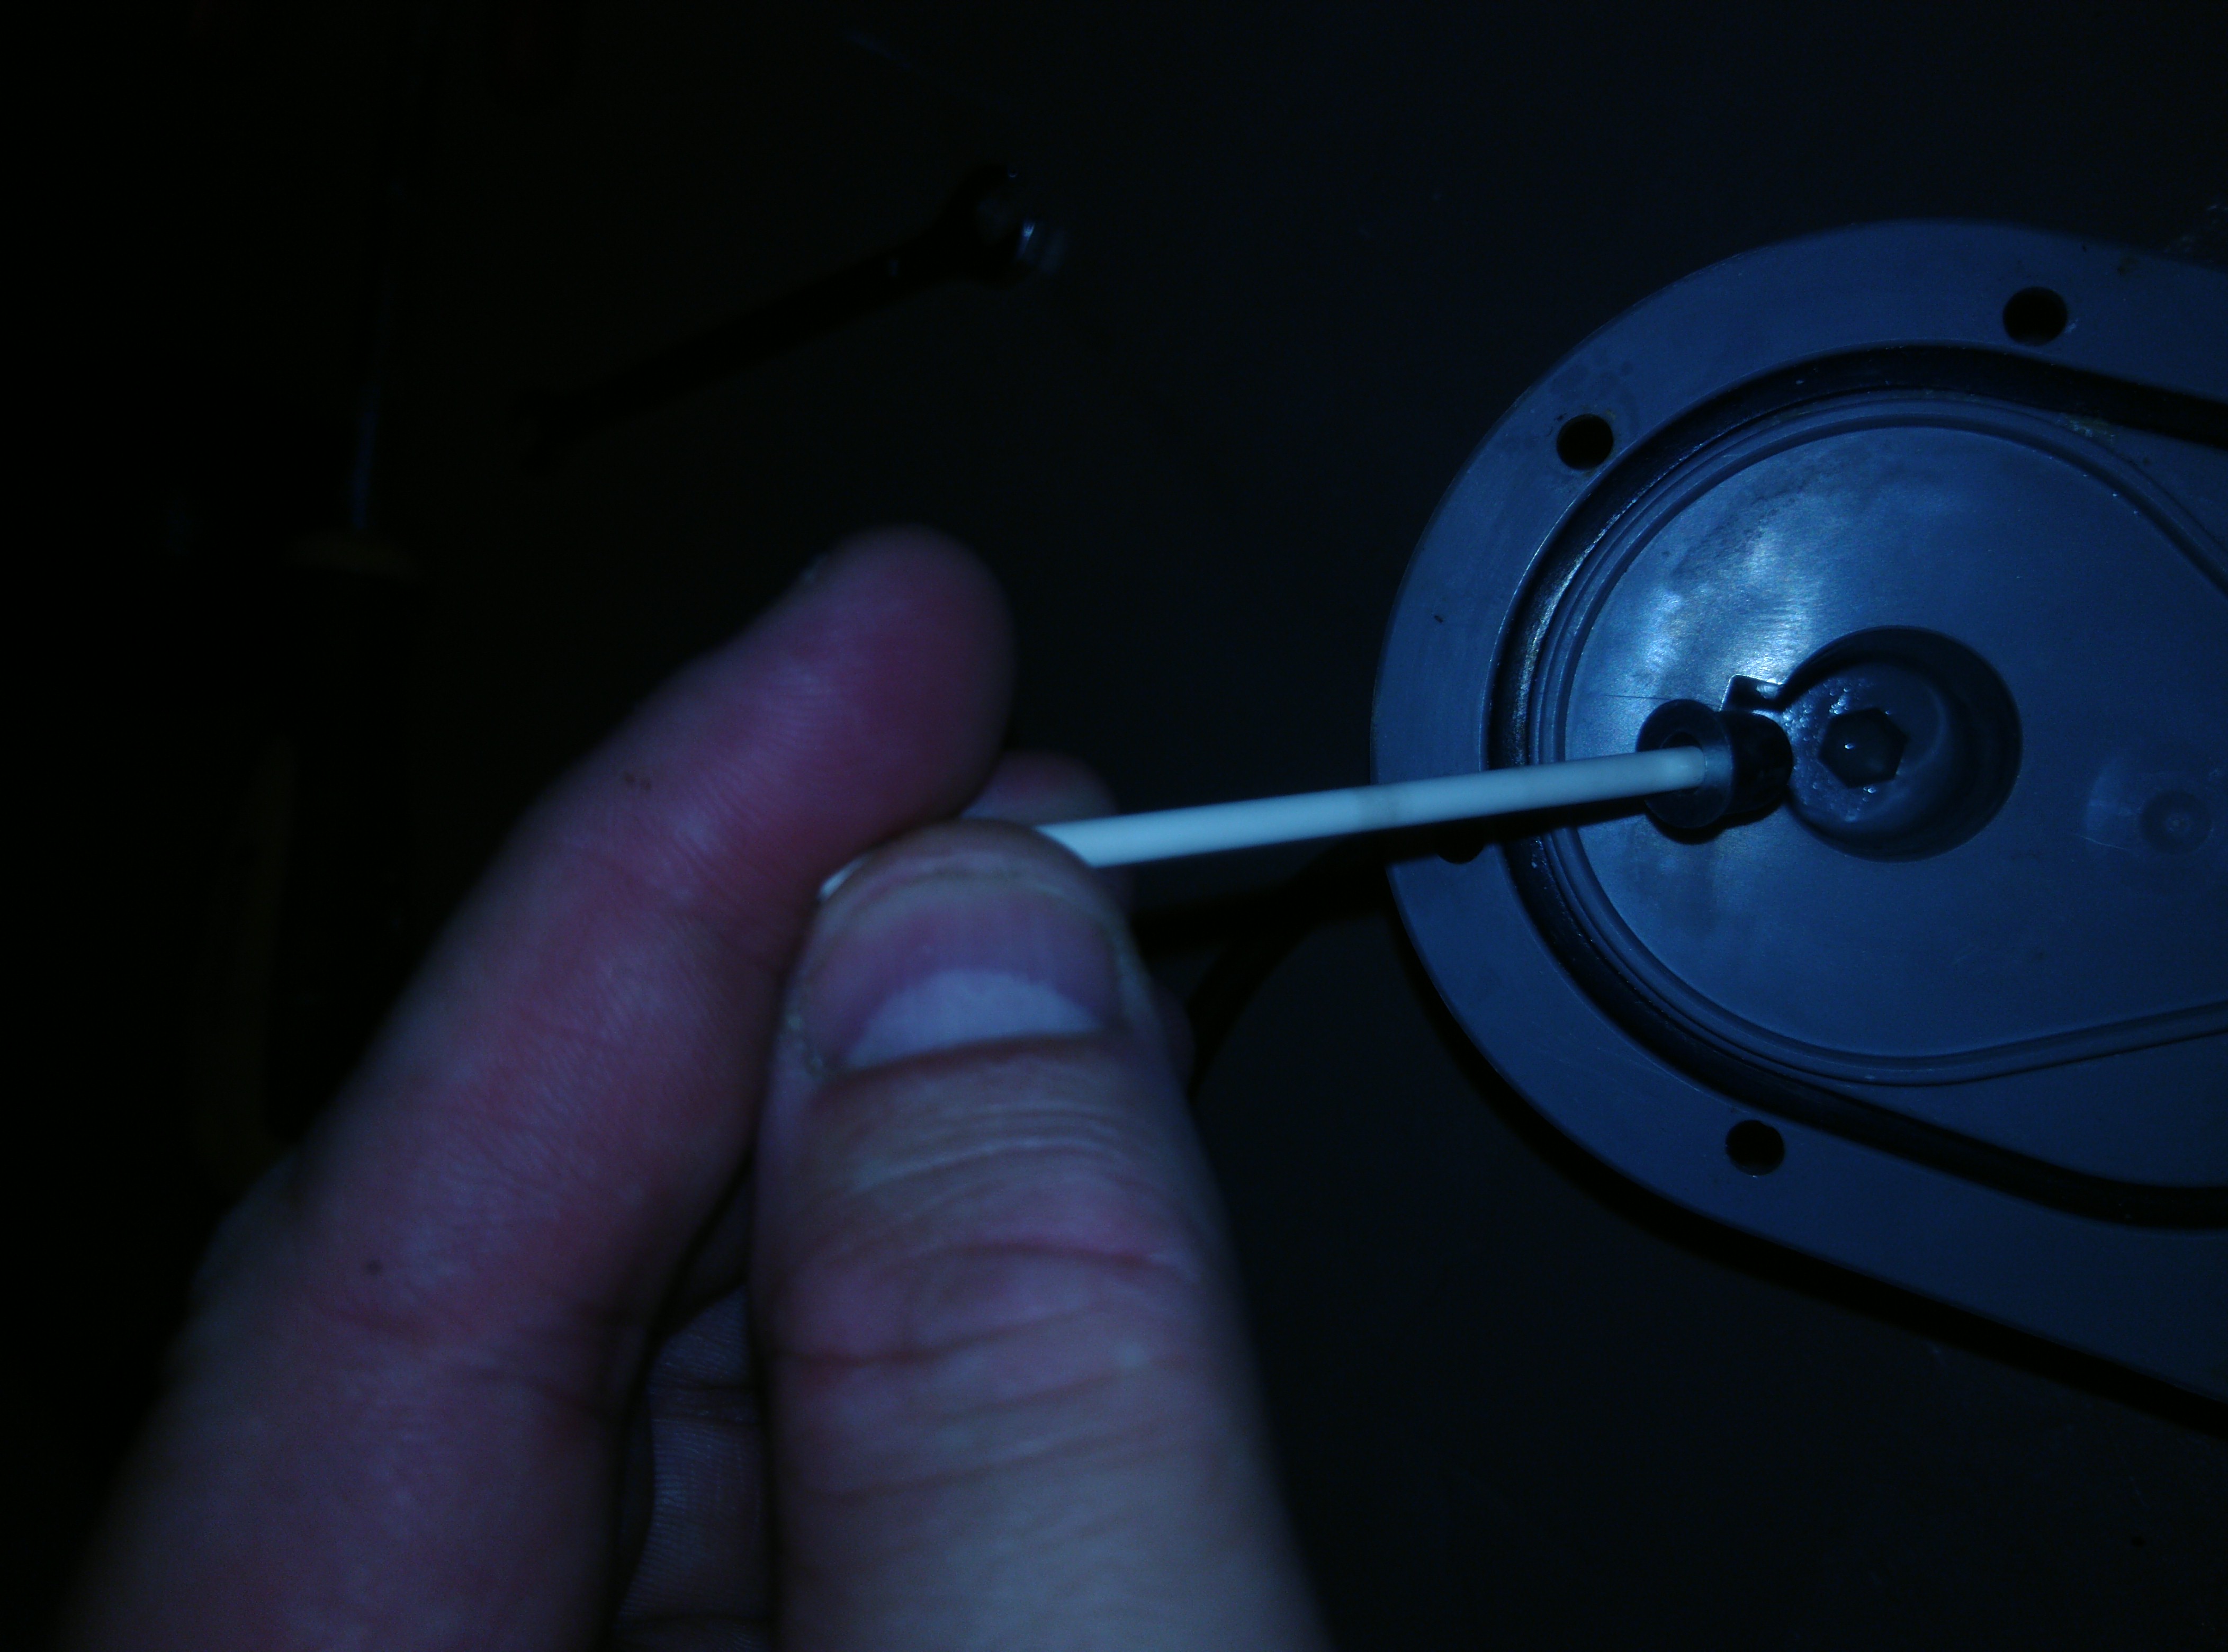
This picture illustrates how the shaft goes in the rubber bearing and then in the front cap
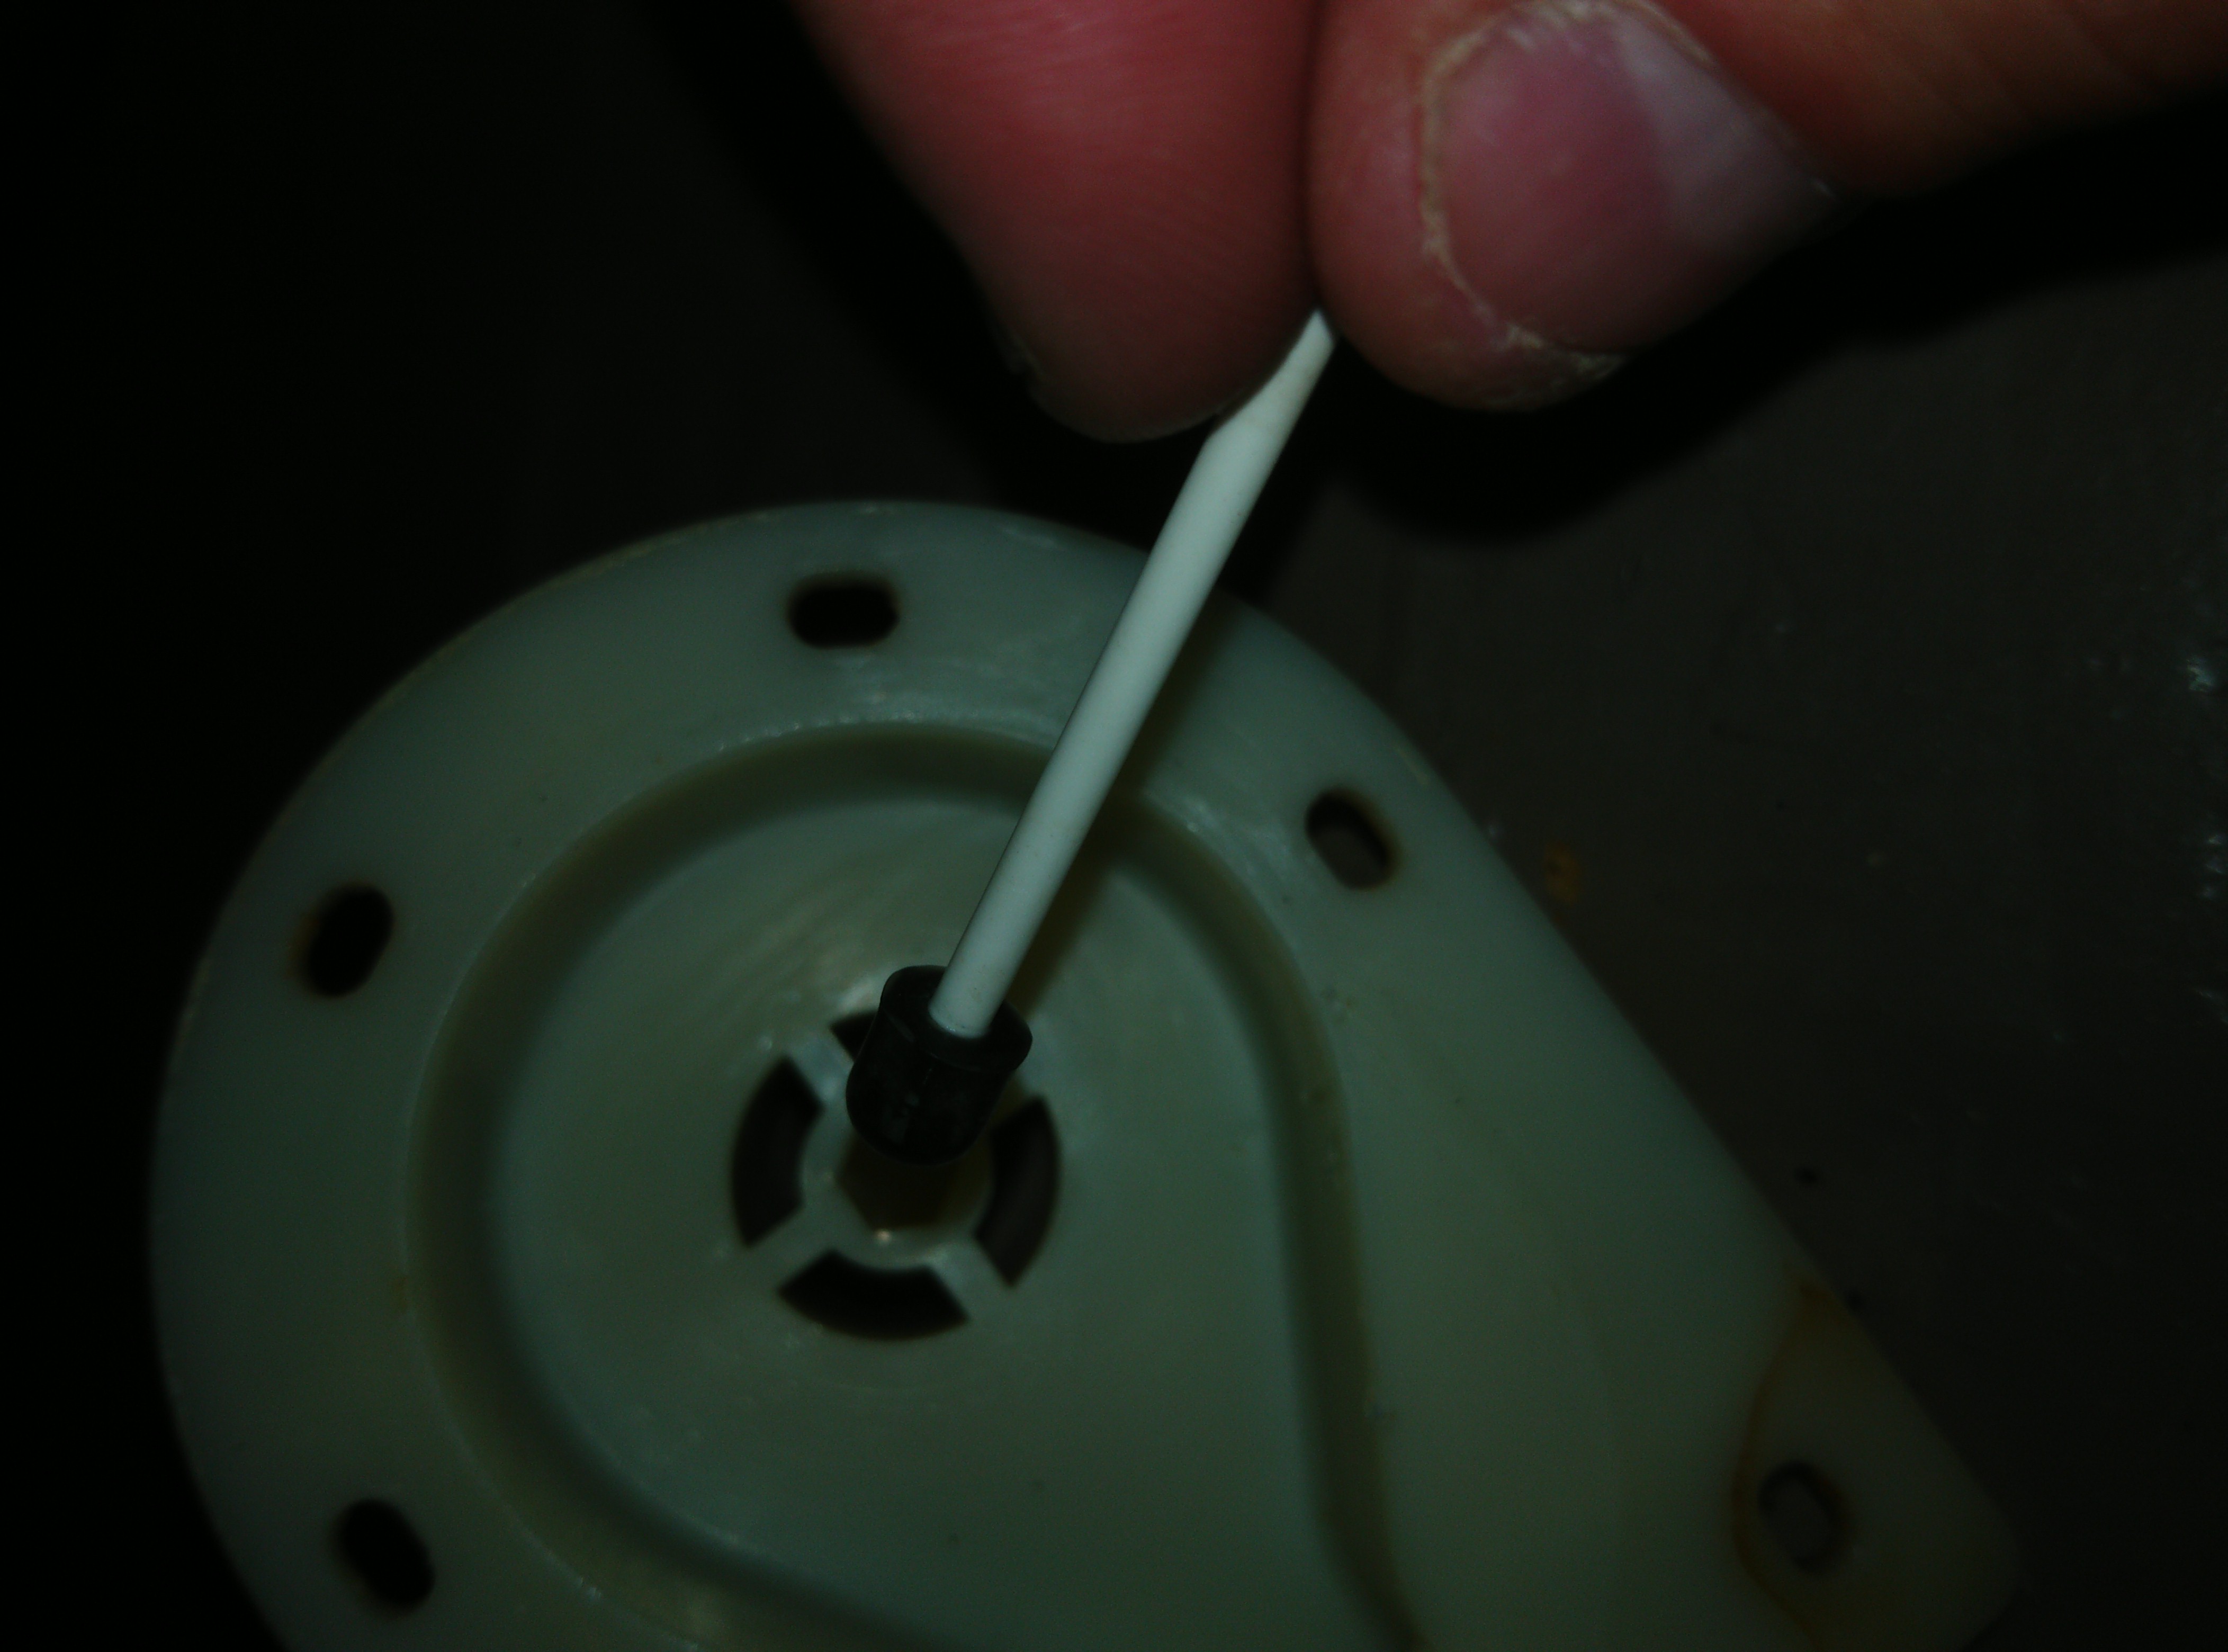
This picture shows the normal assembly of shaft, impeller (plus commutator) and bearing. Normally there is a by the factory added washer too. But mine was completely gone. Debris of it was found in the commutator. This shows how low quality this piece of shit is. This of course should never happen.
This will be the hack. We will place three simple washers on the shaft between the impeller and the bearing.
Update: After a first inspection after two days of running with the washers I noticed that although the washers claim to be stainless steel, I saw and I realized that all steel eventually rusts. I made a little plastic washer instead and I greased it with silicone grease that I once bought to grease the seal of my Scuba dry suite.
This is the plastic washer I made to replace the metallic ones, with that grease applied:

This is that silicone grease. I greased the entire shaft with it too:
This will once reassembled keep the entire assembly (bearings, shaft, commutator) tighter together with the stator. Without these three washers the plastic washer, the whole thing starts wiggling and eventually comes loose. Impeller will become erratic and destroys the washer (in my case) and likely also one of the two rubber bearings. After that it’s pretty much game over and you’ll see the ER02 error.
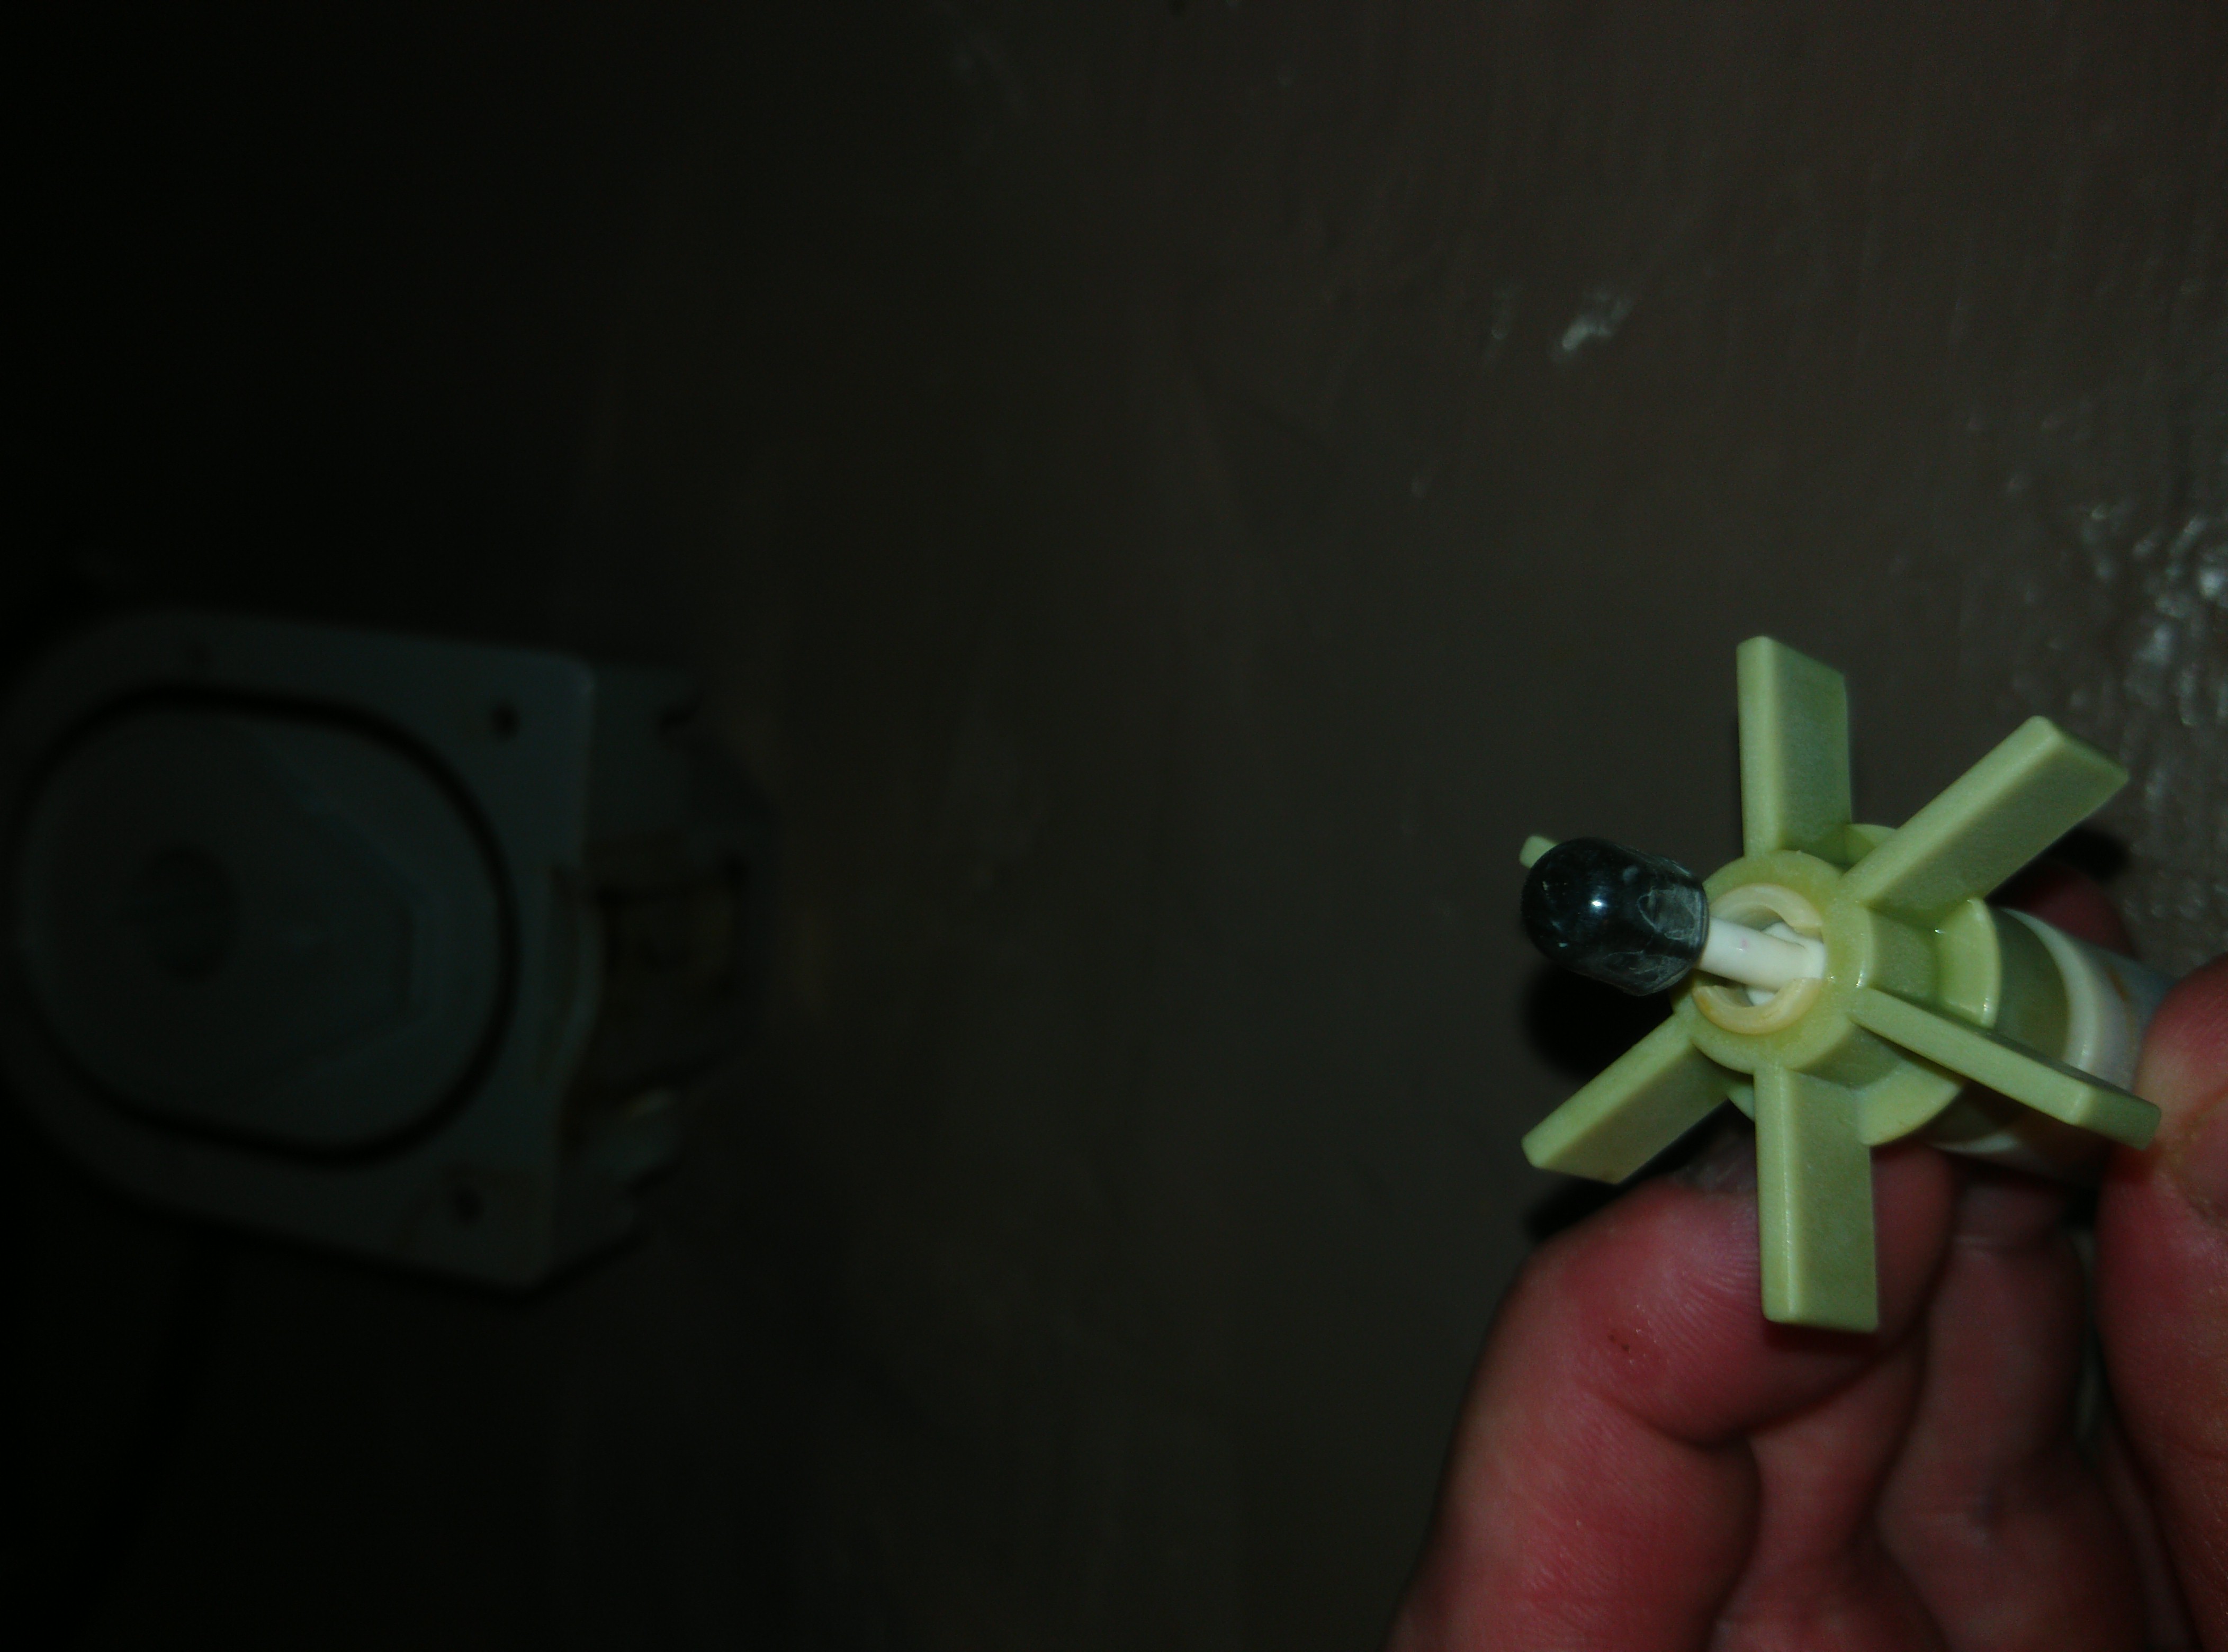
We will also place a washer on the back of the impeller (or commutator) on/over the shaft (update: use the factory provided one). That will look like this (so I’m holding the impeller upside down now). It will fall off if you assemble it upfront. So this is just to show how it will be like once inside of the stator (that or I just made too much pictures, and now I have to write more blog content around it). Front cap, some more washers and stator in the background.
Let’s start assembling it all together. First the shaft with bearing that goes into the hole of the stator. With the factory provided washer. Don’t try to fiddle the impeller together with the shaft into the stator. You’ll just miserably fail due to it all being a bit magnetic of course (it’s an electric motor, remember). Do the shaft with bearing and washer first.
That looks like this (OMG I made too many pictures)
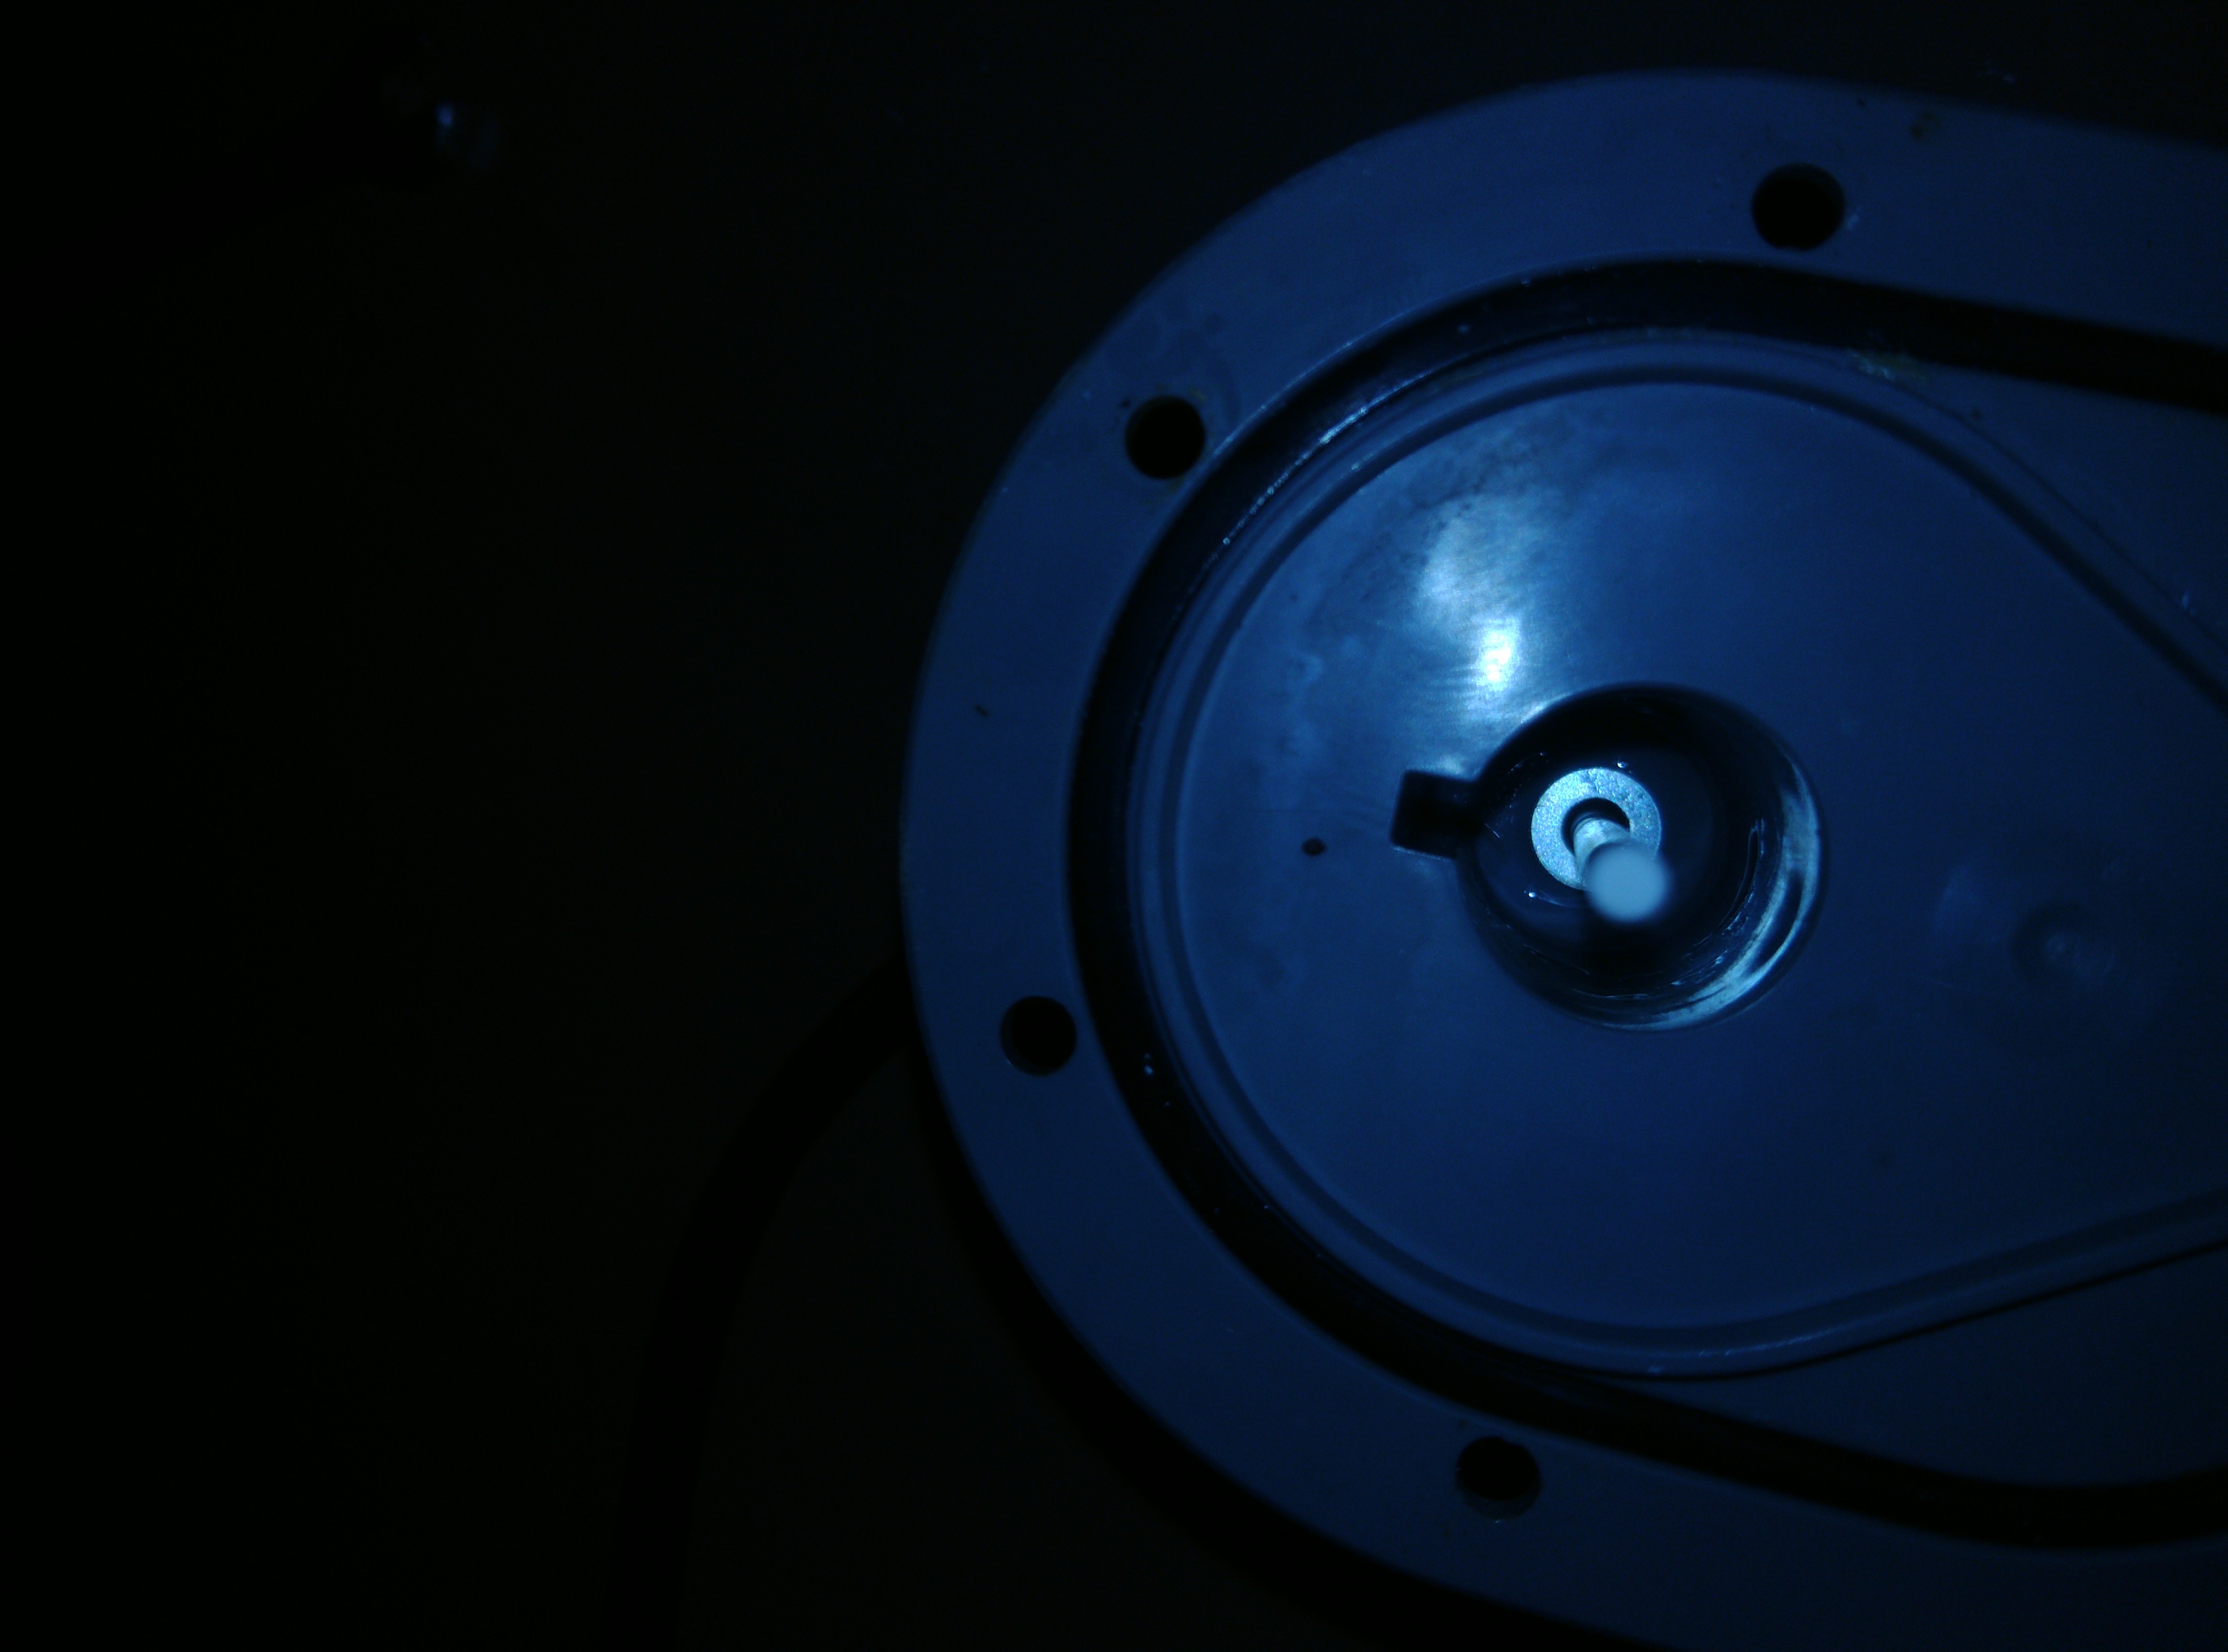
Now we will put the impeller (commutator) over the shaft. Do this gently so that the shaft does not go out of the rubber bearing.
Now place the front cap back. Ensure that the other rubber bearing is in the front cap’s middle center hole. Make sure that the little piece of shaft you have left after the three washers goes into that front cap’s bearing.
When closed that will look (when looking through the water entrance hole) like this. Look carefully and you’ll see the three washers the plastic washer. They will keep everything in place from now on. Note that since the update mentioned earlier I’m using a white plastic washer instead of three metallic ones.

Now you just close the motor by screwing the front cap tight
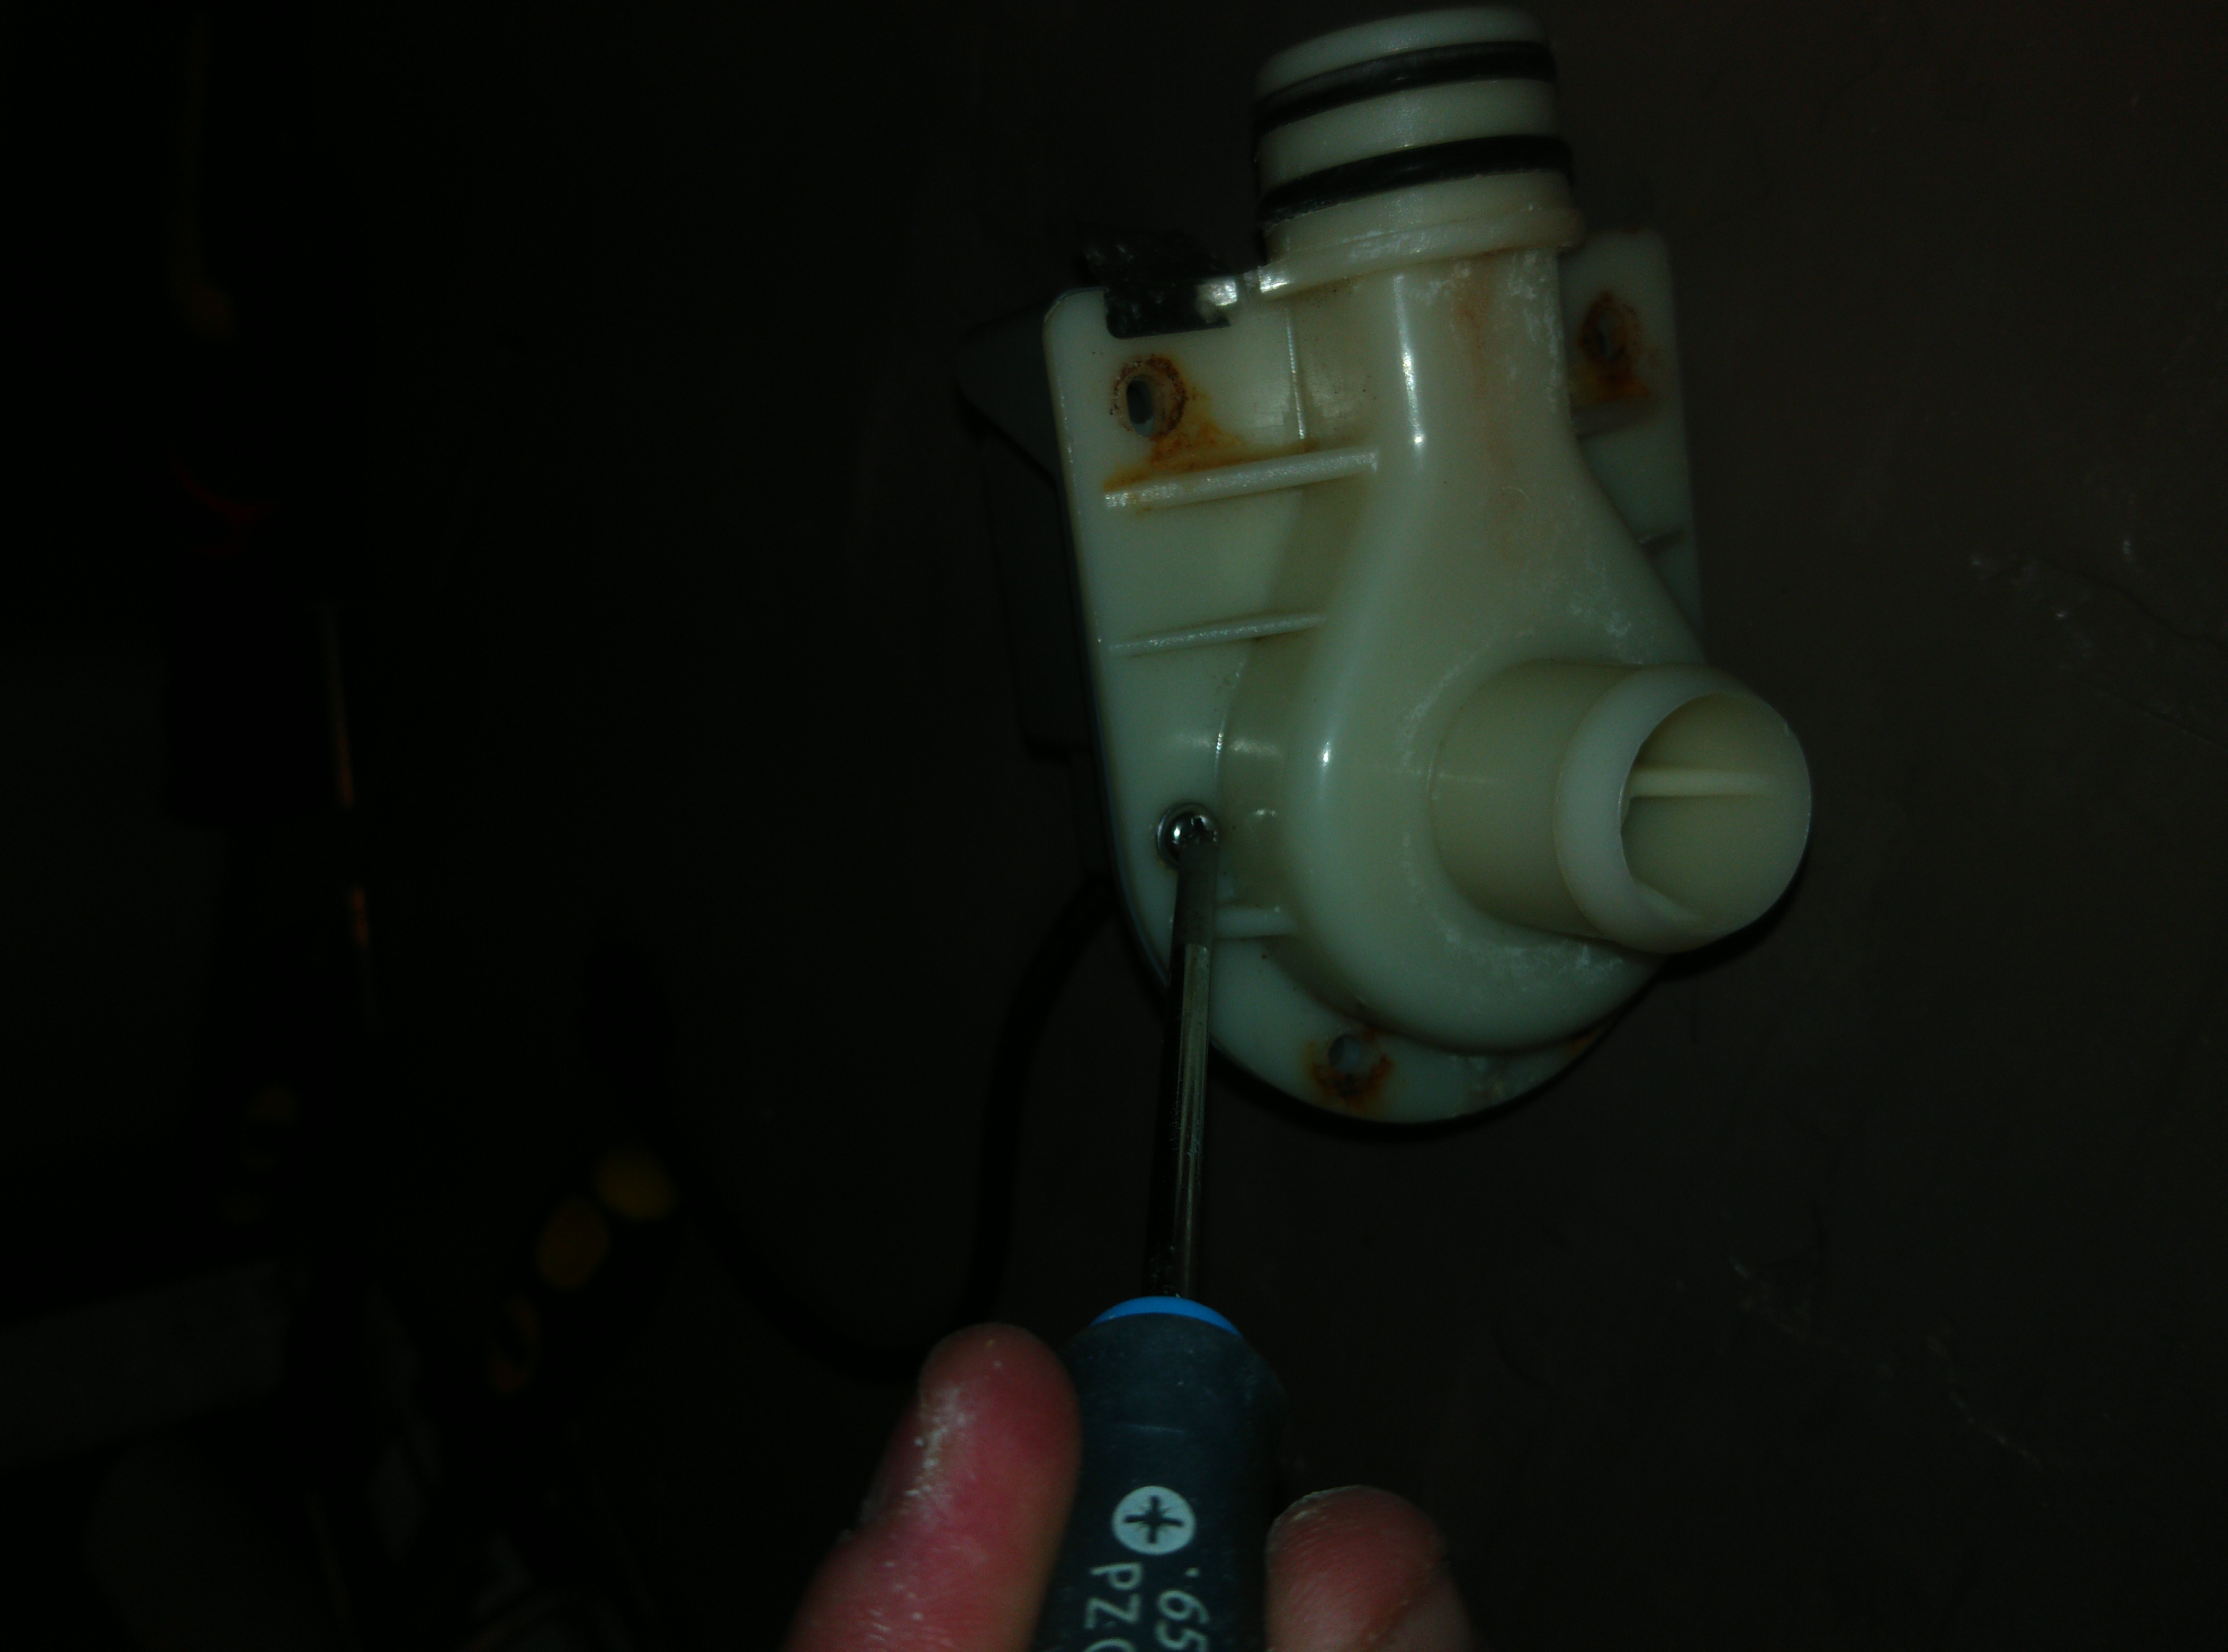
If this doesn’t work (I’ve had motors with the commutator magnet broken into pieces) then you can fairly easily find these motors on the second hand market. The replacement is not very hard so you don’t need to buy an entire new water pump unit.
Yesterday I explained how to make a scrap computer do OCR on your scanner/printer’s scanned PDFs in case you have a SMB file share (a Windows file share) where the printer will write to.
I also promised I would make the E-Mail feature of the printer send E-mails with the PDFs in that E-mail being OCR scanned.
I had earlier explained how you can make your old scanner/printer support modern SMTP servers that have TLS, by introducing a scrap computer running Postfix to forward the E-mails for you. This article depends on that, of course. As we will let the scrap computer now do the OCR part. If you have not yet done that, first do it before continuing here.
I looked at Xavier Merten‘s CockooMX, and decided to massacre it until it would do what I want it to do. Namely call ocrmypdf on the application/pdf attachments and then add the resulting PDF/A (which will have OCR text) to the E-mail.
First install some extra software: apt-get install libmime-tools-perl . It will provide you with MIME::Tools, we will use MIME::Parser and MIME::Entity.
Create a Perl script called /usr/local/bin/ocrpdf.pl (chmod 755 it) that looks like this (which is Xavier’s CockooMX massacred and reduced to what I need – Sorry Xavier. Maybe we could try to make CockooMX have a plugin like infrastructure? But writing what looks suspicious to a database ain’t what I’m aiming for here):
#!/usr/bin/perl

# Copyright note

use Digest::MD5;
use File::Path qw(make_path remove_tree);
use File::Temp;
use MIME::Parser;
use Sys::Syslog;
use strict;
use warnings;

use constant EX_TEMPFAIL => 75; # Mail sent to the deferred queue (retry)
use constant EX_UNAVAILABLE => 69; # Mail bounced to the sender (undeliverable)

my $syslogProgram	= "ocrpdf";
my $sendmailPath	= "/usr/sbin/sendmail";
my $syslogFacility	= "mail";
my $outputDir		= "/var/ocrpdf";
my $ocrmypdf		= "/usr/bin/ocrmypdf";

# Create our working directory
$outputDir = $outputDir . '/' . $$;
if (! -d $outputDir && !make_path("$outputDir", { mode => 0700 })) {
  syslogOutput("mkdir($outputDir) failed: $!");
  exit EX_TEMPFAIL;
}

# Save the mail from STDIN
if (!open(OUT, ">$outputDir/content.tmp")) {
  syslogOutput("Write to \"$outputDir/content.tmp\" failed: $!");
  exit EX_TEMPFAIL;
}
while() {
  print OUT $_;
}
close(OUT);

# Save the sender & recipients passed by Postfix
if (!open(OUT, ">$outputDir/args.tmp")) {
  syslogOutput("Write to \"$outputDir/args.tmp\" failed: $!");
  exit EX_TEMPFAIL;
}
foreach my $arg (@ARGV) {
  print OUT $arg . " ";
}
close(OUT);

# Extract MIME types from the message
my $parser = new MIME::Parser;
$parser->output_dir($outputDir);
my $entity = $parser->parse_open("$outputDir/content.tmp");

# Extract sender and recipient(s)
my $headers = $entity->head;
my $from = $headers->get('From');
my $to = $headers->get('To');
my $subject = $headers->get('Subject');
chomp($from);
chomp($subject);

syslogOutput("Processing mail from: $from ($subject)");

processMIMEParts($entity);
deliverMail($entity);
remove_tree($outputDir) or syslogOuput("Cannot delete \"$outputDir\": $!");

exit 0;

sub processMIMEParts
{
  my $entity = shift || return;
  for my $part ($entity->parts) {
    if($part->mime_type eq 'multipart/alternative' ||
       $part->mime_type eq 'multipart/related' ||
       $part->mime_type eq 'multipart/mixed' ||
       $part->mime_type eq 'multipart/signed' ||
       $part->mime_type eq 'multipart/report' ||
       $part->mime_type eq 'message/rfc822' ) {
         # Recursively process the message
         processMIMEParts($part);
     } else {
       if( $part->mime_type eq 'application/pdf' ) {
         my $type = lc  $part->mime_type;
         my $bh = $part->bodyhandle;
         syslogOutput("OCR for: \"" . $bh->{MB_Path} . "\" (" . $type . ") to \"" . $bh->{MB_Path} . ".ocr.pdf" . "\"" );
         # Perform the OCR scan, output to a new file
         system($ocrmypdf, $bh->{MB_Path}, $bh->{MB_Path} . ".ocr.pdf");
         # Add the new file as attachment
         $entity->attach(Path   => $bh->{MB_Path} . ".ocr.pdf",
                         Type   => "application/pdf",
                         Encoding => "base64");
      }
     }
   }
   return;
}

#
# deliverMail - Send the mail back
#
sub deliverMail {
  my $entity = shift || return;

  # Write the changed entity to a temporary file
  if (! open(FH, '>', "$outputDir/outfile.tmp")) {
    syslogOutput("deliverMail: cannot write $outputDir/outfile.tmp: $!");
    exit EX_UNAVAILABLE;
  }
  $entity->print(\*FH);
  close(FH);

  # Read saved arguments
  if (! open(IN, "<$outputDir/args.tmp")) {
    syslogOutput("deliverMail: Cannot read $outputDir/args.tmp: $!");
    exit EX_TEMPFAIL;
  }
  my $sendmailArgs = ;
  close(IN);

  # Read mail content from temporary file of changed entity
  if (! open(IN, "<$outputDir/outfile.tmp")) {
    syslogOutput("deliverMail: Cannot read $outputDir/content.txt: $!");
    exit EX_UNAVAILABLE;
  }

  # Spawn a sendmail process
  syslogOutput("Spawn=$sendmailPath -G -i $sendmailArgs");
  if (! open(SENDMAIL, "|$sendmailPath -G -i $sendmailArgs")) {
    syslogOutput("deliverMail: Cannot spawn: $sendmailPath $sendmailArgs: $!");
    exit EX_TEMPFAIL;
  }
  while() {
    print SENDMAIL $_;
  }
  close(IN);
  close(SENDMAIL);
}

#
# Send Syslog message using the defined facility
#
sub syslogOutput {
  my $msg = shift or return(0);
  openlog($syslogProgram, 'pid', $syslogFacility);
  syslog('info', '%s', $msg);
  closelog();
}
Now we just do what Xavier’s CockooMX documentation also tells you to do: add it to master.cf:
Create a UNIX user: adduser ocrpdf
Change the smtp service:
smtp      inet  n       -       -       -       -       smtpd
         -o content_filter=ocrpdf
Create a new service
ocrpdf  unix  -       n       n       -       -       pipe
user=ocrpdf argv=/usr/local/bin/ocrpdf.pl -f ${sender} ${recipient}Modern printers can do OCR on your scans. But as we talked about last time, aren’t all printers or scanners modern.
We have a scrap computer that is (already) catching all E-mails on a badly configured local SMTP server, to then forward it to a well configured SMTP server that has TLS. Now we also want to do OCR on the scanned PDFs.
My printer has a so called Network Scan function that scans to a SMB file share (that’s a Windows share). The scrap computer is configured to share /var/scan using Samba as ‘share’, of course. The printer is configured to use that share. Note that you might need in smb.conf this for very old printers:
client min protocol = LANMAN1
server min protocol = LANMAN1
client lanman auth = yes
client ntlmv2 auth = no
client plaintext auth = yes
ntlm auth = yes
security = share
And of course also something like this:
[scan]
 path = /var/scan
 writable = yes
 browsable = yes
 guest ok = yes
 public = yes
 create mask = 0777
First install software: apt-get install ocrmypdf inotify-tools screen bash
We need a script to perform OCR scan on a PDF. We’ll here use it in another script that monitors /var/scan for changes. Later in another post I’ll explain how to use it from Postfix’s master.cf on the attachments of an E-mail. Here is /usr/local/bin/fixpdf.sh:
! /bin/sh
 a=$1
 TMP=`mktemp -d -t XXXXX`
 DIR=/var/scan
 mkdir -p $DIR/ocr
 cd $DIR
 TIMESTAMP=`stat -c %Y "$a"`
 ocrmypdf --force-ocr "$a" "$TMP/OCR-$a"
 mv -f "$TMP/OCR-$a" "$DIR/ocr/$TIMESTAMP-$a"
 chmod 777 "$DIR/ocr/$TIMESTAMP-$a"
 cd /tmp
 rm -rf $TMP
Note that I prepend the filename with a timestamp. That’s because my printer has no way to give the scanned files a good filename that I can use for my archiving purposes. You can of course do this different.
Now we want a script that monitors /var/scan and launches that fixpdf.sh script in the background each time a file is created.
My Xerox WorkCentre 7232 uses a directory called SCANFILE.LCK/ for its own file locking. When it is finished with a SCANFILE.PDF it deletes that LCK directory.
Being bad software developers the Xerox people didn’t use a POSIX rename for SCANFILE.PDF to do an atomic write operation at the end.
It looks like this:
inotifywait -r -m  /var/scan |
    while read file_path file_event file_name; do
           echo ${file_path}${file_name} event: ${file_event}
    done
Setting up watches.  Beware: since -r was given, this may take a while!
 Watches established.
 /var/scan/ event: OPEN,ISDIR
 /var/scan/ event: ACCESS,ISDIR
 /var/scan/ event: ACCESS,ISDIR
 /var/scan/ event: CLOSE_NOWRITE,CLOSE,ISDIR
 /var/scan/ event: OPEN,ISDIR
 /var/scan/ event: ACCESS,ISDIR
 /var/scan/ event: ACCESS,ISDIR
 /var/scan/ event: CLOSE_NOWRITE,CLOSE,ISDIR
 /var/scan/XEROXSCAN003.LCK event: CREATE,ISDIR
 /var/scan/XEROXSCAN003.LCK event: OPEN,ISDIR
 /var/scan/XEROXSCAN003.LCK event: ACCESS,ISDIR
 /var/scan/XEROXSCAN003.LCK event: CLOSE_NOWRITE,CLOSE,ISDIR
 /var/scan/ event: OPEN,ISDIR
 /var/scan/ event: ACCESS,ISDIR
 /var/scan/ event: ACCESS,ISDIR
 /var/scan/ event: CLOSE_NOWRITE,CLOSE,ISDIR
 /var/scan/ event: OPEN,ISDIR
 /var/scan/ event: ACCESS,ISDIR
 /var/scan/ event: CLOSE_NOWRITE,CLOSE,ISDIR
 /var/scan/XEROXSCAN003.PDF event: CREATE
 /var/scan/XEROXSCAN003.PDF event: OPEN
 /var/scan/XEROXSCAN003.PDF event: MODIFY
 /var/scan/XEROXSCAN003.PDF event: MODIFY
 ...
 /var/scan/XEROXSCAN003.PDF event: MODIFY
 /var/scan/XEROXSCAN003.PDF event: MODIFY
 /var/scan/XEROXSCAN003.PDF event: CLOSE_WRITE,CLOSE
 /var/scan/XEROXSCAN003.PDF event: ATTRIB
 /var/scan/XEROXSCAN003.LCK event: OPEN,ISDIR
 /var/scan/XEROXSCAN003.LCK/ event: OPEN,ISDIR
 /var/scan/XEROXSCAN003.LCK event: ACCESS,ISDIR
 /var/scan/XEROXSCAN003.LCK/ event: ACCESS,ISDIR
 /var/scan/XEROXSCAN003.LCK event: ACCESS,ISDIR
 /var/scan/XEROXSCAN003.LCK/ event: ACCESS,ISDIR
 /var/scan/XEROXSCAN003.LCK event: CLOSE_NOWRITE,CLOSE,ISDIR
 /var/scan/XEROXSCAN003.LCK/ event: CLOSE_NOWRITE,CLOSE,ISDIR
 /var/scan/XEROXSCAN003.LCK/ event: DELETE_SELF
 /var/scan/XEROXSCAN003.LCK event: DELETE,ISDIR
The printer deleting that SCANFILE.LCK/ directory is a good moment to start our OCR script (call it for example /usr/local/bin/monitorscan.sh):
! /bin/bash
 inotifywait -r -m -e DELETE,ISDIR /var/scan |
    while read file_path file_event file_name; do
       if [ ${file_event} = "DELETE,ISDIR" ]; then
         if [[ ${file_name} == *"LCK" ]]; then
           suffix=".LCK"
           filename=`echo ${file_name} | sed -e "s/$suffix$//"`.PDF
           /usr/local/bin/fixpdf.sh $filename &
         fi
       fi
    done
Give both scripts 755 permissions with chmod and now you just run screen /usr/local/bin/monitorscan.sh
When your printer was written by good software developers, it will do POSIX rename. That looks like this (yes, also when done over a SMB network share):
inotifywait -r -m  /var/scan |
    while read file_path file_event file_name; do
           echo ${file_path}${file_name} event: ${file_event}
    done
Setting up watches.  Beware: since -r was given, this may take a while!
 Watches established.
 /var/scan/ event: OPEN,ISDIR
 /var/scan/ event: ACCESS,ISDIR
 /var/scan/ event: CLOSE_NOWRITE,CLOSE,ISDIR
 /var/scan/ event: OPEN,ISDIR
 /var/scan/ event: ACCESS,ISDIR
 /var/scan/ event: CLOSE_NOWRITE,CLOSE,ISDIR
 /var/scan/ event: OPEN,ISDIR
 /var/scan/ event: ACCESS,ISDIR
 /var/scan/ event: CLOSE_NOWRITE,CLOSE,ISDIR
 /var/scan/ event: OPEN,ISDIR
 /var/scan/ event: ACCESS,ISDIR
 /var/scan/ event: CLOSE_NOWRITE,CLOSE,ISDIR
 /var/scan/.tmp123.GOODBRANDSCAN-123.PDF event: CREATE
 /var/scan/.tmp123.GOODBRANDSCAN-123.PDF event: OPEN
 /var/scan/.tmp123.GOODBRANDSCAN-123.PDF event: MODIFY
 ...
 /var/scan/.tmp123.GOODBRANDSCAN-123.PDF event: MOVED_FROM
 /var/scan/GOODBRANDSCAN-123.PDF event: MOVED_TO
That means that your parameters for inotifywait could be -r -m -e MOVED_TO and in ${file_name} you’ll have that GOODBRANDSCAN-123.PDF. This is of course better than Xerox’s way with their not invented here LCK things that probably also wouldn’t be necessary with a POSIX rename call.
I will document how to do this to the E-mail feature of the printer with Postfix later.
I first need a moment in my life where I actually need this hard enough that I will start figuring out how to extract certain attachment MIME parts from an E-mail with Posix’s master.cf. I guess I will have to look into CockooMX by Xavier Mertens for that. Update: that article is available now.
.
Here’s a scenario: ten years ago, you renovated your bathroom. As a shower, you chose a walk-in shower with a Belgian blue stone which is porous and is a limestone.
That’s why you have to be careful with products like Antikal. Because they will react with the lime in your limestone. In other words, you have to rinse away the excess Antikal quickly.
But you’re a computer geek and because you have a piece of software that you programmed and are already thinking about, you sometimes forget this.
Thus, a drop of Antikal remains on your blue stone.
A few hours later, that drop became a white stain. Which now really seems to be inside your stone.
Unfortunately, it really is. No matter what you try, it cannot be scrubbed off. Unless you let a professional come and polish a layer off of your stone (which costs about 800 euros, by the way).
Unfortunately, not much later the stains come back. Because the stains are deep in your stone and the reaction ‘continues’. That was 800 euros for a few weeks’ peace of mind.
Now what?
Of course you buy a whole gang of HG products such as HG blauwesteen reiniger, HG grafsteenreiniger and HG natuursteen kleurvlekkenverwijderaar.
You spray it on, let it soak in for half an hour; a little of the stains are now indeed better. But not really.
What actually worked better was the Mr. Proper Magic sponge. That sanded the top layer of that white stain away a bit.
But what worked best after that was a coat of Moeller Stone Care HMK P333 Hardsteenolie.
Your Belgian Blue stone will become a Belgian dark blue stone. But the stains (which I had first rubbed out with the Mr. Proper Magic sponge) are less visible and seem to belong to the stone’s natural life.
Then, after two full days letting the stuff get impregnated, a sticky top layer appeared. I had probably used a little too much of that stuff.
But another heavy treatment with the whole gang of HG products, such as HG blauwesteen reiniger, HG grafsteenreiniger and HG natuursteen kleurvlekkenverwijderaar (all at the same time and soak for half an hour) followed by rubbing hard with an iron sponge, and the sticky top layer is gone.
The stone is actually quite beautiful now. Dark blue.
Een eigen Europees leger starten. Waarbij ieder Europees land haar eigen expertise in de groep werpt.
Afspraken maken met Rusland over de energievoorziening van Europa.
Een nieuw veiligheidspakt met Rusland maken opdat er zo weinig mogelijk conflicten in Europa zullen zijn.
Machtsprojectie doen vanuit Europa, met het Europees leger. We moeten opnieuw leren wat het is om aan geostrategie te doen. We moeten dat Europees leger durven inzetten om onze strategische doelen te behalen. We moeten niet verlegen zijn om de wereld duidelijk te maken dat wij zulke strategische doelen hebben.
Het conflict in Oekraïne beïndigen. Want het dient ons (Europeanen) en Russen niet. We zijn beiden benadeeld door dit conflict. We hebben er beiden baad bij om dit te beïndigen.
Durven praten over Europa en niet enkel over de Europese Unie.
For the people who want to know how to get around the ongoing media bans:
Do a Google search and type in ‘free ssh country‘. Use as ‘country‘ the country where the media is that you want to reach. Take the first hit. Create the SSH tunnel account that is freely available.
In a console (if you don’t have SSH, you can install it with for example Git Bash, Cygwin, etc on Windows. You can also use Putty of course – make a SOCKS tunnel). Note that the username and hostname will be different (the website will tell you).
ssh -D 1337 -q -C -N user-vpnthathost.com@countryNr.thathost.com
For Firefox: Settings->Network Settings [Settings]->Manual Proxy configuration. Type next to SOCKS Host: localhost, and next to Port: 1337. Next check ‘Proxy DNS when using SOCKS v5’. You have equivalent settings in Chrome and Chromium among other browsers.
There are many options as VPN service. You can also search with Tor-browser if you think the secret services want to kill you or something. It’s not very likely, though. But if you are paranoid, then I guess sure.
Tor-browser itself might by the way also work just fine.
Install some software
apt-get install imagej wget imagemagick bash
Get a JSON with all the versions of a image on Wikipedia
Let’s assume you want to watch how the invasion in Ukraine took place. That’s this one:
We only need the URL, so iiprop=|url. If you need the timestamp (when was the image file made) then use iiprop=|url|timestamp. A list of them you can find here.
You can use wget or in your browser just do save file as (use RAW data at the top then, for example in Firefox).
Fetch the images
#! /bin/bash

mkdir svg
cd svg
ITEMS=`cat api-result.json | jq '.query.pages."-1".imageinfo | .[] | .url'`
for a in $ITEMS
do
    wget "$a"
    sleep 1
done
Convert them to PNGs:
Normally they are already in the right order. So no renaming should be needed. Else you have to add to the iiprop of the query ‘timestamp’ and then with jg you extract that from the JSON to for example add it somehow to the filenames.
Or just use touch to change the file’s last modification date after wget fetched it and then here you use UNIX find to loop in the right order, and write PNG files like 0001.png, 0002.png, etc.
#! /bin/bash
cd ..
mkdir png
for a in svg/*
do
    # You can come up with a better translation for the filename
    b=`echo $a | sed s/svg//g`
    convert -density 250 -size 1546x1038 $a png/$b.png
done
Convert PNGs to a movie
Convert into fake-news, propaganda, etc
We are a few years further. A few years in which we all tried to make a difference.
I’m incredibly proud of my achievement of QTBUG-61928. At the time I thought I could never convince the Qt development team of changing their APIs. They did and today in Qt6 it’s all very much part of the package.
I want to thank Thiago and others. But I also think it’s a team effort. It might not be because of just me. But I still feel a little bit proud of having pushed this team just enough to make the changes.
I am now at a new Qt bug report. This time it’s about int64_t. I think that QModelIndex should be completely supporting it. Again, I think a lot. And I have a lot of opinions. But I anyway filed QTBUG-99312 for this.
Qt published its New_Features in Qt 6.0.
Some noteworthy items in their list:
I like to think I had my pirate-hook in it at least a little bit with QTBUG-61928.
Ik vind deze zin van Jordan Peterson erg krachtig (en ik wilde die op een oud medium zoals blogs doen voortbestaan):
I do believe that each of us participate in the transformation of what could be, into what is.
The earth is a cube. It’s a Pyrite crystal that didn’t stop growing. Here is the earth scaled to my size:
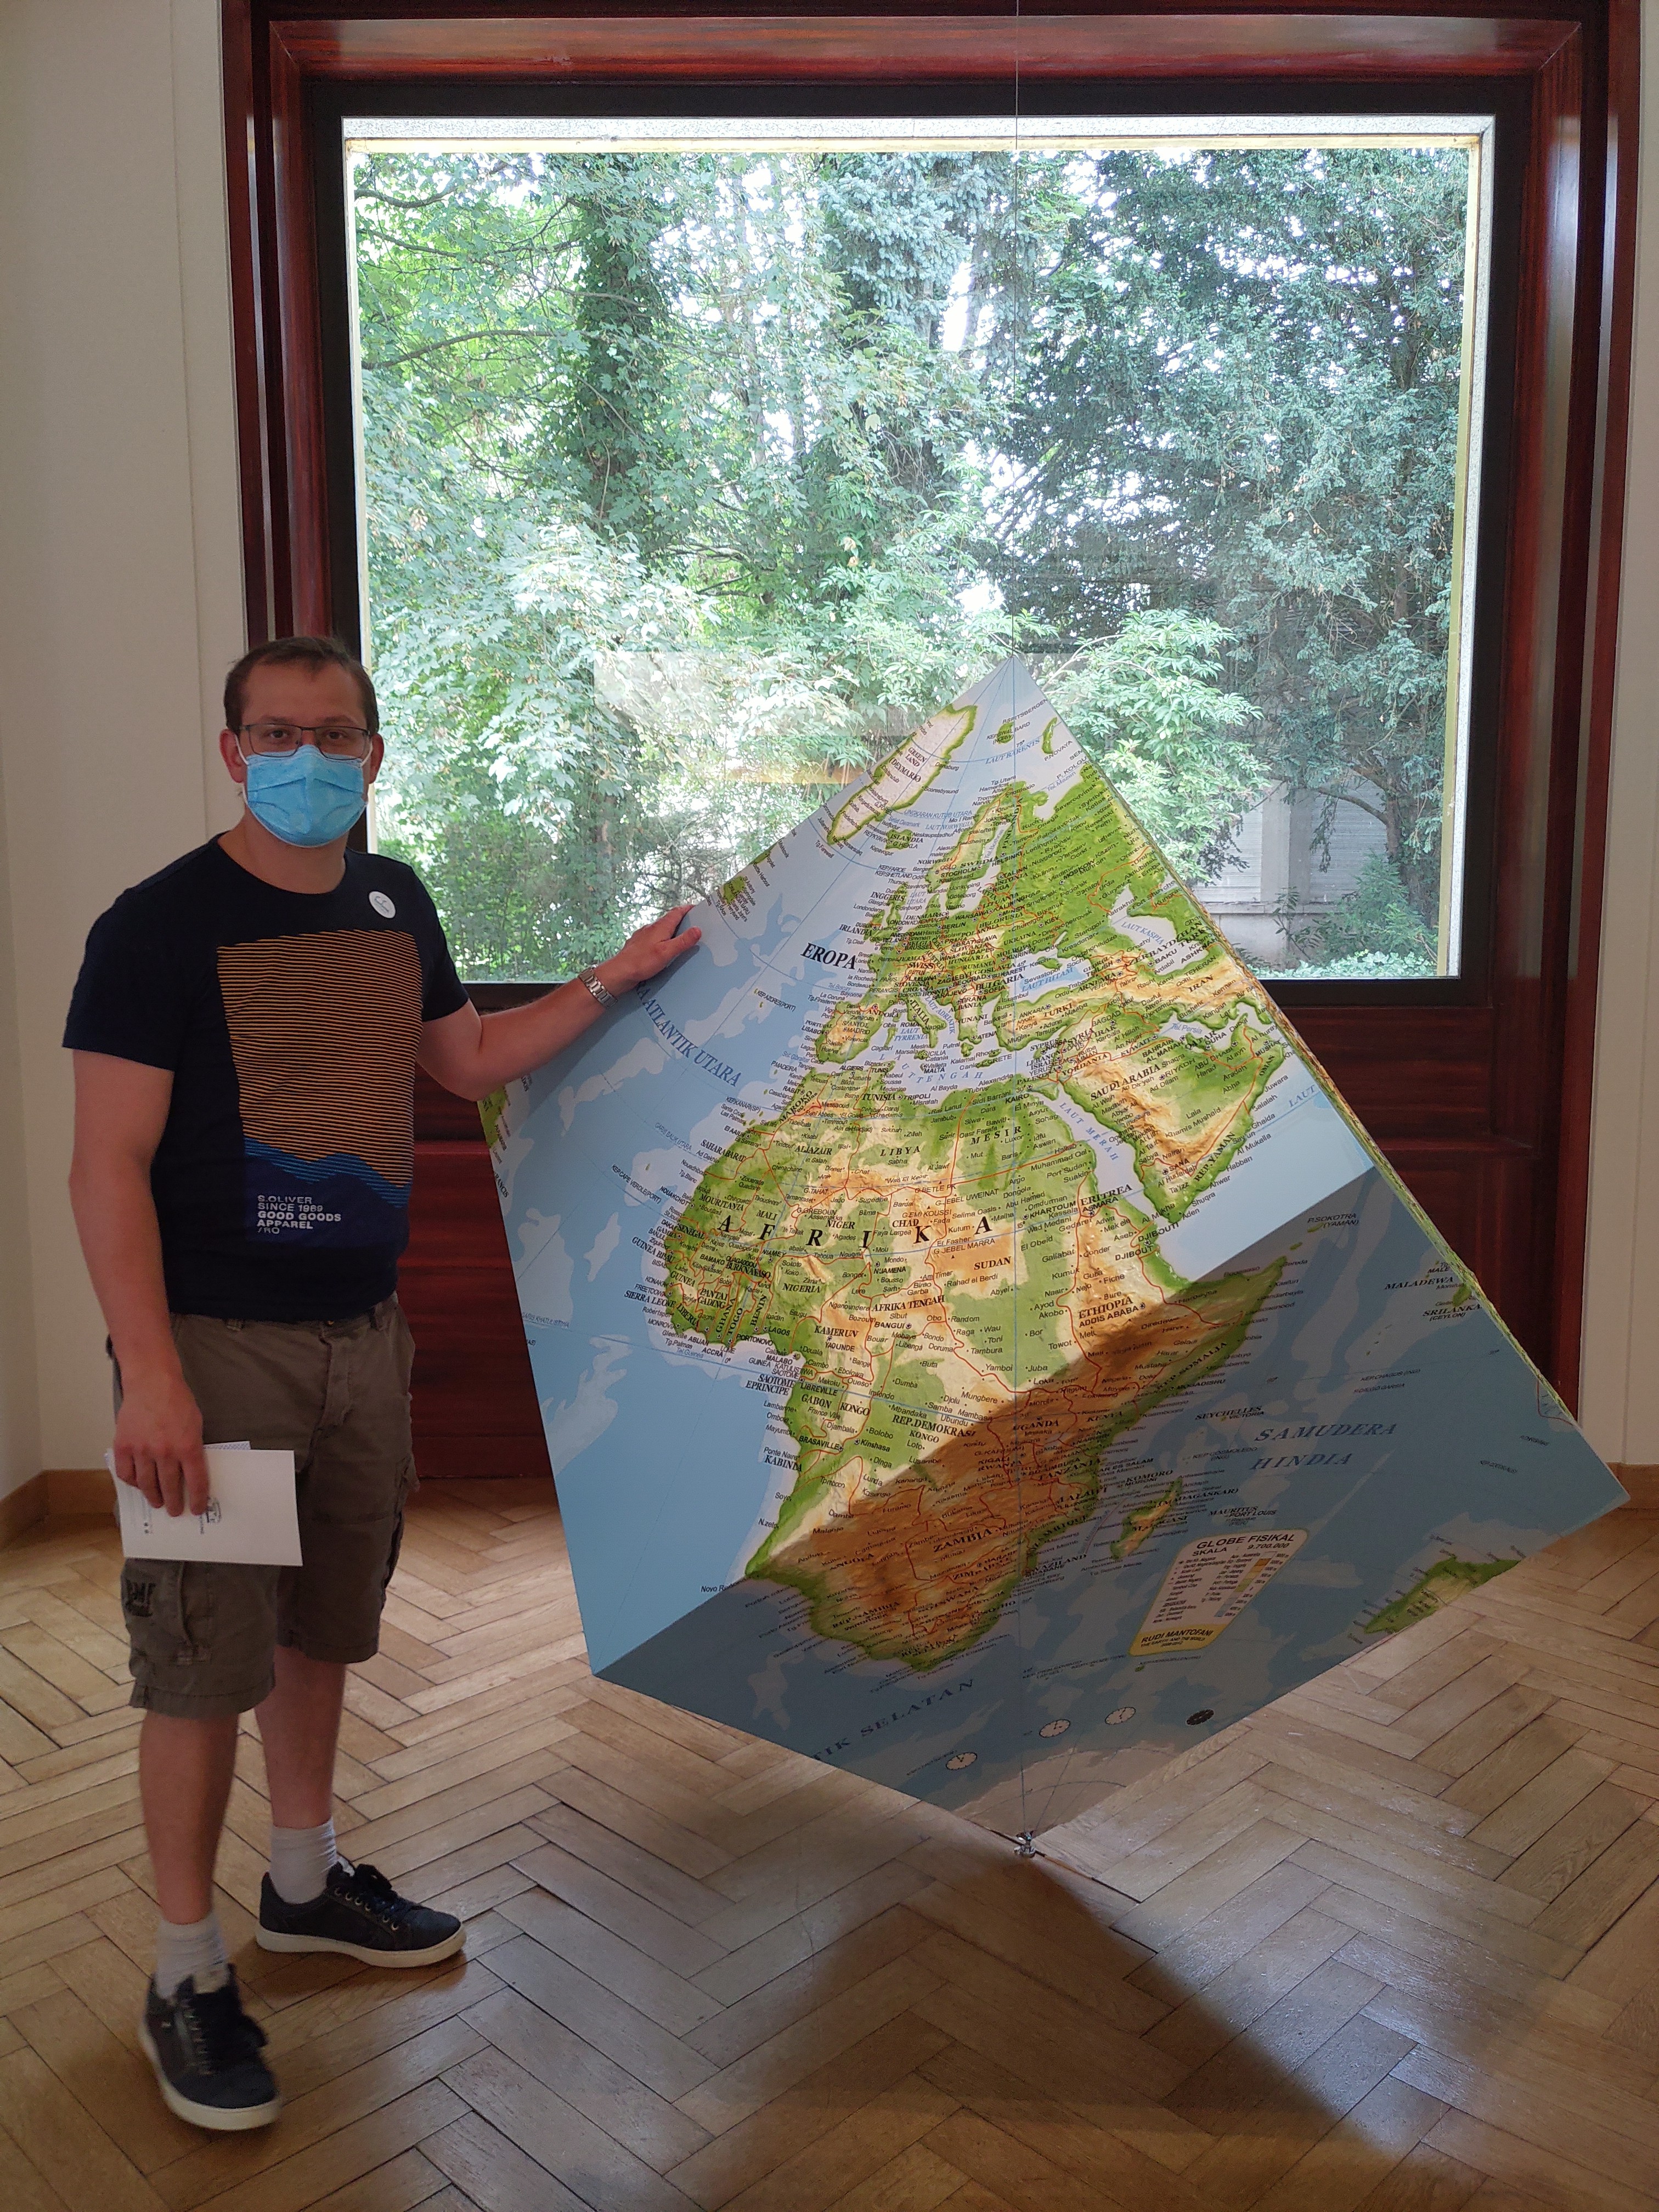
I’m telling you; it’s Pyrite cubes all the way down.
Na een zware periode waar ik zelf angst heb gehad, bedacht ik me een paar uur geleden:
Niets blijkt moeilijker te zijn dan te accepteren dat er geen gevaar is.
Ik heb besloten dat dit de nieuwe ondertoon van deze blog wordt. Wat dat juist wil zeggen? Dat een tiental van de komende blog artikels dat als lijn gaan aanhouden.
Clowns to the left of me are prevaricating (uitereraard een verwijzing naar de song die in Reservoir Dogs aanwezig was), is geschiedenis.
Wat was het vorige? Toen dacht ik er vast nog niet zo hard over na. Misschien zou ik dat nu beter ook niet doen? Ik denk te veel over ongeveer alles na.
Dus, daarom de nieuwe ondertitel:
Accepteer, dat er geen gevaar is.
Ik heb hem Nederlands gemaakt. Want de enige groepen die zich in mijn blog interesseren zijn a) jullie of b) misschien staatsveiligheid. Die laatste heeft in dat geval een budget om één en ander te laten vertalen en jullie spreken al Nederlands.
Goed ja. Er is wel wat gevaar natuurlijk. Maar we hebben het eigenlijk erg goed onder controle.
Do not assume US still aspires to be a world leader. Differently put: it is time for a EU army.
She also said: the UK will have to “live with the consequences” of Boris Johnson ditching Theresa May’s plan to maintain close economic ties with the EU after Brexit.
Answering would a no-deal Brexit be a personal defeat for you? No. It would, of course, be in Britain’s and all EU member states’ interests to achieve an orderly departure. But that can only happen if it is what both sides want.
Her Germany is ready for no matter what. She made it so. And she’s telling you.