Ik heb mezelf eindelijk een (refurbished) nieuw toestel gekocht waarmee je kan bellen en zo van die andere nuttige dingen.
Uiteraard moet daar SailfishOS van me opstaan.
En deze keer werkt echt alles dat ik nodig heb. Goede ontvangst, GPS, 4G
Ik heb mezelf eindelijk een (refurbished) nieuw toestel gekocht waarmee je kan bellen en zo van die andere nuttige dingen.
Uiteraard moet daar SailfishOS van me opstaan.
En deze keer werkt echt alles dat ik nodig heb. Goede ontvangst, GPS, 4G
Beste andere Belgen
Venera en ik hebben een bébé gemaakt. Hij is Troi en naar het schijnt lijkt hij erg op mij.
Hier is een fotooke van hem en zijn mama. Troi is uiteraard heel erg schattig:

Ik merkte op het einde van een Terzake dat onze teerbeminde ADIV opzoek is naar mensen.
Ik mag hopen dat ze planet.grep lezen want ja, een deel van het soort volk dat de ADIV nodig heeft leest onze blogs. Gelukkig maar.
Nu, ik heb in 2014 al eens omschreven wat toen Miguel De Bruycker nodig had voor zijn Centrum voor Cybersecurity.
Meneer Van Strythem Michel; jij hebt precies hetzelfde nodig als Miguel toen. Toch? Je gaat die mensen dan ook op precies dezelfde manier vinden als hoe Miguel ze vond: Bescherm ons tegen afluisteren, luister zelf enkel binnen een wettelijk kader af.
Ik schreef in 2014:
Zolang de overheid haar eigen moreel compas volgt, zijn deze mensen bereid hun kunnen voor de overheid in te zetten.
Maar de wet staat boven de militair. Ze moet gevolgd worden. Ook door de inlichtingendiensten. Het is onze enige garantie op een vrije samenleving: ik wil niet werken of geholpen hebben aan een wereld waarin de burger door technologie vrijheden zoals privacy verliest.
Daartussen vond je in mijn schrijfsel een opsommig van een paar opdrachtjes die een klein beetje moeilijk zijn.
Zoals het verbergen van een Linux kernel module, wat dus een standaard Linux virus zou doen. Het exfiltreren van data over een netwerk device zonder dat het al te veel opvalt. Dat is iets wat de ADIV zal willen doen. Het ontvangen van commando’s. Dat is eigenlijk wat Back orifice ook al deed.
Ik omschreef ook dat ze moeten weten hoe een bufferoverflow fout werkt. Omdat dit een veel voorkomende programmeursfout is die tot beveiligingsproblemen leidt. M.a.w. ze moeten toch op zijn minst weten hoe ze zelf zo’n beveiligingsprobleem zouden kunnen maken. Al was het maar om hun aanvalstechnieken te kunnen voorbereiden.
Ik verwachtte ook dat ze een standaard socket-servertje kunnen opzetten. Natuurlijk. Dat is minimaal.
De gemiddelde programmeur zal dat vast allemaal niet kunnen. Maar we hebben de gemiddelde programmeur dan ook niet nodig.
Als de ADIV zich houdt aan de wet en steeds binnen de context van de wet werkt, dan zal de ADIV de besten van ons land vinden. Net zoals hoe de brandweer de beste mensen van het land weet te activeren, zal de ADIV de beste programmeurs kunnen activeren.
Maar dat is omdat het zich aan haar eigen morele compas houdt.
Doet ze dat niet, dan niet.
Met vriendelijke groeten,
Philip. Programmeur.
Ik schrijf nu zo’n zeven jaar software voor high-end vijf-as CNC machines bij Heidenhain.
Wij zijn bezig aan de TNC 7 software. Dit is de opvolger van de TNC 640 software. Ik ben samen met een team ontwikkelaars die in Traunreut zitten de ontwikkelaar van voornamelijk de NC editor en alles wat daarbij hoort (alle integraties met de omliggende onderdelen van al wat er ook bij komt kijken – en dat is veel).
Als ik naar de TNC 640 kijk is dit software die veertig jaar zal meegaan.
Als ik naar onze eigen Belgische ruimtevaartindustrie maar ook bv. wapenindustrie kijk, maar ook echt om het even wat, is dat software die ongeveer overal gebruikt wordt. Voor ongeveer alles. De Jobs-pagina van FN Herstal bijvoorbeeld toont al een paar jaar mensen die effectief een CNC machine met een Heidenhain TNC 640 bedienen. Binnenkort zal daar dus onze nieuwe TNC 7 gebruikt worden! (om dan weet ik veel, bijvoorbeeld onze soldaten hun machinegeweren mee te maken).
Enfin. Genoeg gestoef daarover!
Ik ben (dus) de laatste tijd geïnteresseerd geraakt in het wereldje van metaalbewerking. Toen ik een jonge gast van zo’n 15 – 16 was, was mijn grootvader een draaibank metaalbewerker (bij AGFA-gevaert). Die man was altijd trots om mij voortdurend uitleg te geven daarover.
Ik heb ook op school tijdens mijn jaren electromechanica een paar toetsen mogen of moeten doen met een eenvoudige manuele draaibank.
Dat was eigenlijk wel interessant. Maar computers, die waren toen ook heel erg interessant!
Vandaag komt het voor mij samen.
Maar ik moet zeggen. Nee echt. De echte ‘hackers‘ (het aanpassen van een systeem opdat het meer doet dan dat waar het voor ontworpen is) zitten nog veel meer in de machining wereld dan in de of onze software wereld. Hoewel wij er ook wel een stel hebben rondlopen.
Jullie (of wij) andere sofware ontwikkelaars hebben er vaak geen idee van hoe enorm uitgebreid die andere wereld is. Zowel in hout als in metaal. Het loopt daar de spuigaten uit van de hackers.
Ik wil maar zeggen, vooral aan de jonge kuikens: leg uw interesses breed. Ga heel erg ver. Het is allemaal zo ontzettend interessant.
En vooral: het zit in de combinatie van software én iets anders. Dat kan security zijn. Maar dus ook machining. Of medisch (imaging, enzo)? Een combinatie van alles. Ik sprak met mensen die tools maken voor CNC machines die zaken voor chirurgen produceren.
Enkel Python code kloppen is niet de essentie van onze passie. Je schrijft die Python code opdat het samenwerkt met of voor iets anders. Dat iets anders moet je dus ook kennen of willen kennen.
Vandaag had ik een gesprek met een 23 jarige.
Het heeft zowel mijn ogen geopend als dat het ze sloot. Deze dame beweerde endometriose te hebben.
Haar hele lichaam had daar last van. En de wereld moet zich daar maar eens mee bezig houden ook. Vond ze.
Het viel me op dat zij het commerciële heel erg belangrijk vond. Blijkbaar zijn er in de V.S. en in de U.K. specialisten bereid om voor veel geld haar baarmoeder te verwijderen.
En omdat dat vele geld daar is, daarom, is het zo, dat, alles, wat die zeggen, de waarheid is.
Aldus deze 23 jarige.
Zij wilde in geen geval kinderen. Dat wist ze als 23 jarige. De symptonen van endometriose waren dusdanig ernstig dat zij als 23 jarige haar baarmoeder wilde laten verwijderen door een aantal chirurgen in de V.S. en de U.K. die daartoe bereid waren, voor veel geld, dat te doen. Dat, waar de Belgische specialisten in Leuven, niet toe bereid waren.
Het maakt blijkbaar niet meer uit waar onze Belgische specialisten van overtuigd zijn. Het extreem-kapitalisme heeft het al lang overgenomen: vrouwen die hun baarmoeder willen laten verwijderen vinden gehoor in de Angelsaksische wereld.
De vrije markt heeft beslist: baarmoeders verwijderen is een transactie zoals alle anderen.
Het kostte me veel moeite om deze jongedame terug te brengen naar de werkelijkheid: dat haar lichaam een geschenk is en dat haar gift om leven te kunnen schenken het belangrijkste is dat er maar bestaat.
The combined number of men killed or wounded reached nearly 50,000, with close to 25,000 casualties on the French side and approximately 23,000 for the Allied army.
Western estimate: 60,000+ casualties (20,000+ killed) Per Ukraine: 100,000+ killed or wounded (20,000–30,000 killed)
Bypassing paywalls is a sport for some. And it ain’t hard for Desktop Browsers. Just install a addon in your favorite Desktop Browser.
Unfortunately this didn’t work on a Android or iPhone phone. Nor on Sailfish OS with its Android emulation. Because over there browsers like Chrome and Chromium don’t allow extensions to be installed. Firefox does have some limited support for addons, but it can’t open local XPI files. Its addon menu doesn’t contain the addon and the addon website for it sees the running browser as incompatible.
Luckily you have Kiwi Browser, which is a Chrome based browser that did not disable extensions to be installed.
Once Kiwi is installed you can go to either chrome://extensions or kiwi://extensions, enable Developer mode and then open the zip file as explained in the Readme.md.
ps. For Sailfish I had to install an older version of Kiwi Browser, as the most recent version doesn’t seem to work.
A lot of people have or are buying those cheap inflatable Bestway hottubs.
A lot of people have in the past realized after about half a year of continuous running that the water pump unit is of very low quality.
I have been running my Bestway hottub for about five or six years now. Because of this low quality I had to enroll myself into the world of Bestway parts and repairs. I regularly had and have to repair various things about my Bestway hottub. Usually something about the water pump unit.
Last time, in 2019, it was the water flow sensor. Being a good engineer, I of course hacked it. I have also bought one time a second hand infamous #58113 motor (the number is already infamous and known in the Bestway parts community).
Today I had the ER02 error back. No water flow. But after some testing I knew that it was not the water flow sensor this time. Then it’s probably the motor itself. These #58113 motors often have it that their impeller comes loose inside of the motor.
Instead of ordering either a new impeller or a new motor, I decided to investigate it this time. And try to figure out what the engineering mistake is that the person who designed this motor made.
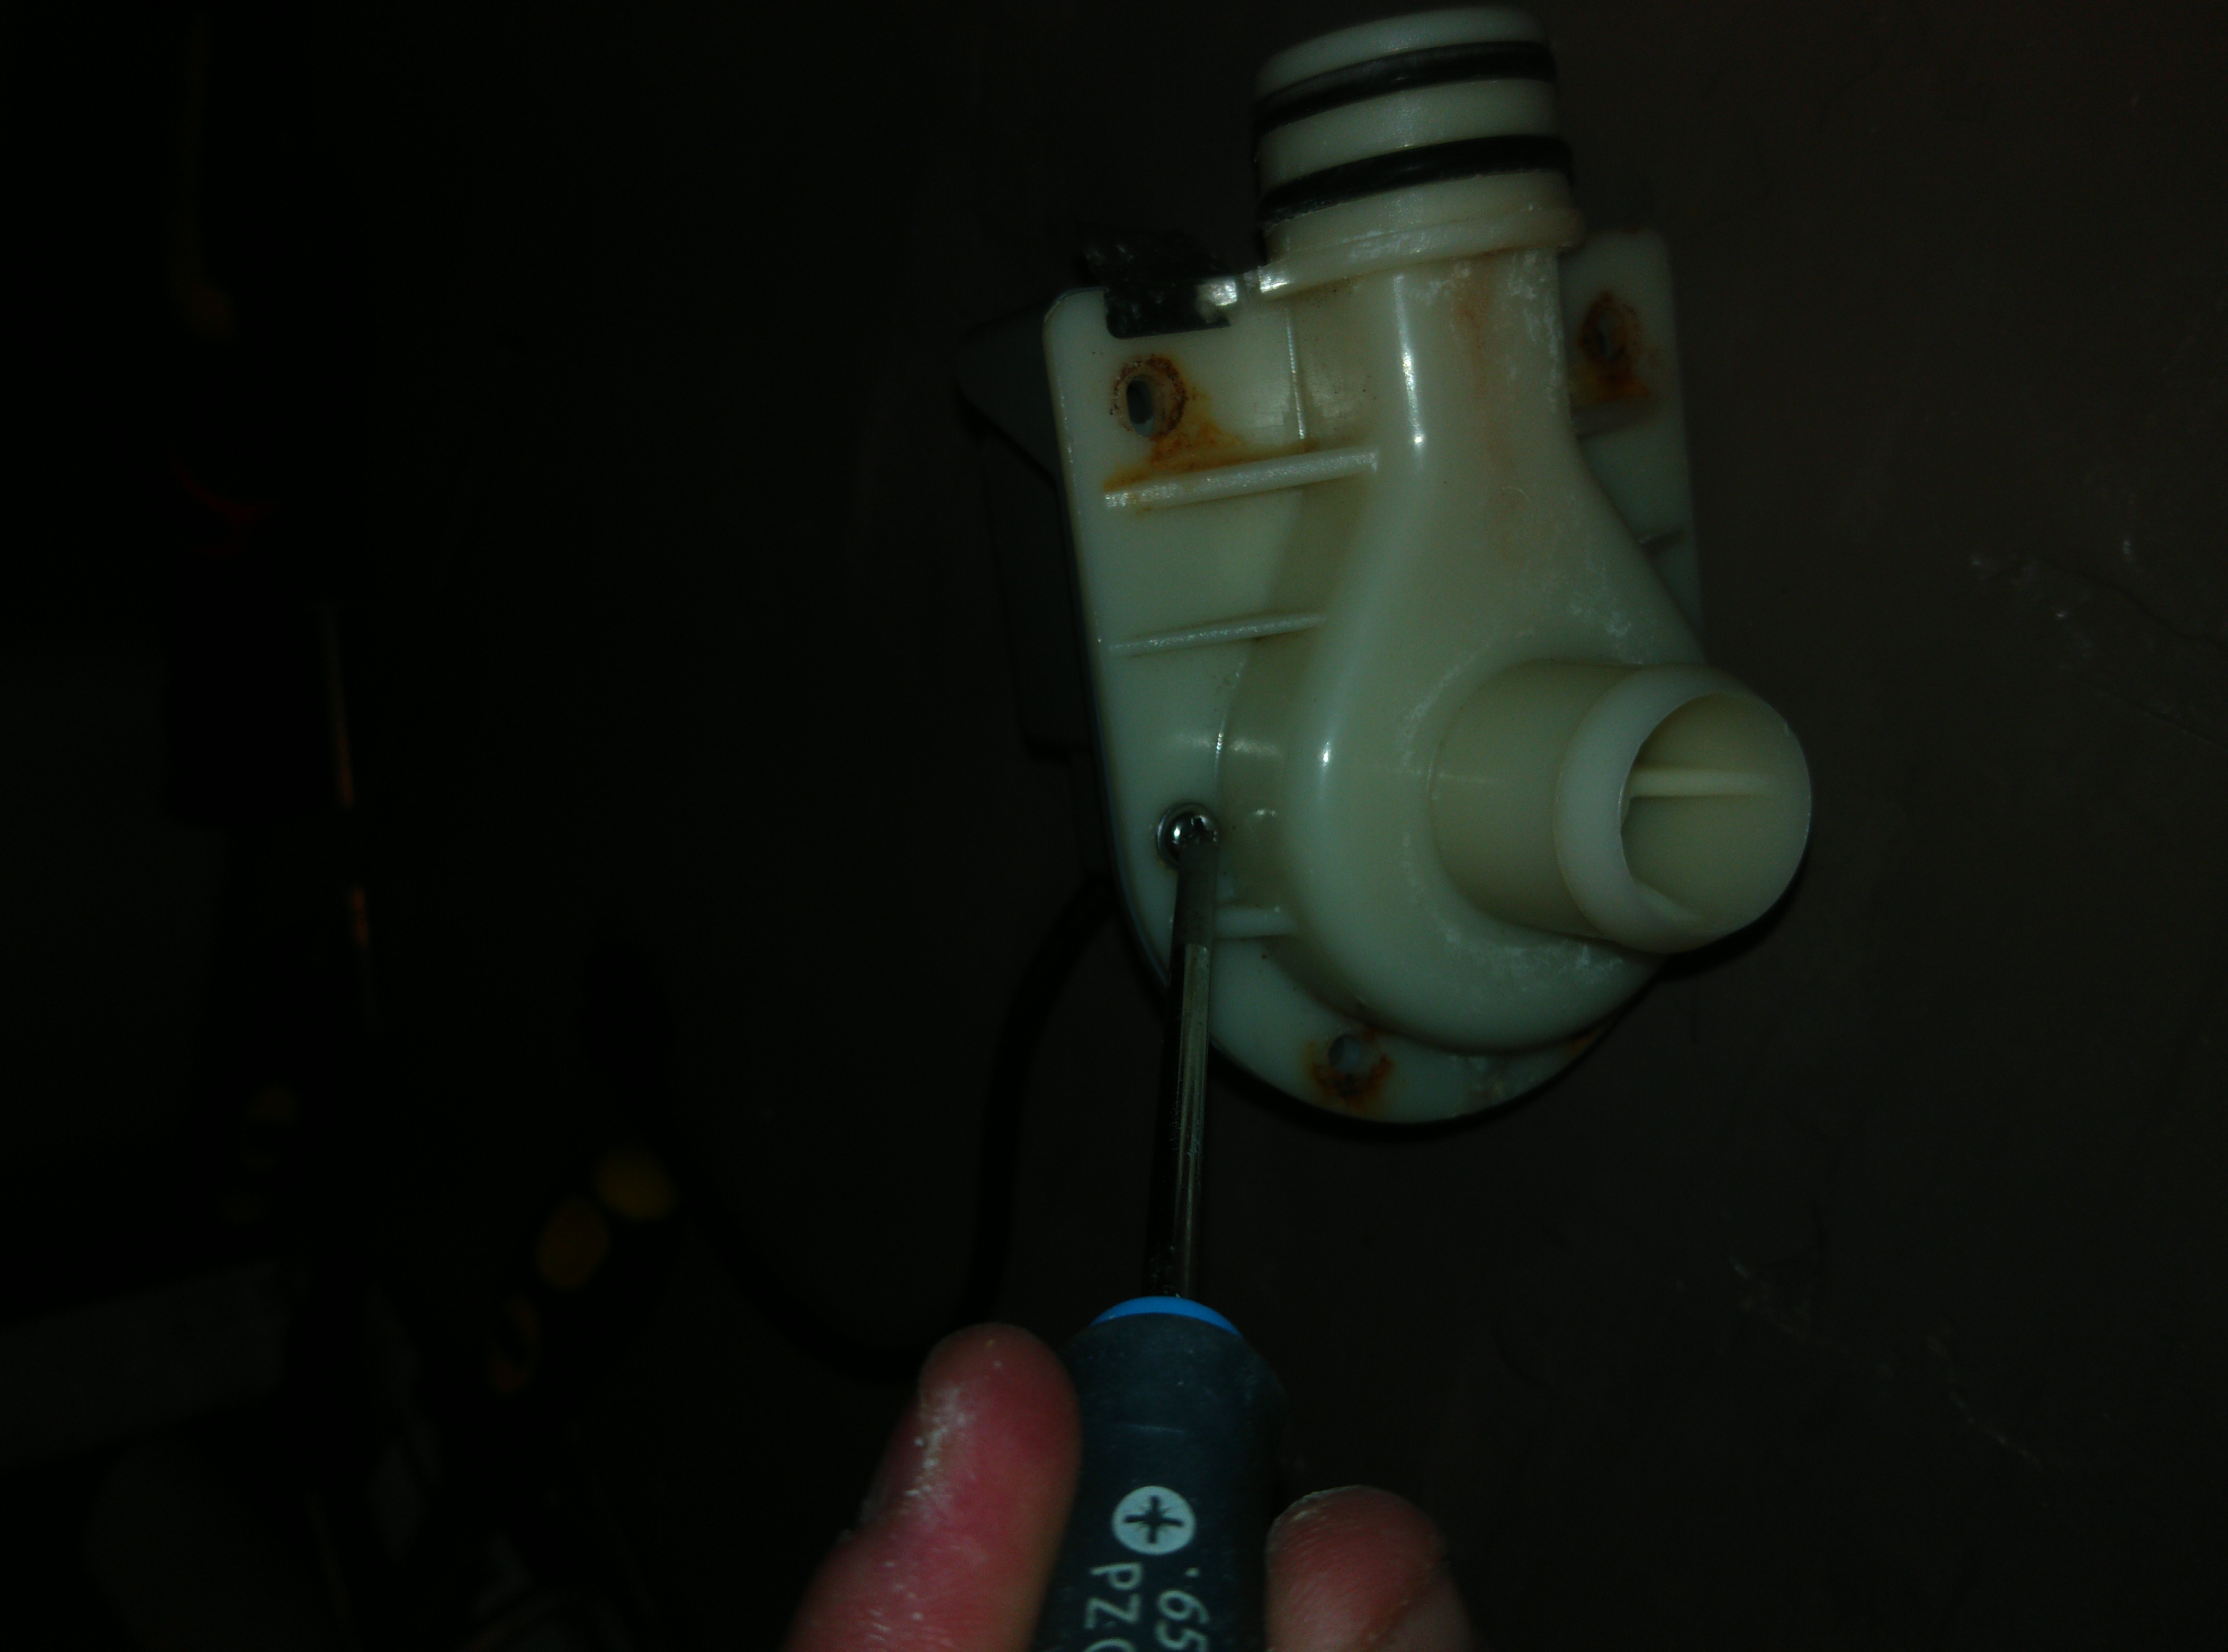
Getting the motor out is probably already plenty challenging for most owners of a Lay-Z-Spa. It’s not too complicated though: turn the motor pump upside down. Take off the bottom panel. Loosen two screws of the motor. Disconnect the electric cable. Pull the motor out. For the motor you don’t need to open the top of the water pump unit. If your problem is the water flow sensor, then you do need to open the top instead.
I found out what is wrong about the motor (the rubber bearings are just cheap) and I will now present a hack that you can do to salvage your Bestway #58113 motor with four cheap washers that will keep the impeller better in place.
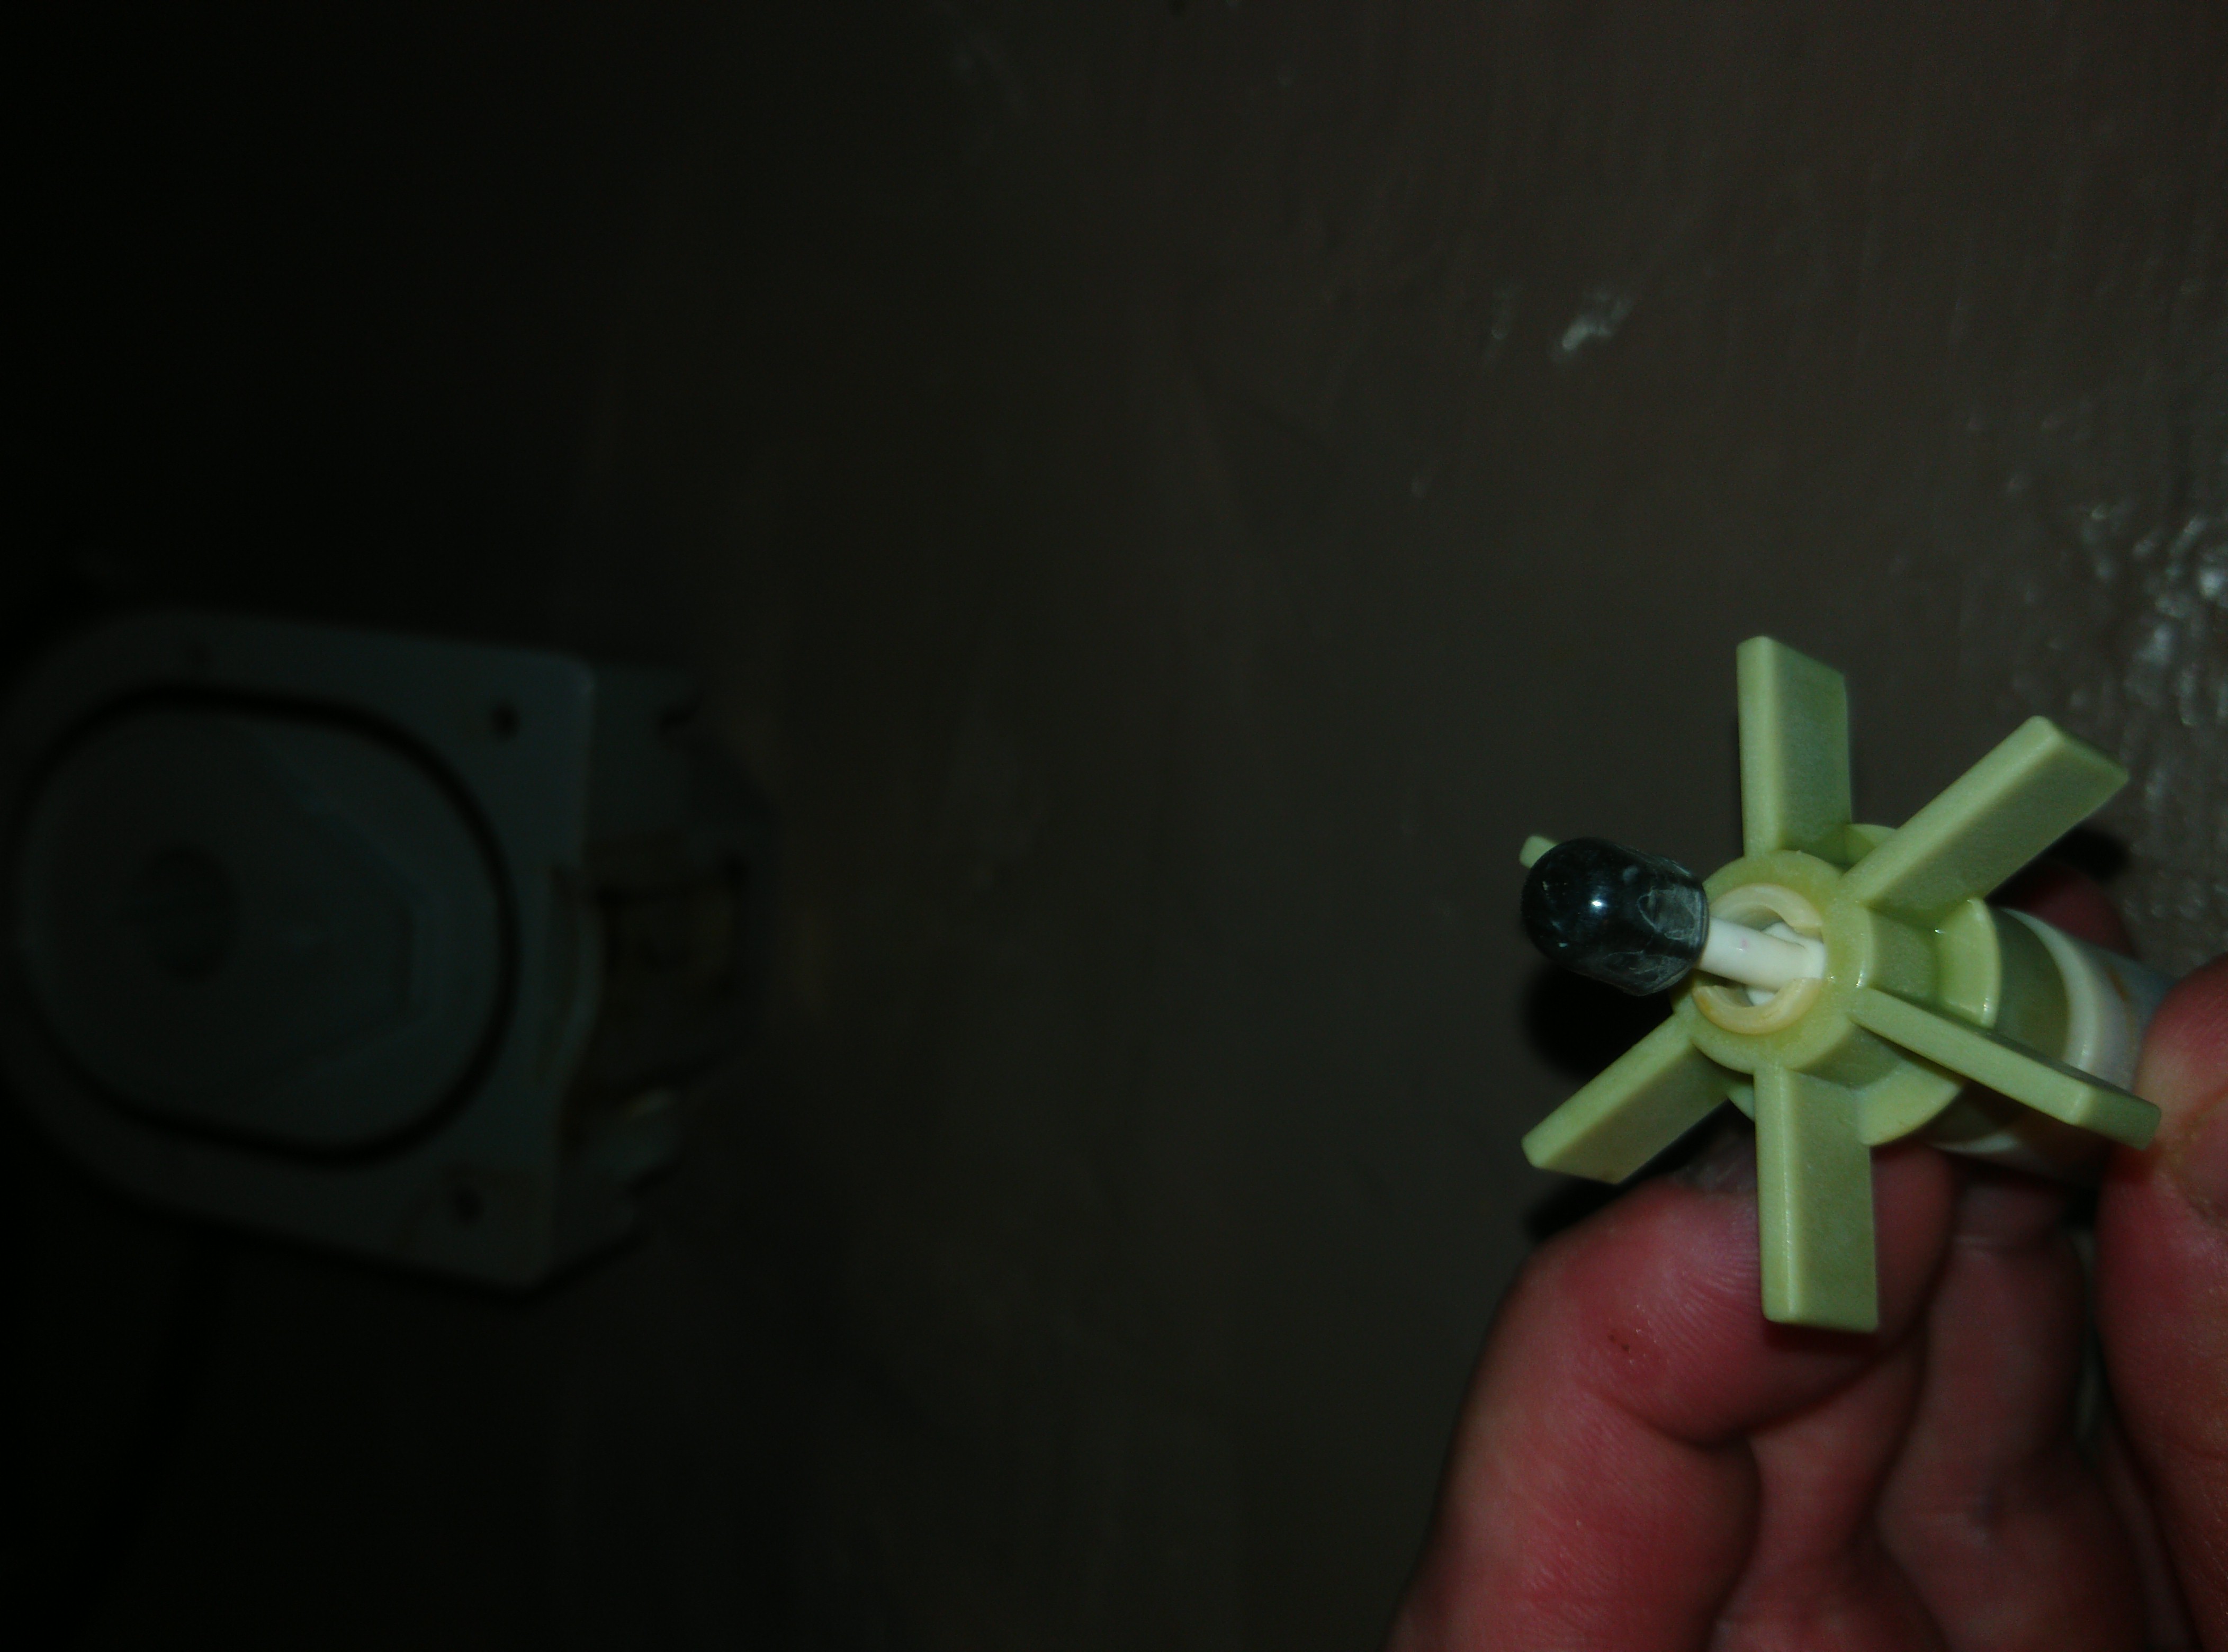
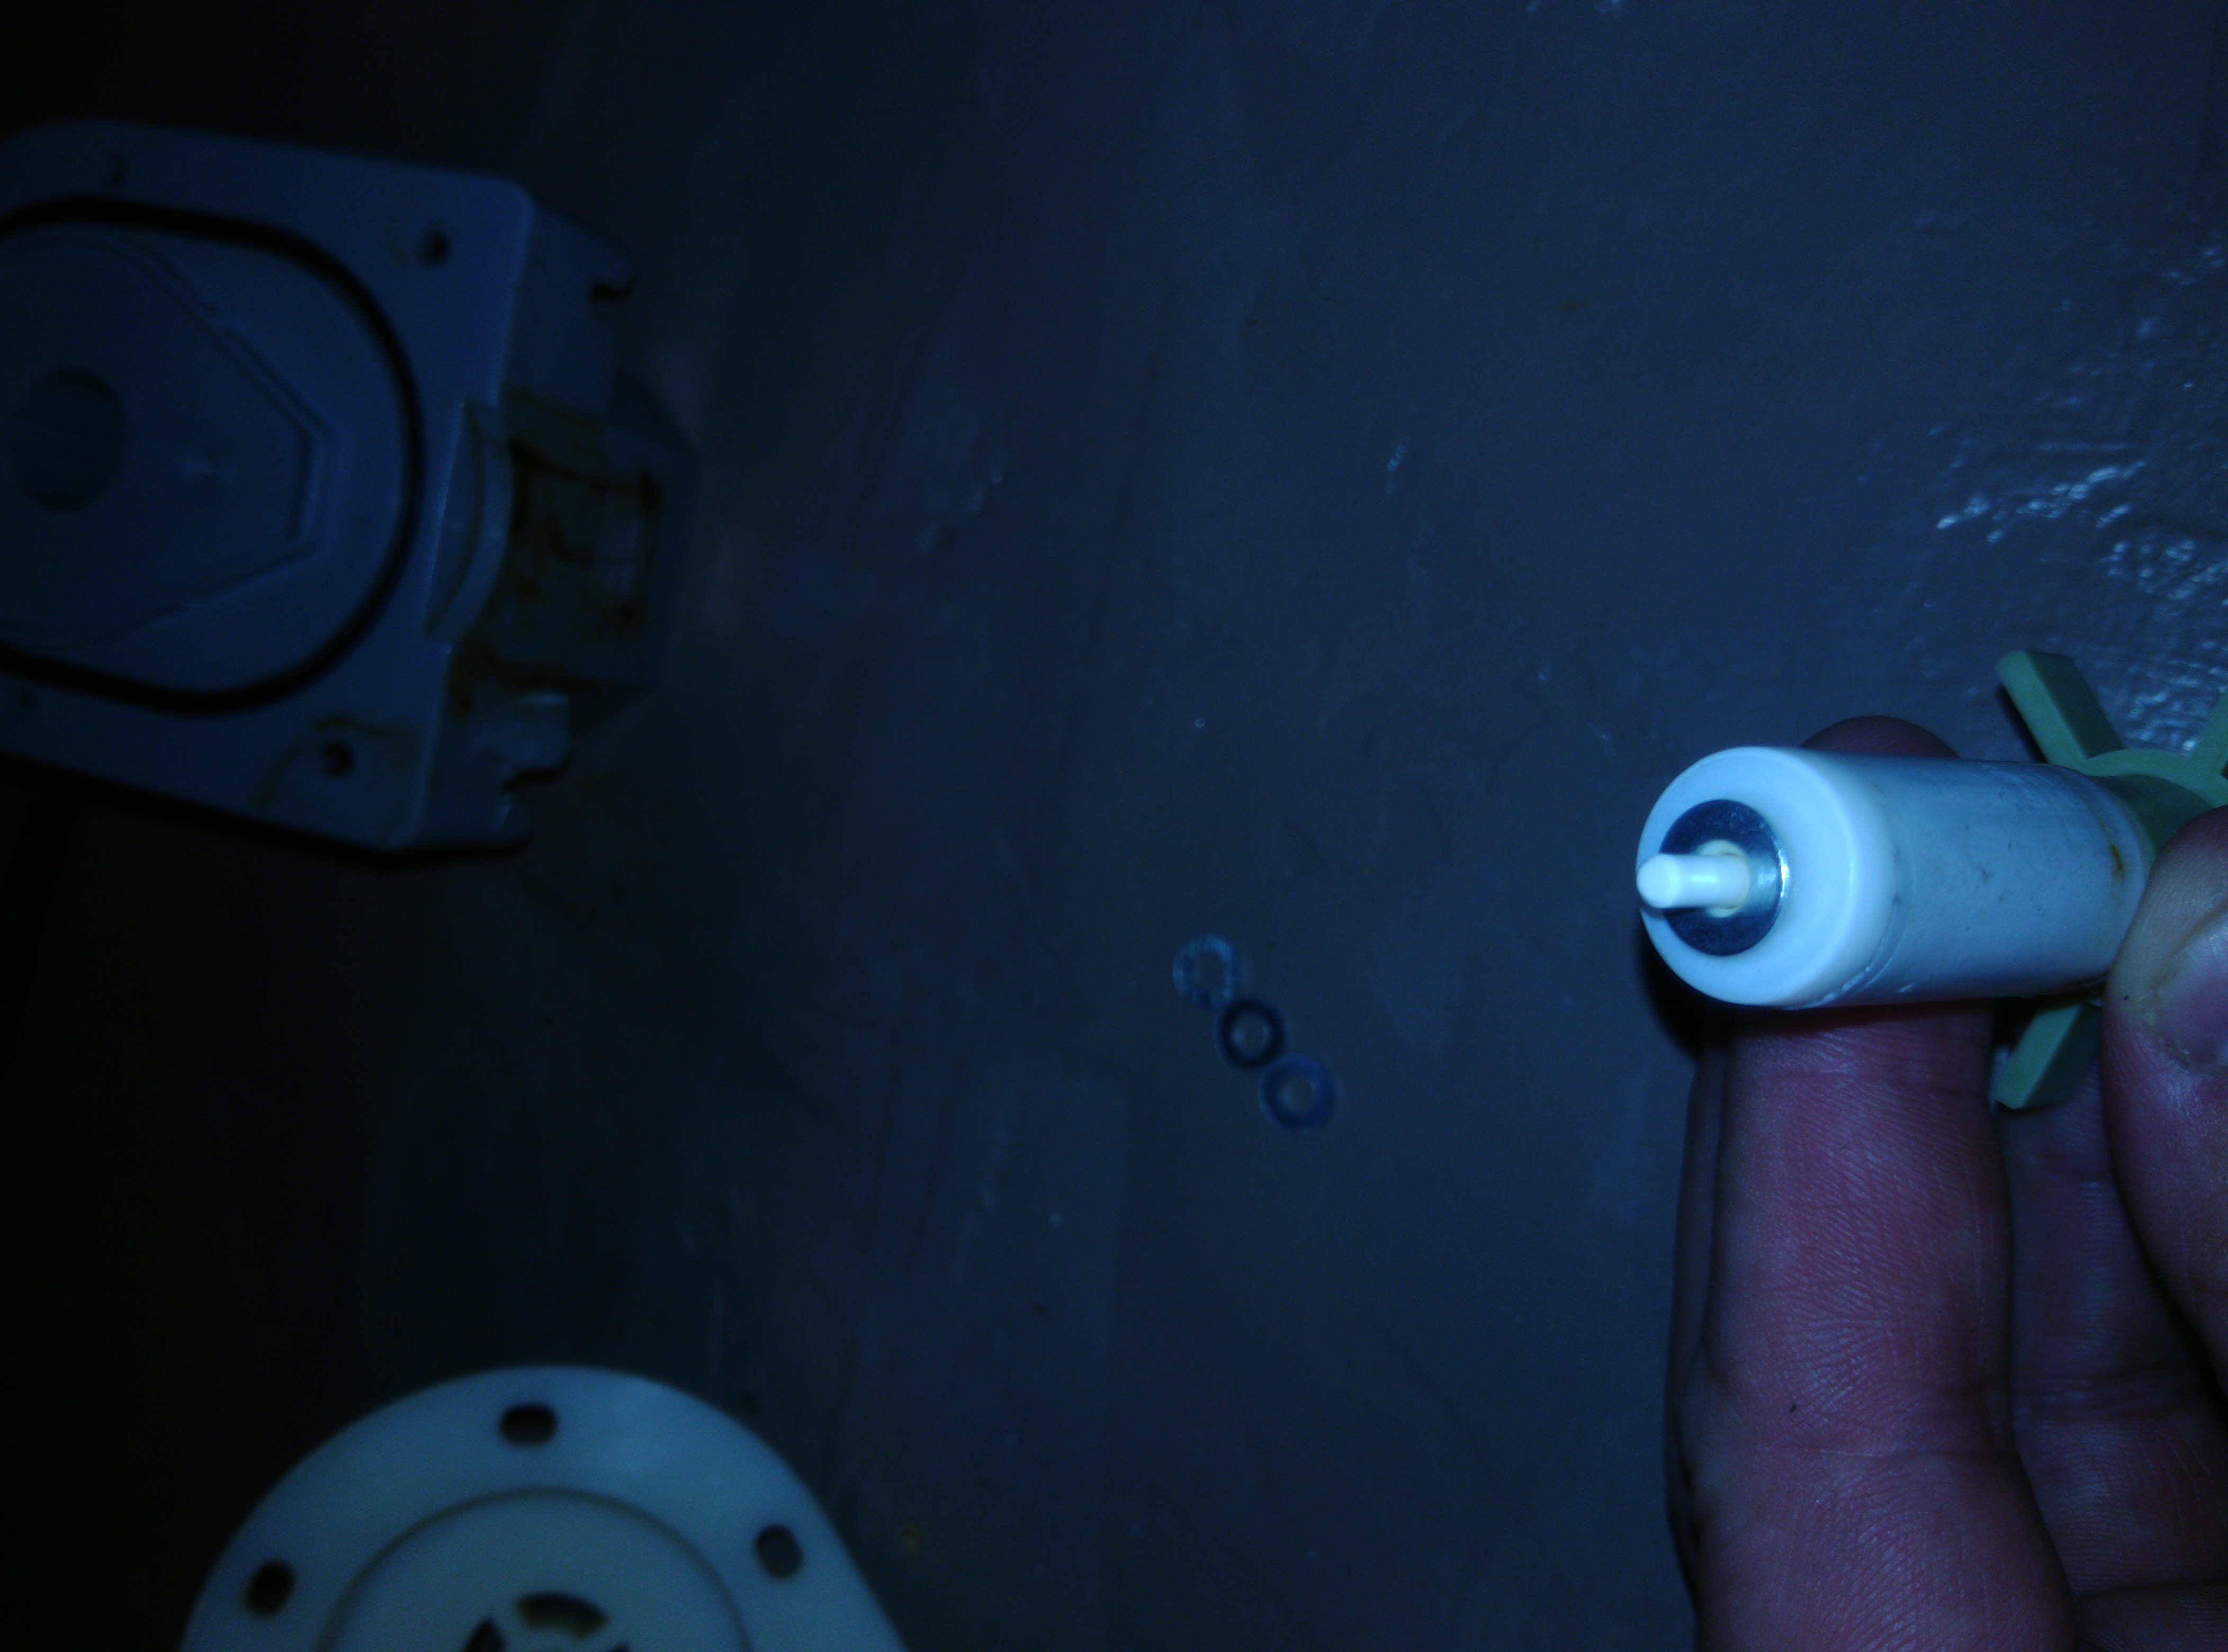
Here you have the impeller (or/plus commutator) and the rubber “bearing” for it (in background the disassembled stator):

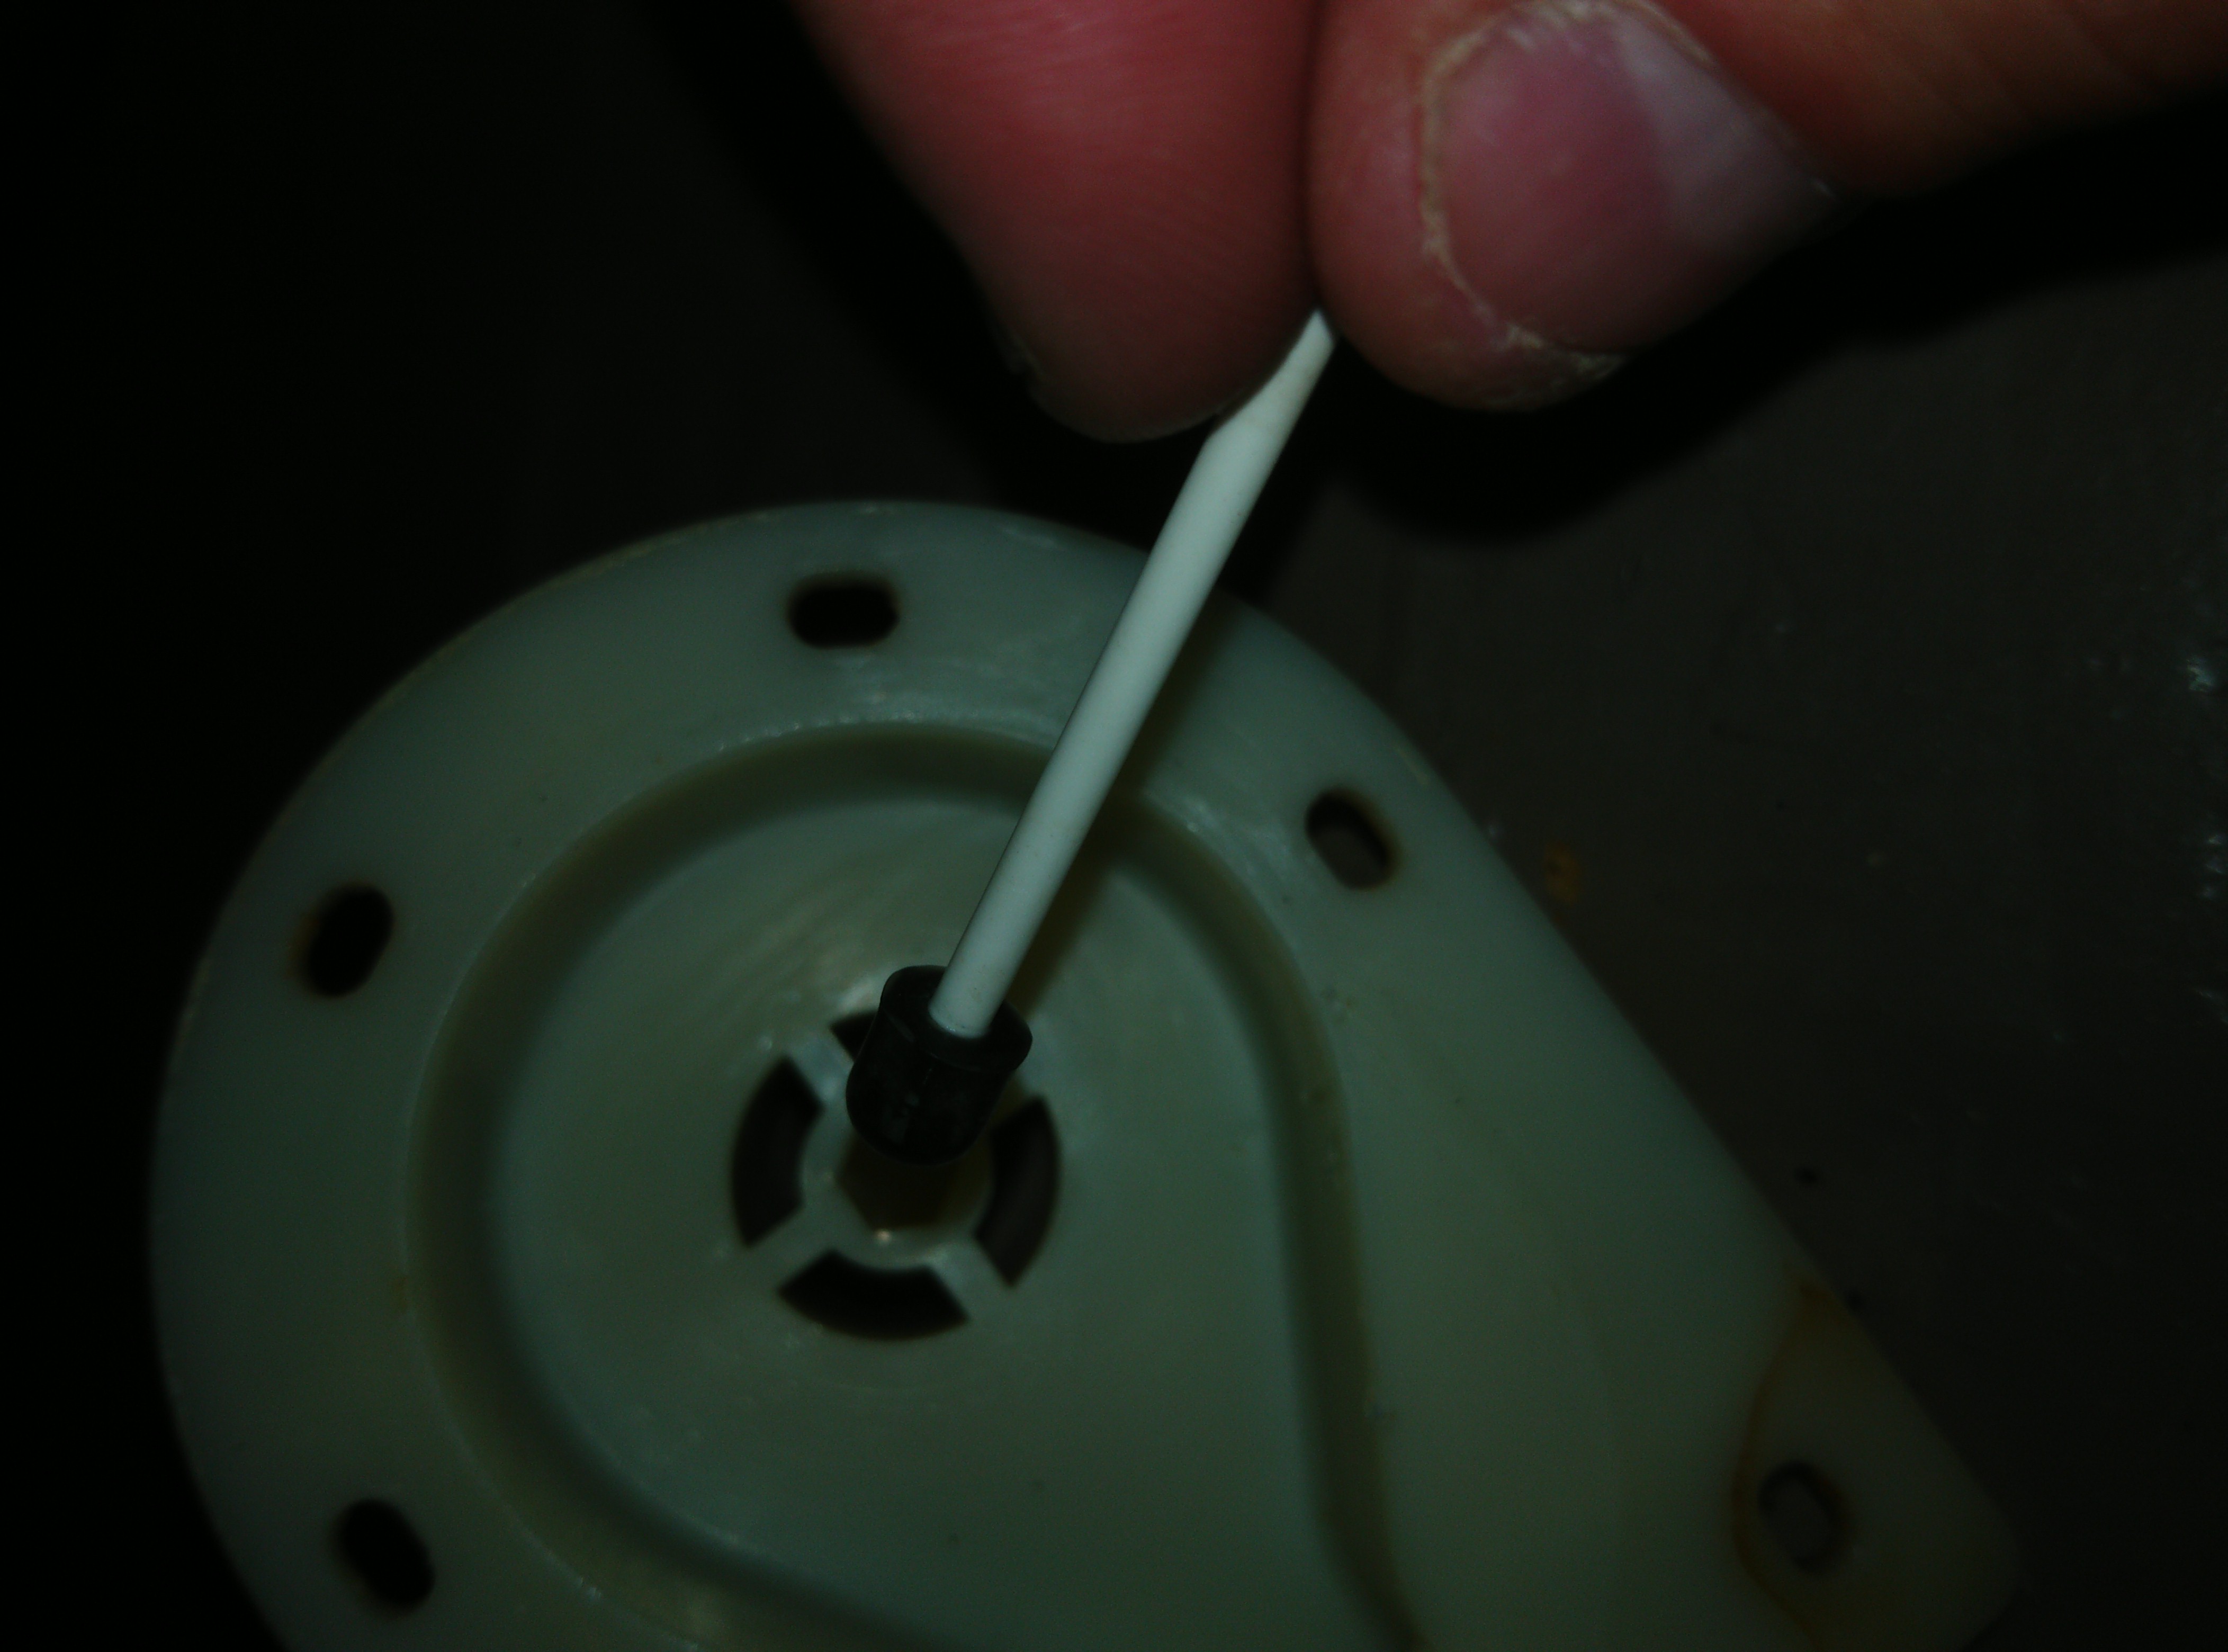
And this is the shaft and again that rubber “bearing”. The shaft will go through the middle of the impeller (plus commutator) and at the ends two of those rubber bearings go to keep the shaft nicely centered. All this is plastic. Super low quality. Almost guaranteed to fail after a few months of operation.

This is the stator. One of those rubber bearings must go in the middle of it. And then the shaft in the bearing. Keep the rubber seal good. Else when reassembling the motor water will splash all over the place. This is not good.
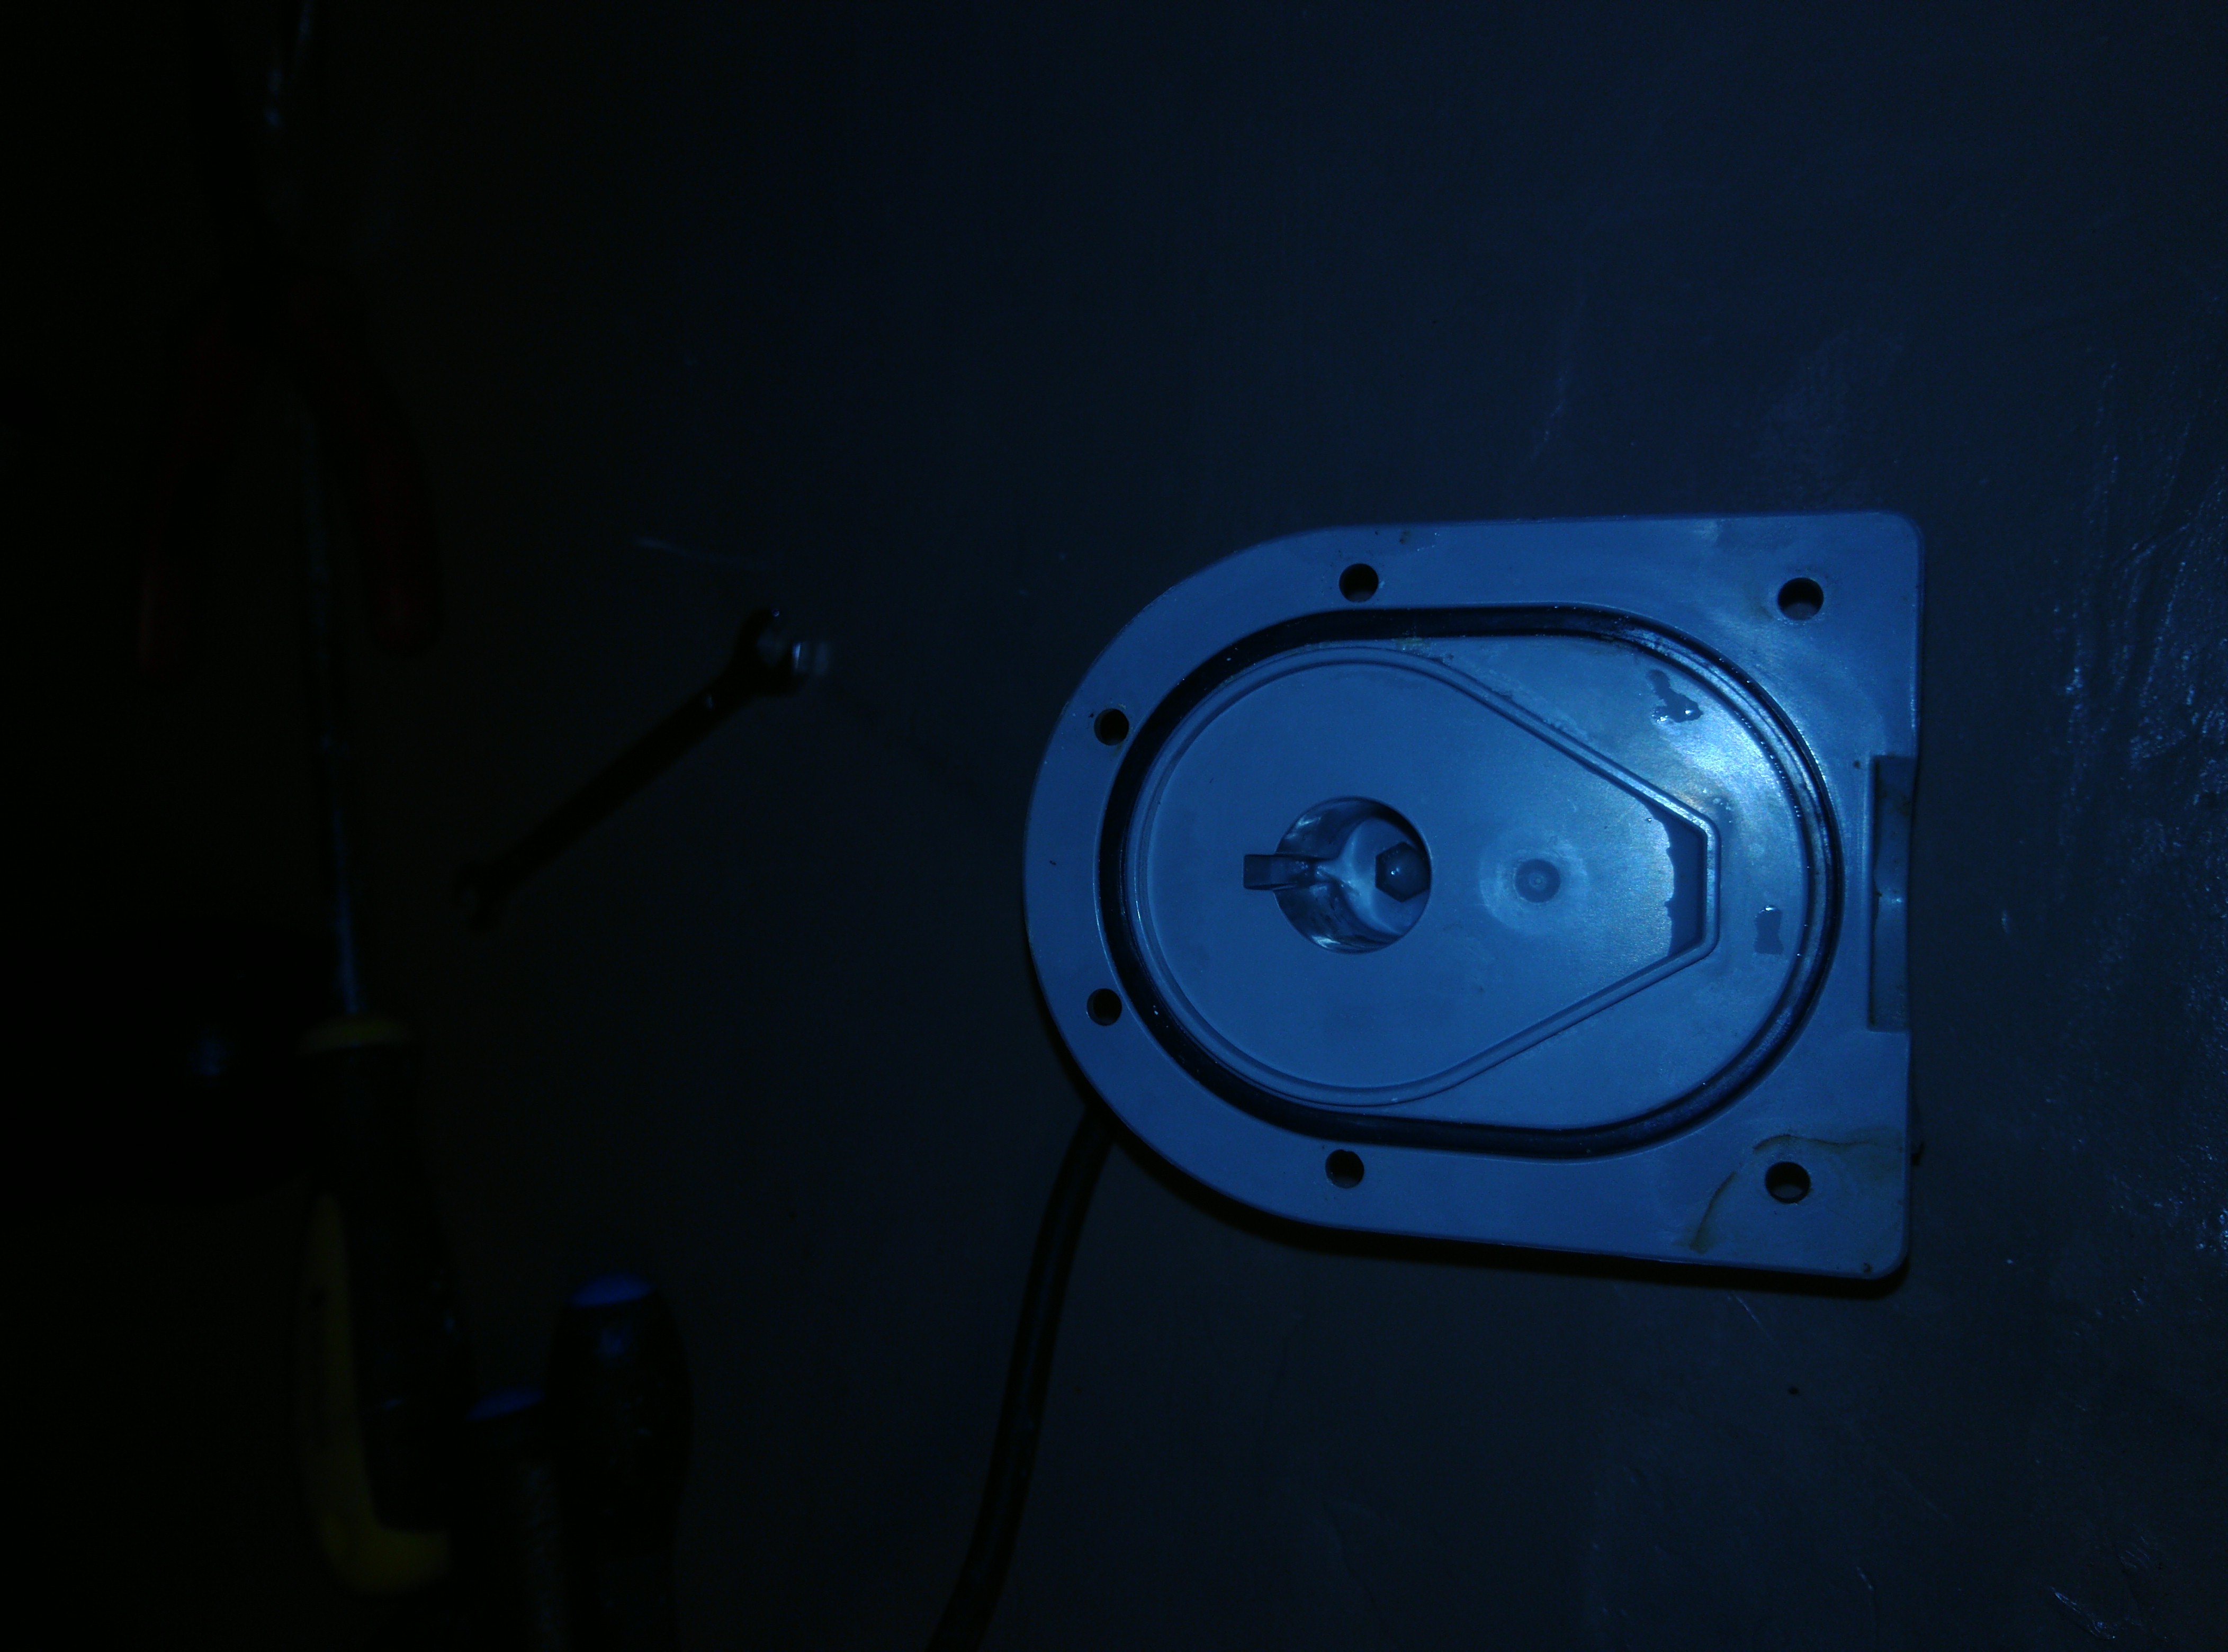
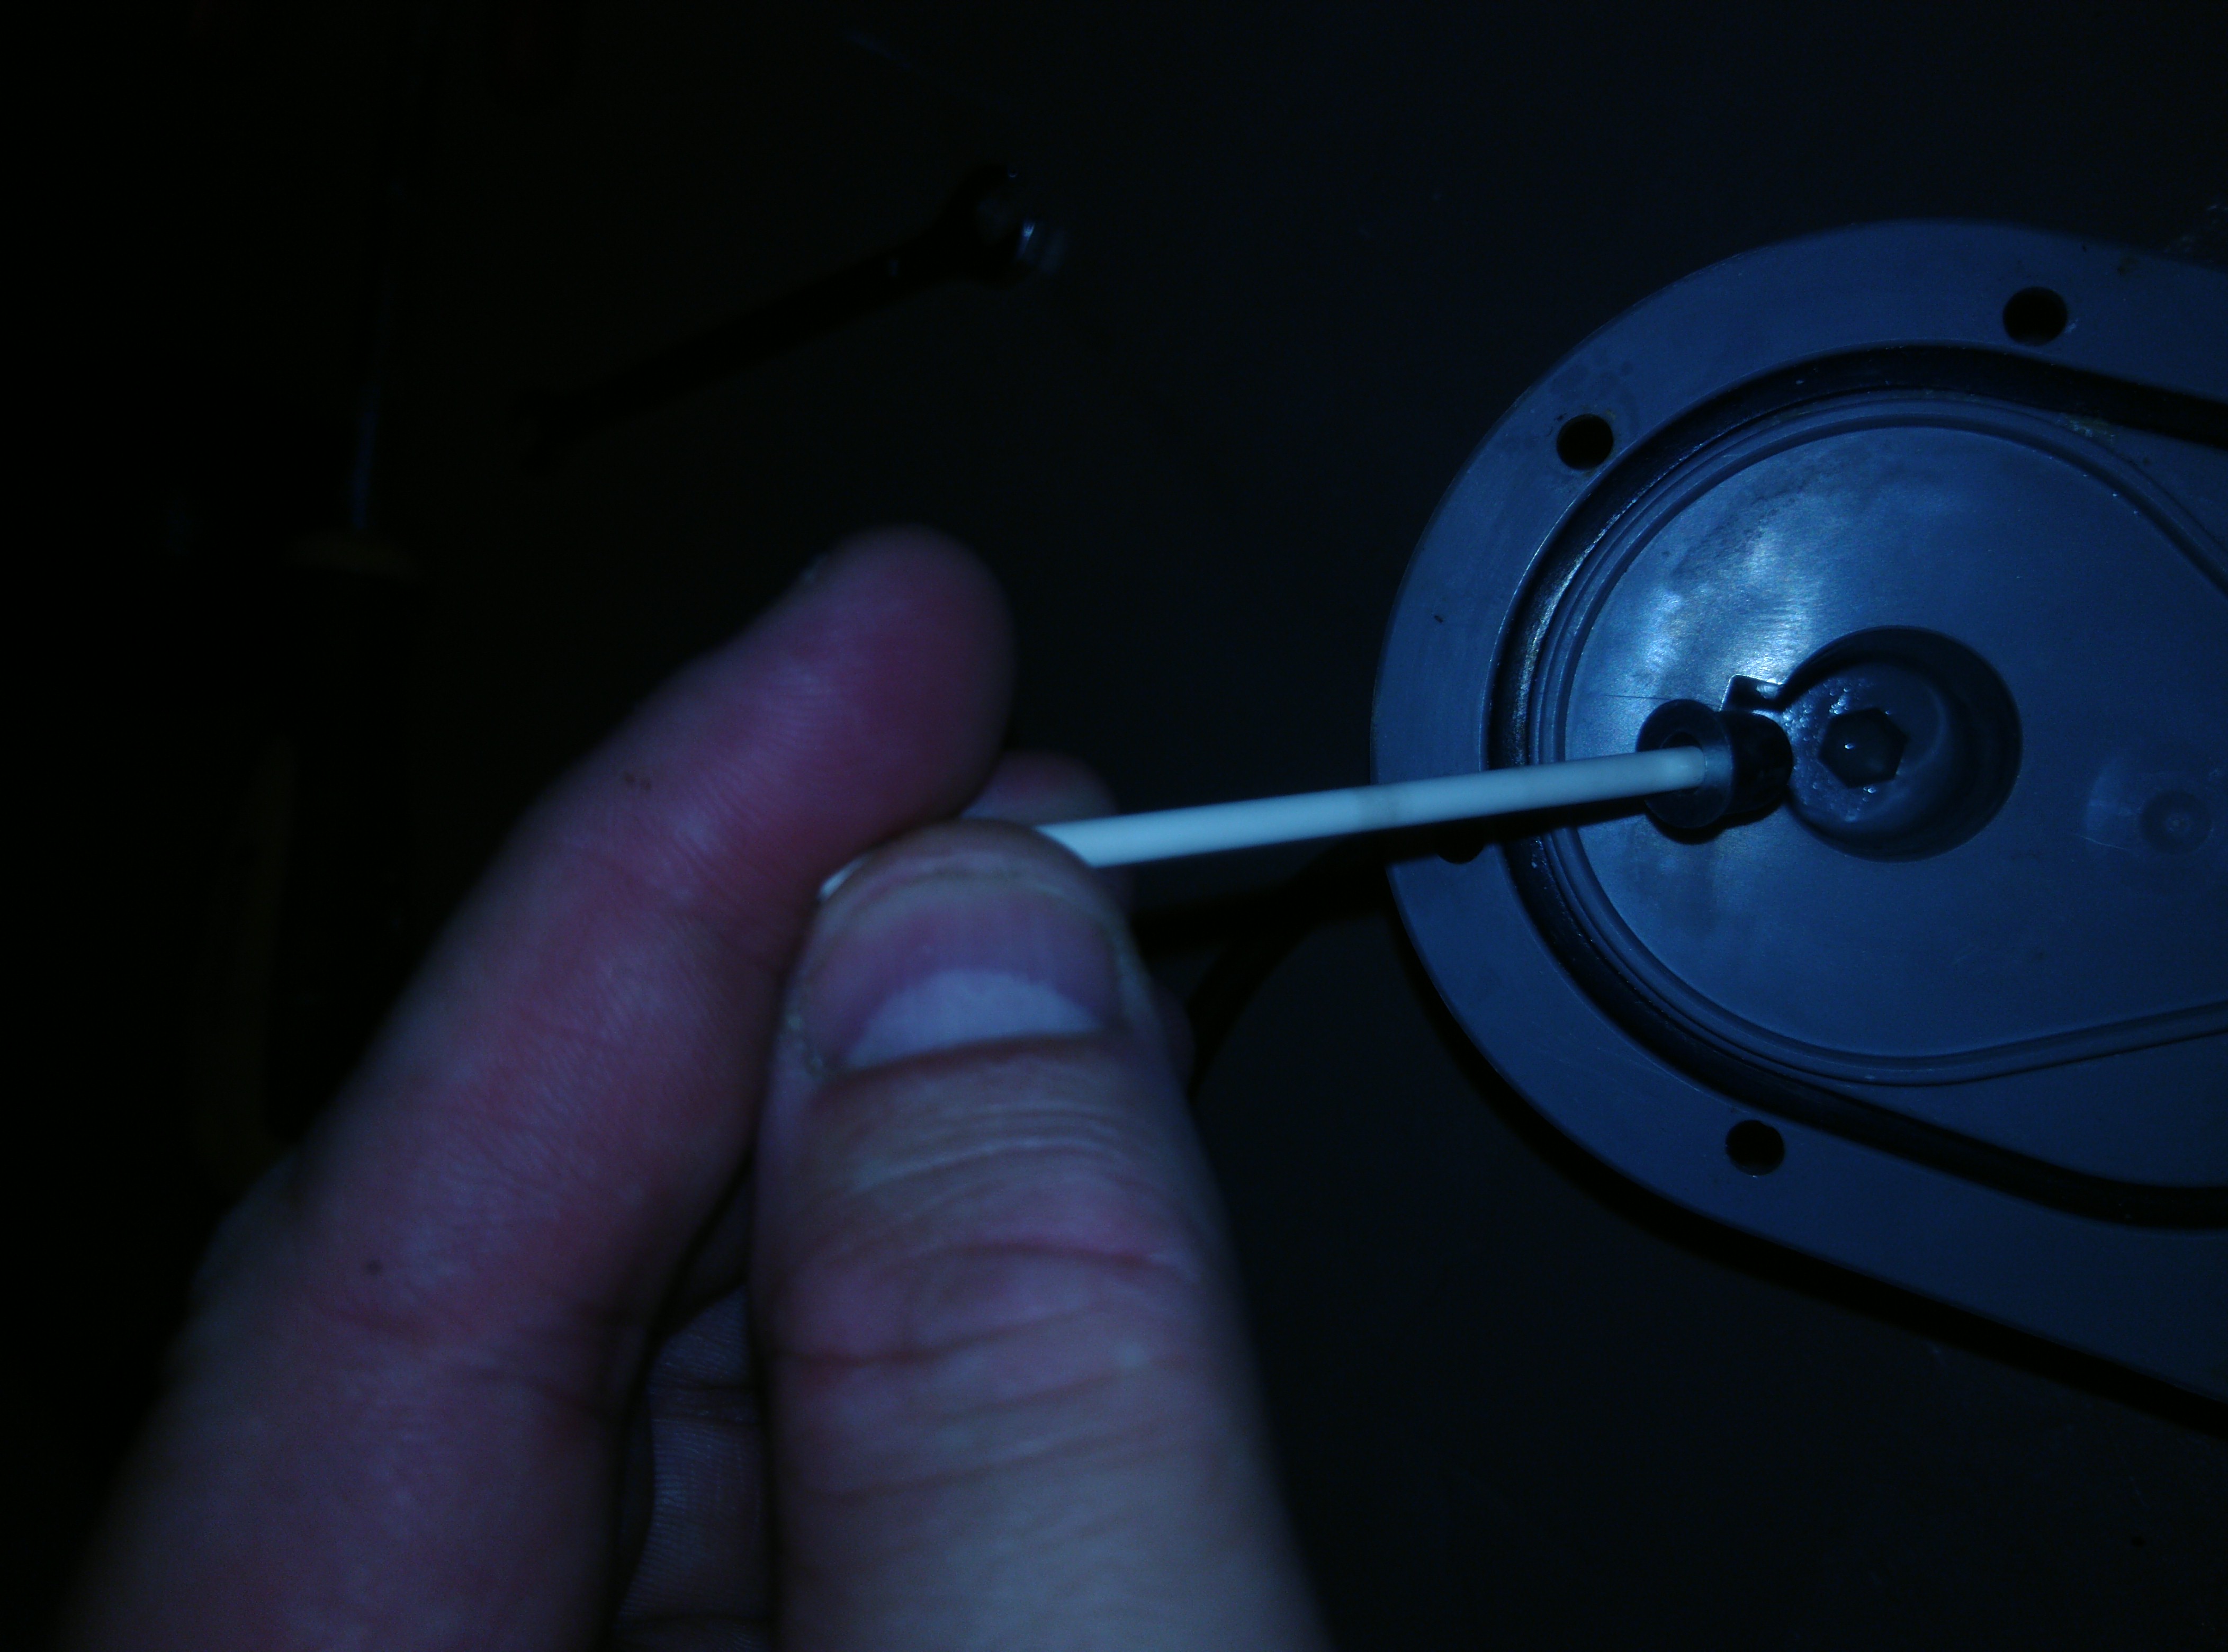
This picture illustrates how the shaft goes in the rubber bearing and then in the front cap
This picture shows the normal assembly of shaft, impeller (plus commutator) and bearing. Normally there is a by the factory added washer too. But mine was completely gone. Debris of it was found in the commutator. This shows how low quality this piece of shit is. This of course should never happen.
This will be the hack. We will place three simple washers on the shaft between the impeller and the bearing.
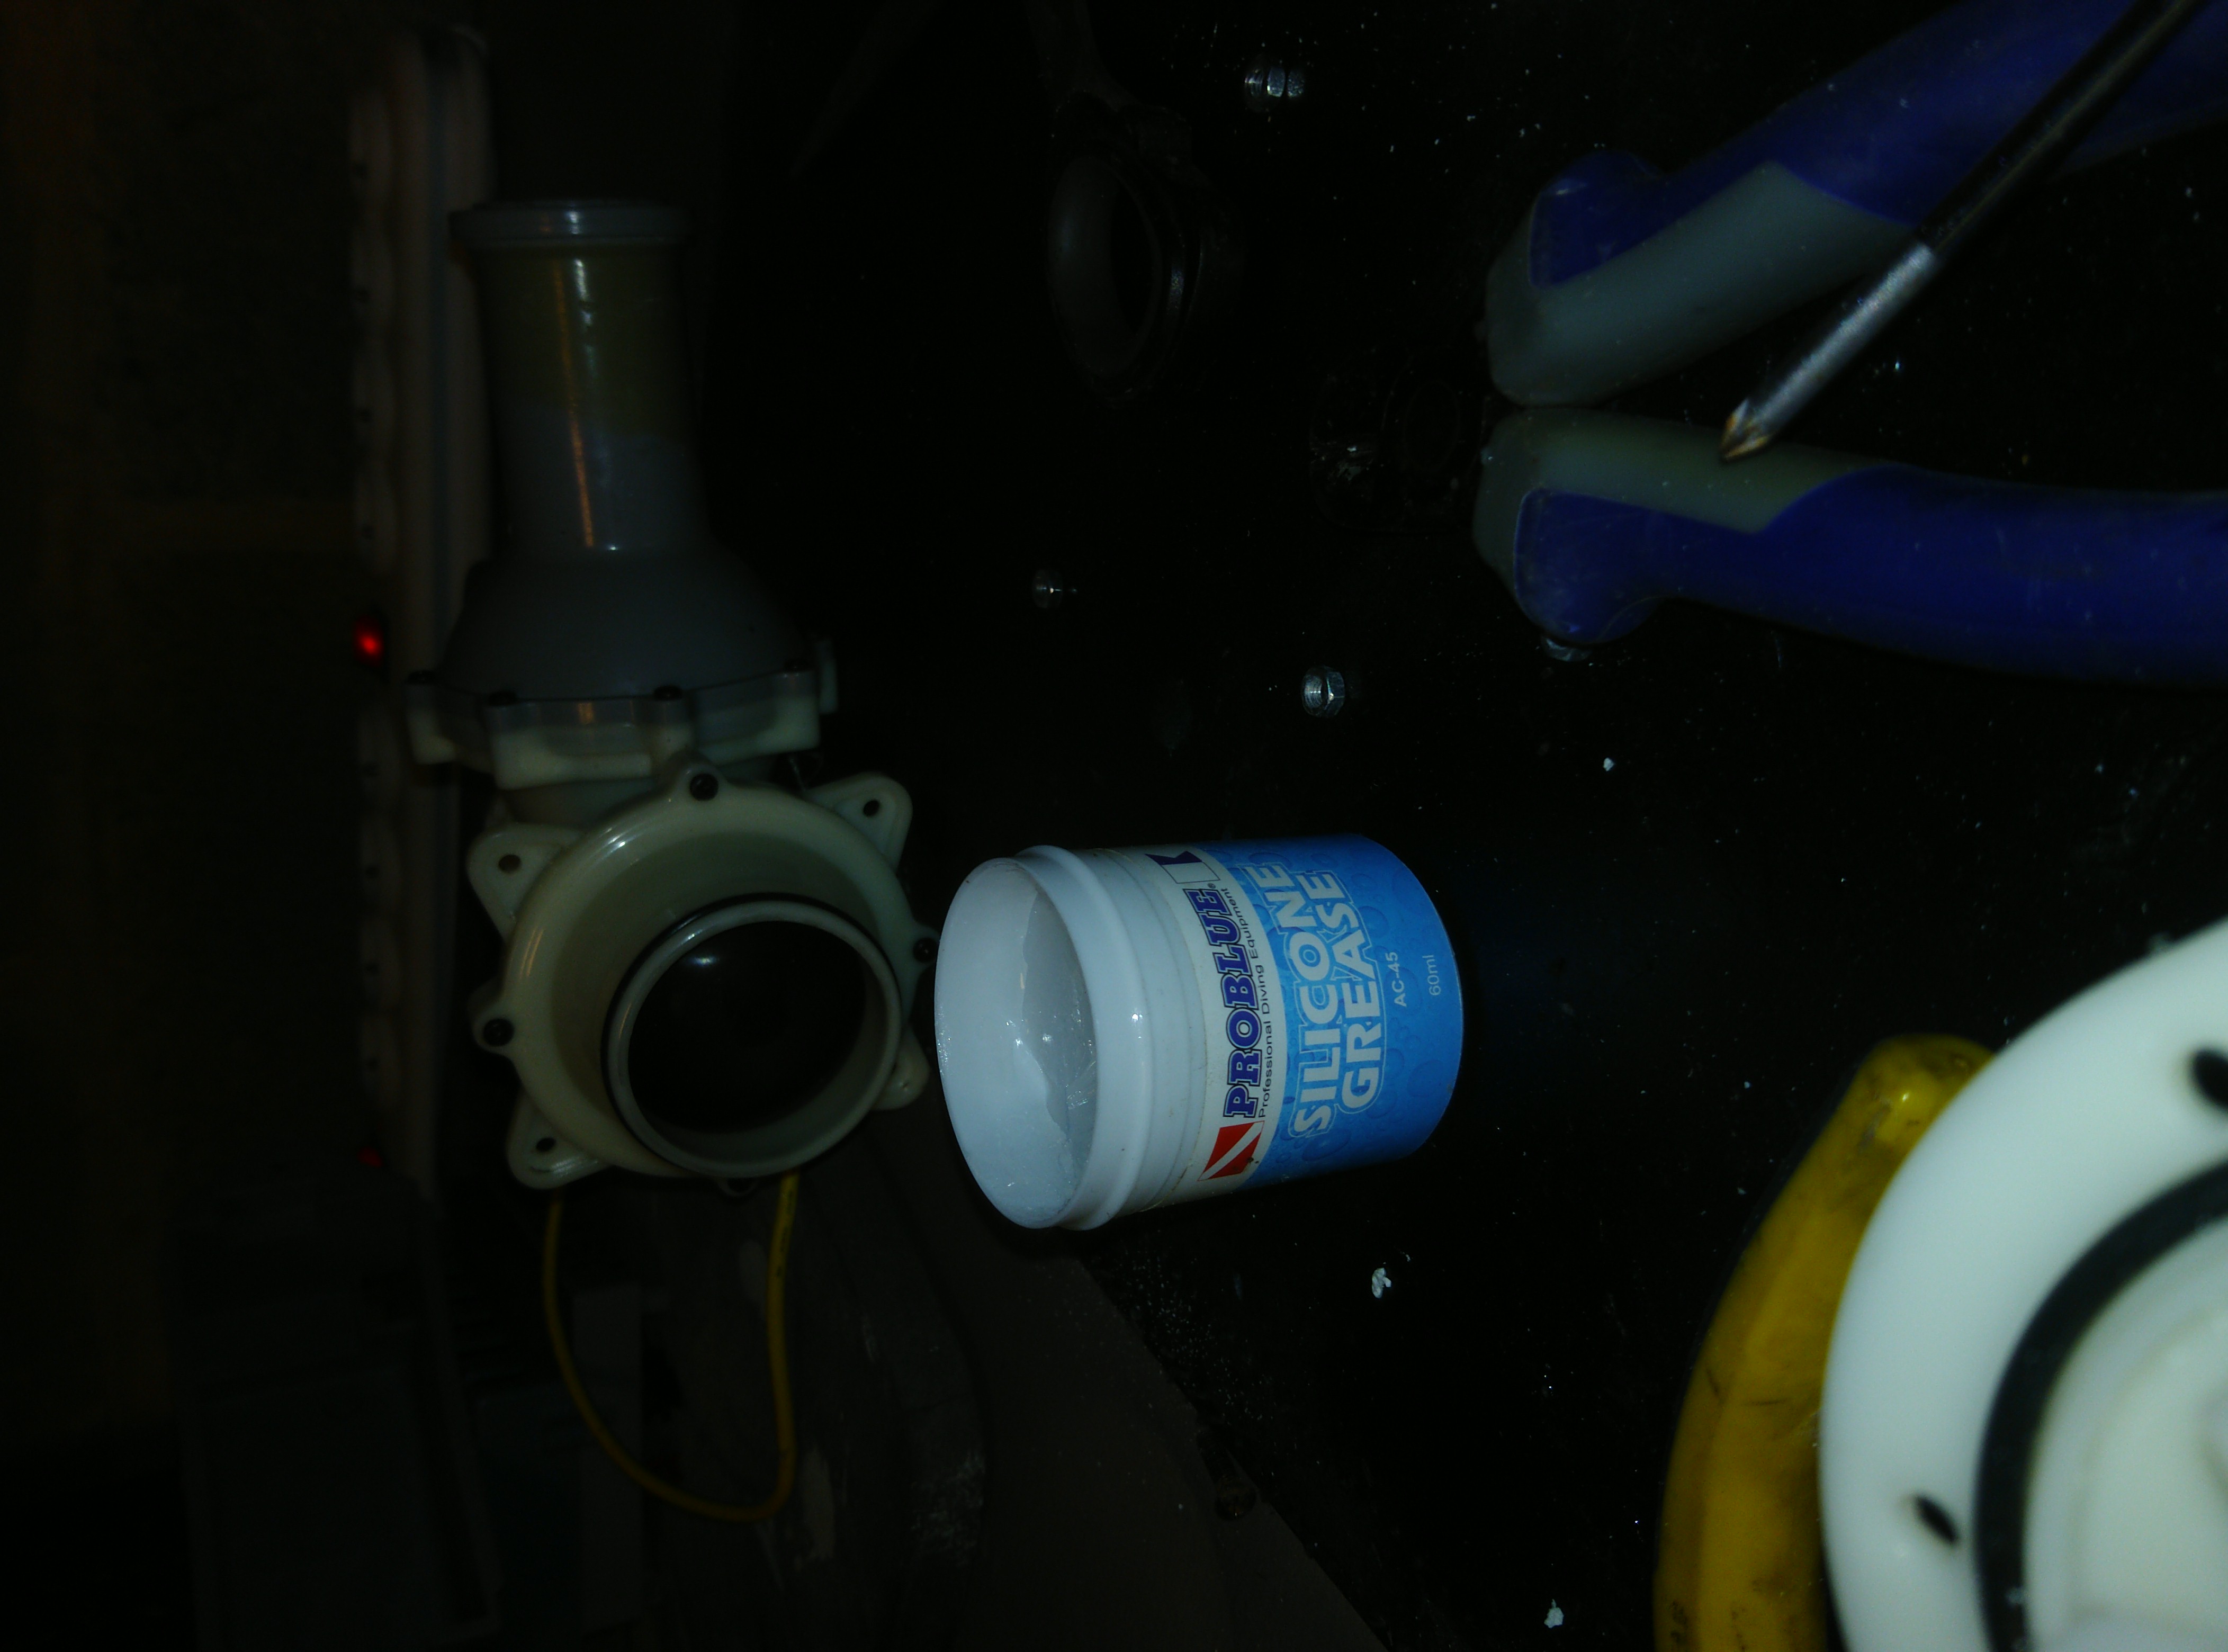
Update: After a first inspection after two days of running with the washers I noticed that although the washers claim to be stainless steel, I saw and I realized that all steel eventually rusts. I made a little plastic washer instead and I greased it with silicone grease that I once bought to grease the seal of my Scuba dry suite.
This is the plastic washer I made to replace the metallic ones, with that grease applied:

This is that silicone grease. I greased the entire shaft with it too:
This will once reassembled keep the entire assembly (bearings, shaft, commutator) tighter together with the stator. Without these three washers the plastic washer, the whole thing starts wiggling and eventually comes loose. Impeller will become erratic and destroys the washer (in my case) and likely also one of the two rubber bearings. After that it’s pretty much game over and you’ll see the ER02 error.
We will also place a washer on the back of the impeller (or commutator) on/over the shaft (update: use the factory provided one). That will look like this (so I’m holding the impeller upside down now). It will fall off if you assemble it upfront. So this is just to show how it will be like once inside of the stator (that or I just made too much pictures, and now I have to write more blog content around it). Front cap, some more washers and stator in the background.
Let’s start assembling it all together. First the shaft with bearing that goes into the hole of the stator. With the factory provided washer. Don’t try to fiddle the impeller together with the shaft into the stator. You’ll just miserably fail due to it all being a bit magnetic of course (it’s an electric motor, remember). Do the shaft with bearing and washer first.
That looks like this (OMG I made too many pictures)
Now we will put the impeller (commutator) over the shaft. Do this gently so that the shaft does not go out of the rubber bearing.
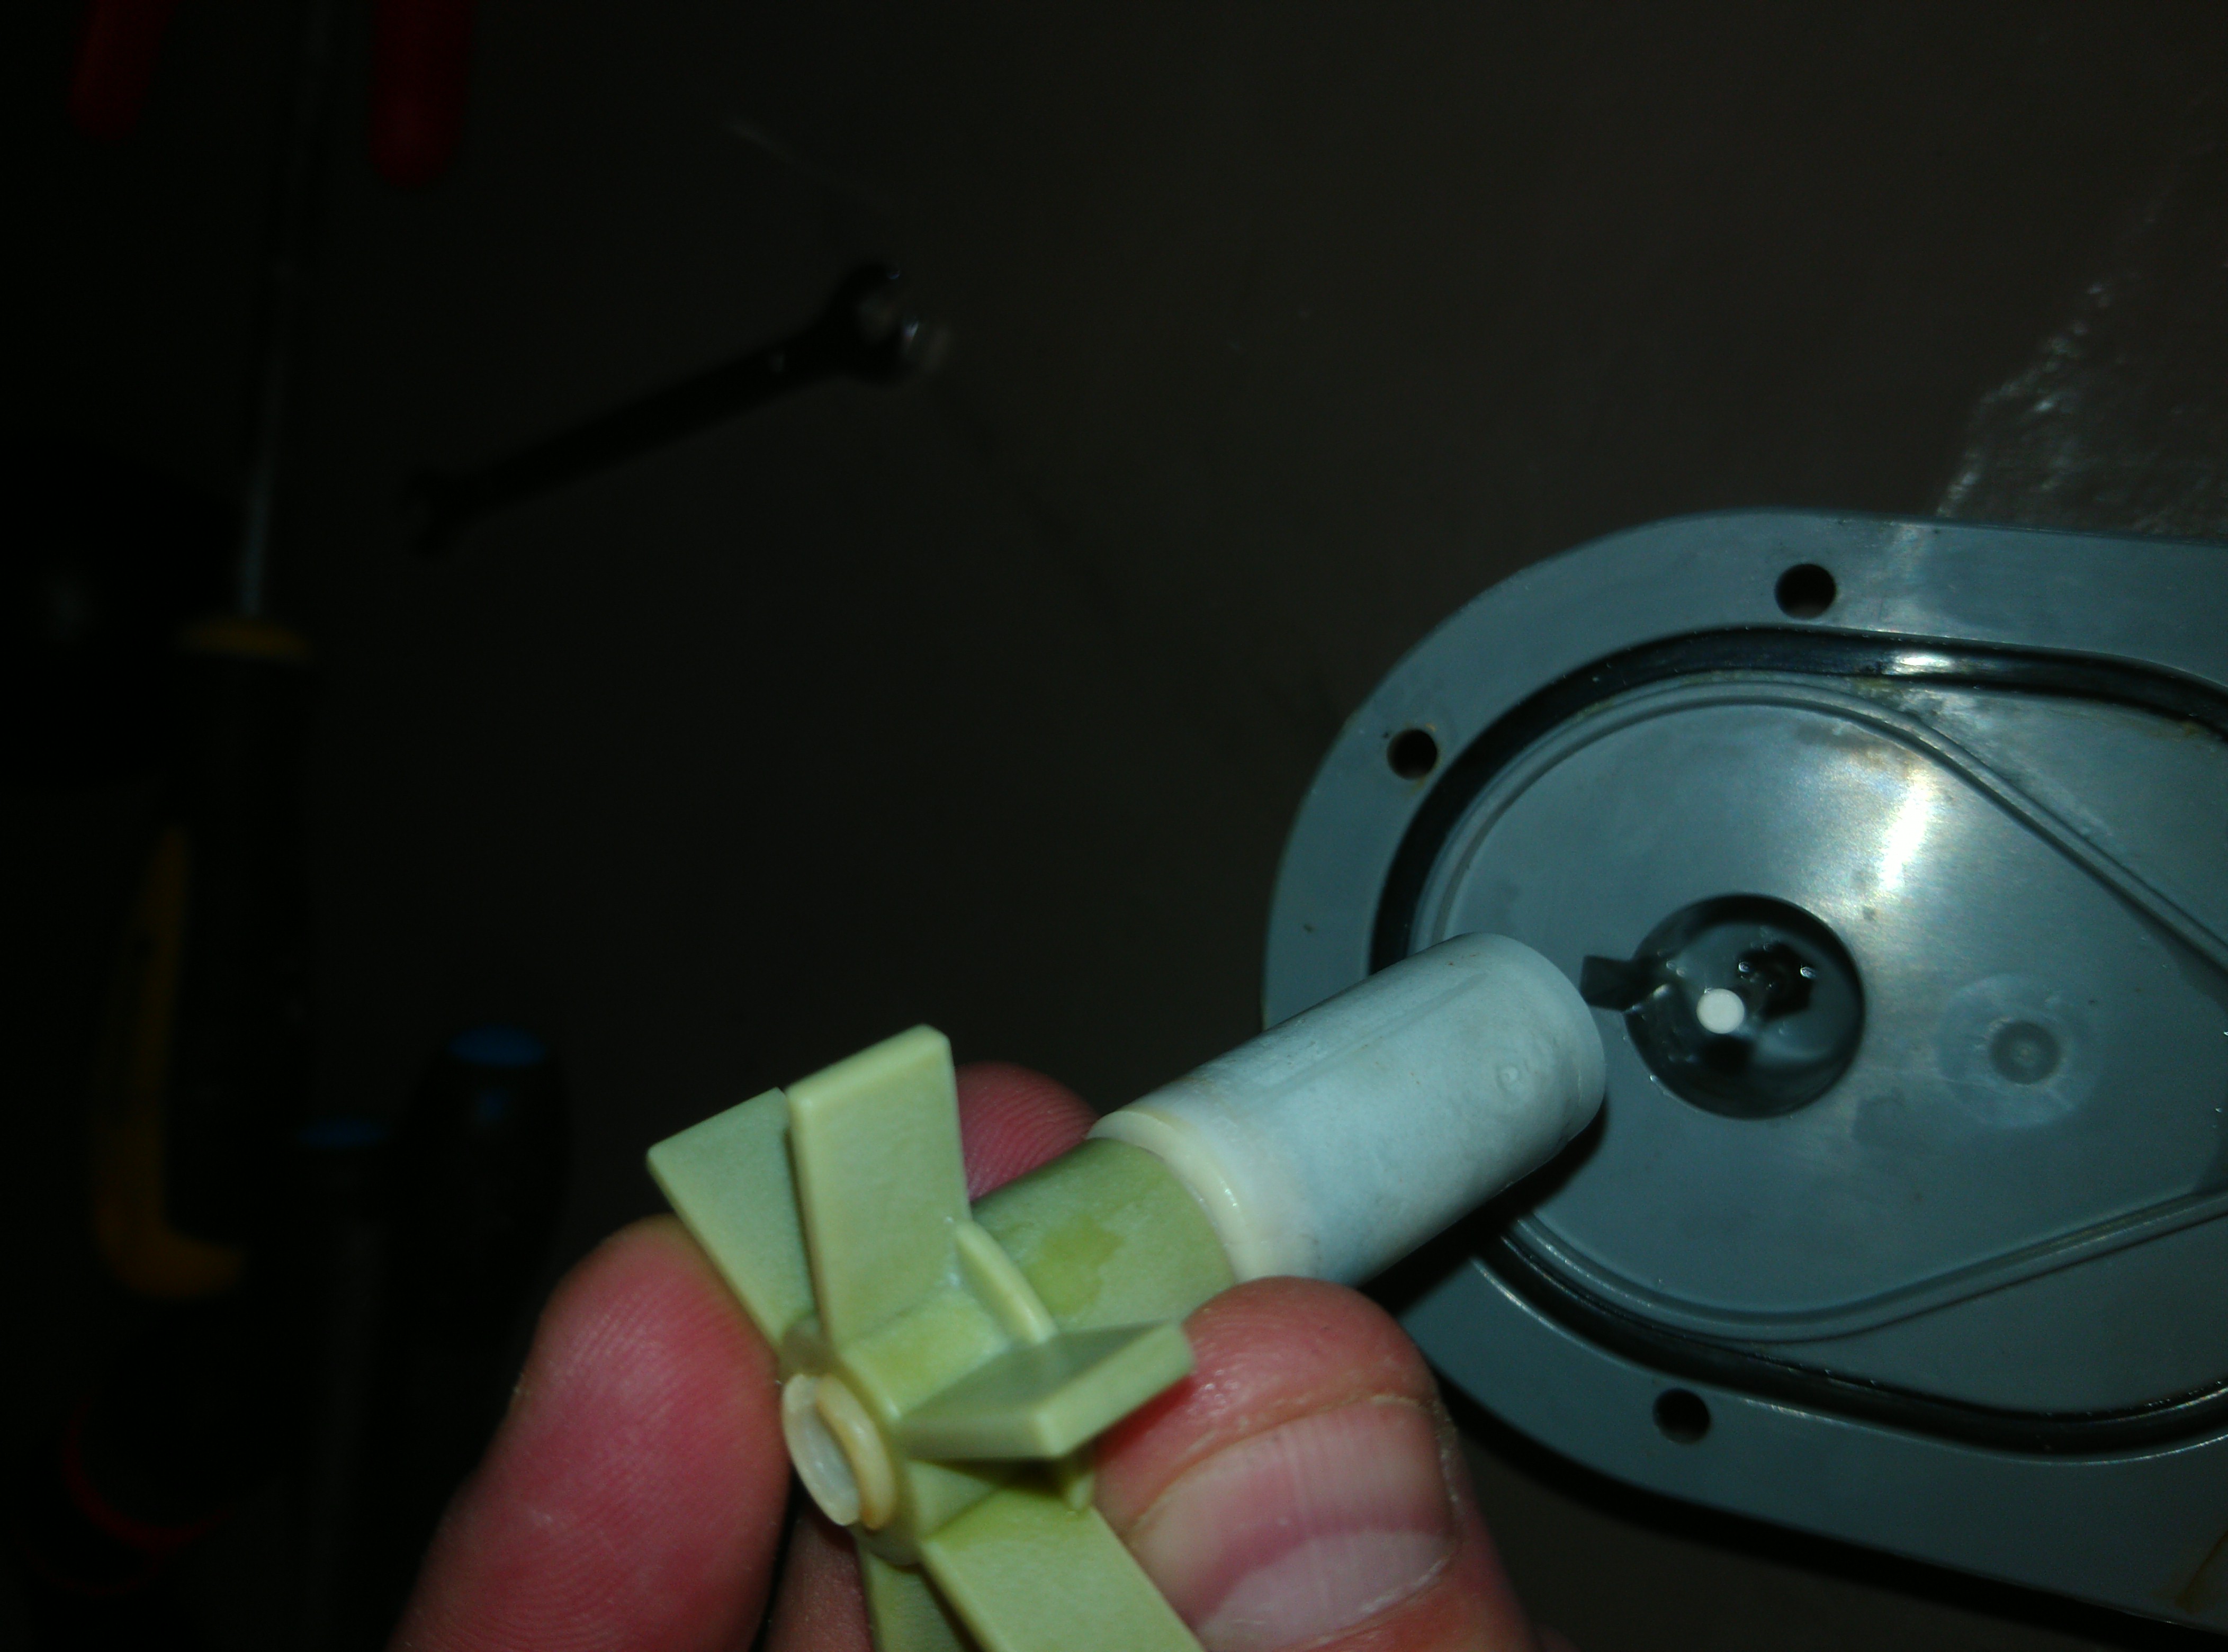
Now place the front cap back. Ensure that the other rubber bearing is in the front cap’s middle center hole. Make sure that the little piece of shaft you have left after the three washers goes into that front cap’s bearing.
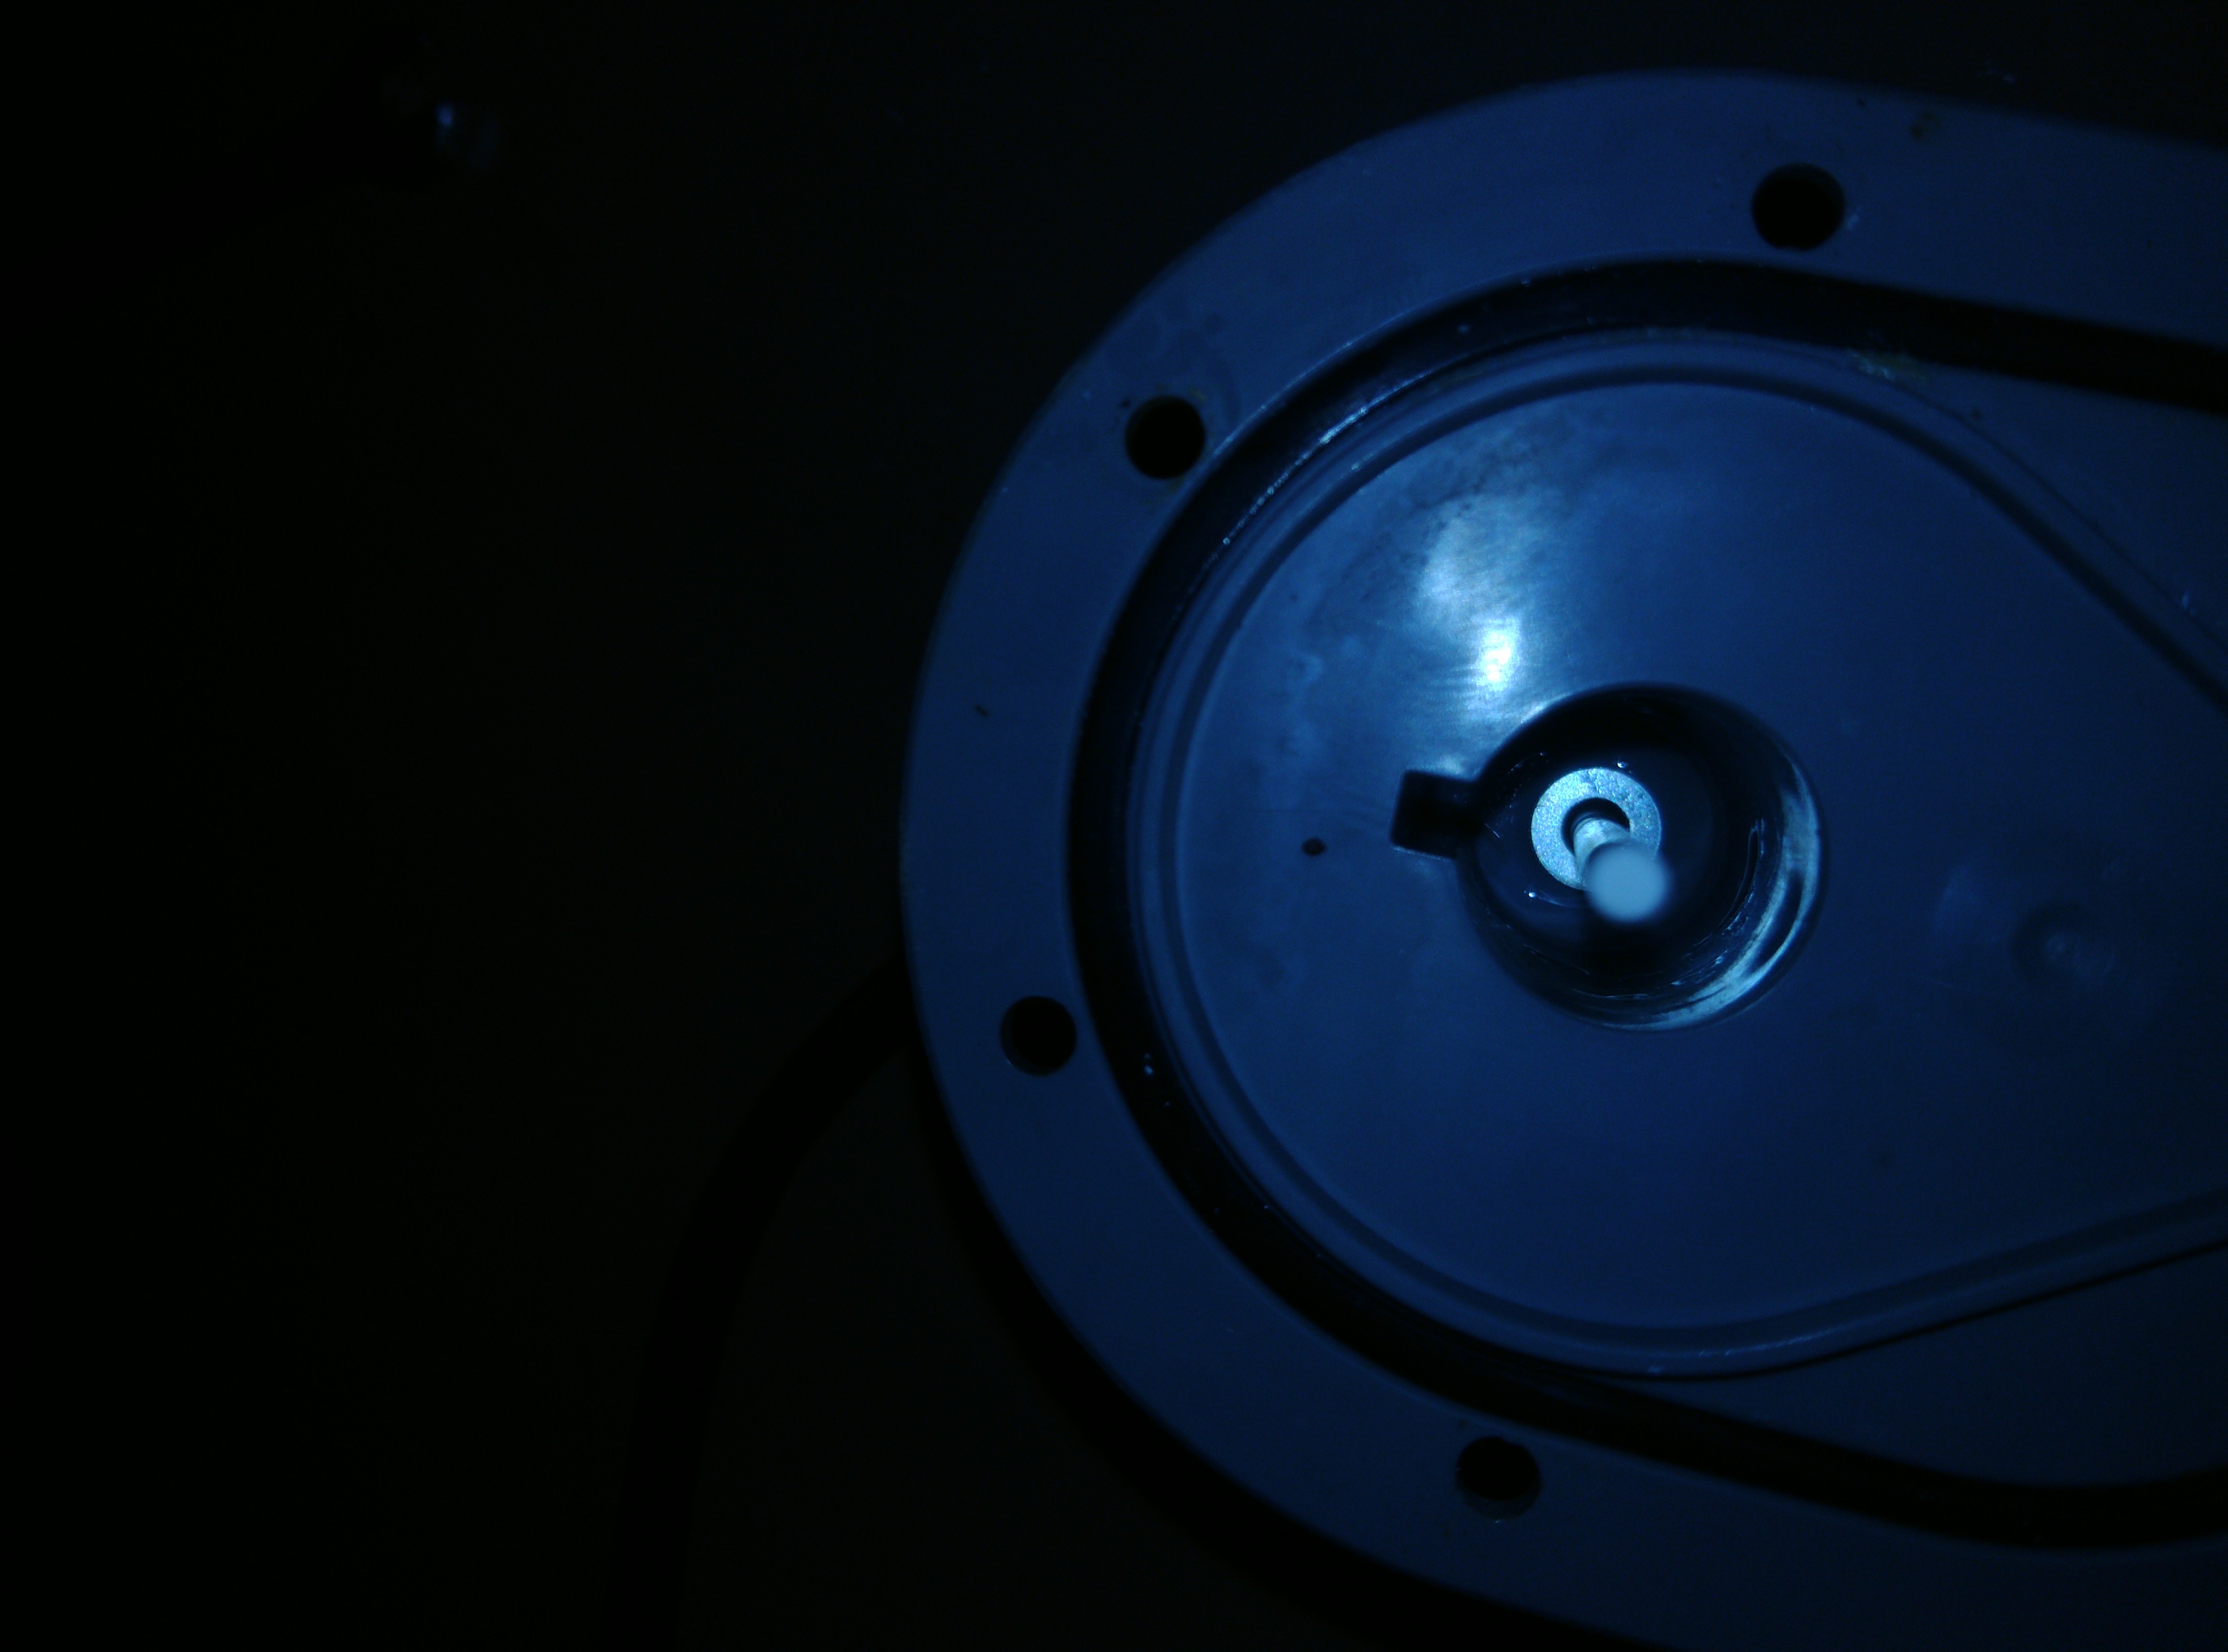
When closed that will look (when looking through the water entrance hole) like this. Look carefully and you’ll see the three washers the plastic washer. They will keep everything in place from now on. Note that since the update mentioned earlier I’m using a white plastic washer instead of three metallic ones.

Now you just close the motor by screwing the front cap tight
If this doesn’t work (I’ve had motors with the commutator magnet broken into pieces) then you can fairly easily find these motors on the second hand market. The replacement is not very hard so you don’t need to buy an entire new water pump unit.
Voor een deel komt dit doordat Westerse hoogtechnologische wapens nog niet volledig toegezegd worden aan de oorlog in Oekraïne. Voor een ander deel niet.
Ongeacht de fantagtische mega whoo ideeën van Westerlingen en hun oorlogsmateriaalproducerende nageslacht, blijkt een echte oorlog met een echte tegenstander (dus niet één zoals in bijna alle Westerse oorlogen tegen zandmannen met refurbished Kalashnikovs) een oorlog te zijn zoals de Tweede Wereldoorlog was:
Het belangrijkste is en blijft de aanvoerlijn.
Daar is nagenoeg niet in geïnvesteerd. Want dat kon tijdens Rambo III en Terminator niet verkocht worden aan de filmindustrie van Hollywood.
De aanvoerlijn is nog steeds voor zowel Oekraïne als Rusland zoals het tijdens de Tweede Wereldoorlog was. En omdat Rusland momenteel een veel beter georganiseerde aanvoerlijn heeft als Oekraïne, zullen zij deze oorlog voorlopig gezien dan ook winnen.
De filmindustrie van Hollywood is daar niet de schuldige van. Maar wel de propagandaindustrie van het Westen. Zij hebben gekozen voor deze richting van kartonnen huizen zonder de diepte van een echte investering. Zij holden ons uit. Want enkel de buitenkant doet er toe.
JDAMs zijn zo’n voorbeeld daarvan: goed tegen zandmannen die geen GPS signaal kunnen jammen. De Russen kunnen dat wel. Maar daar gingen we niet tegen vechten. Dus investeren in bv. inertial navigation systems was geen doel. Kartonnen huizen. Geen diepte. De definitie van het Westen.
De dag van vandaag moet modern militair materiaal er vooral mat zwart en koel uitzien. Zoals de lak van een macho-auto of iPhone. De buitenkant doet er toe. De man die met het spuitpistool komt is belangrijker. Vooral als die met idiote maar wel modieuze camouflagepatronen afkomt (die vooral onbewezen waren, en soldatenlevens hebben gekost). Het is de karton dat er toe doet. Dat is modern. Het moet er goed uitzien. Goed voelen. Mooi zijn. Het moet niet goed zijn. Het moet goed voelen.
Wij Westerlingen zijn zwakke prutsers geworden. Prutsers die een miljoen keer teveel geld uitgeven aan zaken die er gewoon niet toe doen en die zelfs gevaarlijk slecht zijn.
ps. Ik plaatste geen links. Maar ga er maar van uit dat ik “modieuze camouflage”, “JDAMs wiens GPS signaal gejammed kan worden”, “Rambo III” en “Terminator” en “zandmannen met refurbished Kalashnikovs” had kunnen linken. Je zou ook versteld staan van waar ik naar zou linken. Hoe debiel het allemaal is. Zelfs fundamenteel en vooral ook ontegensprekelijk debiel.
Ons materiaal is slecht. Omdat het niet werkt in een echte oorlogssituatie.
Ik was eens naar de clip van You Can Call Me Al aan het kijken. Het alom bekende nummer van Paul Simon. Daar herkende ik toch een speler in die clip die een soort van slaafje speelt voor hoofdzanger Chevy Chase.
Dat slaafje deed mij denken aan Jonathan Holslag. Ja nee. Serieus.
Ik wilde dat maar melden. Jullie mogen zelf invullen wie Al Chevy is, en wie Betty Jonathan is. Maar stel dat het de VS en de EU zouden zijn?! Zelfs moest het niet in die volgorde opgevoerd worden!?
Nan na na nah. Nan na na nah.
I can call you Betty, Jonathan. Betty when you call me you can call me Al.
I consider myself a Paul Simon generalist, trying to see the big picture without losing sight of the details.

Yesterday I explained how to make a scrap computer do OCR on your scanner/printer’s scanned PDFs in case you have a SMB file share (a Windows file share) where the printer will write to.
I also promised I would make the E-Mail feature of the printer send E-mails with the PDFs in that E-mail being OCR scanned.
I had earlier explained how you can make your old scanner/printer support modern SMTP servers that have TLS, by introducing a scrap computer running Postfix to forward the E-mails for you. This article depends on that, of course. As we will let the scrap computer now do the OCR part. If you have not yet done that, first do it before continuing here.
I looked at Xavier Merten‘s CockooMX, and decided to massacre it until it would do what I want it to do. Namely call ocrmypdf on the application/pdf attachments and then add the resulting PDF/A (which will have OCR text) to the E-mail.
First install some extra software: apt-get install libmime-tools-perl . It will provide you with MIME::Tools, we will use MIME::Parser and MIME::Entity.
Create a Perl script called /usr/local/bin/ocrpdf.pl (chmod 755 it) that looks like this (which is Xavier’s CockooMX massacred and reduced to what I need – Sorry Xavier. Maybe we could try to make CockooMX have a plugin like infrastructure? But writing what looks suspicious to a database ain’t what I’m aiming for here):
#!/usr/bin/perl

# Copyright note

use Digest::MD5;
use File::Path qw(make_path remove_tree);
use File::Temp;
use MIME::Parser;
use Sys::Syslog;
use strict;
use warnings;

use constant EX_TEMPFAIL => 75; # Mail sent to the deferred queue (retry)
use constant EX_UNAVAILABLE => 69; # Mail bounced to the sender (undeliverable)

my $syslogProgram	= "ocrpdf";
my $sendmailPath	= "/usr/sbin/sendmail";
my $syslogFacility	= "mail";
my $outputDir		= "/var/ocrpdf";
my $ocrmypdf		= "/usr/bin/ocrmypdf";

# Create our working directory
$outputDir = $outputDir . '/' . $$;
if (! -d $outputDir && !make_path("$outputDir", { mode => 0700 })) {
  syslogOutput("mkdir($outputDir) failed: $!");
  exit EX_TEMPFAIL;
}

# Save the mail from STDIN
if (!open(OUT, ">$outputDir/content.tmp")) {
  syslogOutput("Write to \"$outputDir/content.tmp\" failed: $!");
  exit EX_TEMPFAIL;
}
while() {
  print OUT $_;
}
close(OUT);

# Save the sender & recipients passed by Postfix
if (!open(OUT, ">$outputDir/args.tmp")) {
  syslogOutput("Write to \"$outputDir/args.tmp\" failed: $!");
  exit EX_TEMPFAIL;
}
foreach my $arg (@ARGV) {
  print OUT $arg . " ";
}
close(OUT);

# Extract MIME types from the message
my $parser = new MIME::Parser;
$parser->output_dir($outputDir);
my $entity = $parser->parse_open("$outputDir/content.tmp");

# Extract sender and recipient(s)
my $headers = $entity->head;
my $from = $headers->get('From');
my $to = $headers->get('To');
my $subject = $headers->get('Subject');
chomp($from);
chomp($subject);

syslogOutput("Processing mail from: $from ($subject)");

processMIMEParts($entity);
deliverMail($entity);
remove_tree($outputDir) or syslogOuput("Cannot delete \"$outputDir\": $!");

exit 0;

sub processMIMEParts
{
  my $entity = shift || return;
  for my $part ($entity->parts) {
    if($part->mime_type eq 'multipart/alternative' ||
       $part->mime_type eq 'multipart/related' ||
       $part->mime_type eq 'multipart/mixed' ||
       $part->mime_type eq 'multipart/signed' ||
       $part->mime_type eq 'multipart/report' ||
       $part->mime_type eq 'message/rfc822' ) {
         # Recursively process the message
         processMIMEParts($part);
     } else {
       if( $part->mime_type eq 'application/pdf' ) {
         my $type = lc  $part->mime_type;
         my $bh = $part->bodyhandle;
         syslogOutput("OCR for: \"" . $bh->{MB_Path} . "\" (" . $type . ") to \"" . $bh->{MB_Path} . ".ocr.pdf" . "\"" );
         # Perform the OCR scan, output to a new file
         system($ocrmypdf, $bh->{MB_Path}, $bh->{MB_Path} . ".ocr.pdf");
         # Add the new file as attachment
         $entity->attach(Path   => $bh->{MB_Path} . ".ocr.pdf",
                         Type   => "application/pdf",
                         Encoding => "base64");
      }
     }
   }
   return;
}

#
# deliverMail - Send the mail back
#
sub deliverMail {
  my $entity = shift || return;

  # Write the changed entity to a temporary file
  if (! open(FH, '>', "$outputDir/outfile.tmp")) {
    syslogOutput("deliverMail: cannot write $outputDir/outfile.tmp: $!");
    exit EX_UNAVAILABLE;
  }
  $entity->print(\*FH);
  close(FH);

  # Read saved arguments
  if (! open(IN, "<$outputDir/args.tmp")) {
    syslogOutput("deliverMail: Cannot read $outputDir/args.tmp: $!");
    exit EX_TEMPFAIL;
  }
  my $sendmailArgs = ;
  close(IN);

  # Read mail content from temporary file of changed entity
  if (! open(IN, "<$outputDir/outfile.tmp")) {
    syslogOutput("deliverMail: Cannot read $outputDir/content.txt: $!");
    exit EX_UNAVAILABLE;
  }

  # Spawn a sendmail process
  syslogOutput("Spawn=$sendmailPath -G -i $sendmailArgs");
  if (! open(SENDMAIL, "|$sendmailPath -G -i $sendmailArgs")) {
    syslogOutput("deliverMail: Cannot spawn: $sendmailPath $sendmailArgs: $!");
    exit EX_TEMPFAIL;
  }
  while() {
    print SENDMAIL $_;
  }
  close(IN);
  close(SENDMAIL);
}

#
# Send Syslog message using the defined facility
#
sub syslogOutput {
  my $msg = shift or return(0);
  openlog($syslogProgram, 'pid', $syslogFacility);
  syslog('info', '%s', $msg);
  closelog();
}
Now we just do what Xavier’s CockooMX documentation also tells you to do: add it to master.cf:
Create a UNIX user: adduser ocrpdf
Change the smtp service:
smtp      inet  n       -       -       -       -       smtpd
         -o content_filter=ocrpdf
Create a new service
ocrpdf  unix  -       n       n       -       -       pipe
user=ocrpdf argv=/usr/local/bin/ocrpdf.pl -f ${sender} ${recipient}Modern printers can do OCR on your scans. But as we talked about last time, aren’t all printers or scanners modern.
We have a scrap computer that is (already) catching all E-mails on a badly configured local SMTP server, to then forward it to a well configured SMTP server that has TLS. Now we also want to do OCR on the scanned PDFs.
My printer has a so called Network Scan function that scans to a SMB file share (that’s a Windows share). The scrap computer is configured to share /var/scan using Samba as ‘share’, of course. The printer is configured to use that share. Note that you might need in smb.conf this for very old printers:
client min protocol = LANMAN1
server min protocol = LANMAN1
client lanman auth = yes
client ntlmv2 auth = no
client plaintext auth = yes
ntlm auth = yes
security = share
And of course also something like this:
[scan]
 path = /var/scan
 writable = yes
 browsable = yes
 guest ok = yes
 public = yes
 create mask = 0777
First install software: apt-get install ocrmypdf inotify-tools screen bash
We need a script to perform OCR scan on a PDF. We’ll here use it in another script that monitors /var/scan for changes. Later in another post I’ll explain how to use it from Postfix’s master.cf on the attachments of an E-mail. Here is /usr/local/bin/fixpdf.sh:
! /bin/sh
 a=$1
 TMP=`mktemp -d -t XXXXX`
 DIR=/var/scan
 mkdir -p $DIR/ocr
 cd $DIR
 TIMESTAMP=`stat -c %Y "$a"`
 ocrmypdf --force-ocr "$a" "$TMP/OCR-$a"
 mv -f "$TMP/OCR-$a" "$DIR/ocr/$TIMESTAMP-$a"
 chmod 777 "$DIR/ocr/$TIMESTAMP-$a"
 cd /tmp
 rm -rf $TMP
Note that I prepend the filename with a timestamp. That’s because my printer has no way to give the scanned files a good filename that I can use for my archiving purposes. You can of course do this different.
Now we want a script that monitors /var/scan and launches that fixpdf.sh script in the background each time a file is created.
My Xerox WorkCentre 7232 uses a directory called SCANFILE.LCK/ for its own file locking. When it is finished with a SCANFILE.PDF it deletes that LCK directory.
Being bad software developers the Xerox people didn’t use a POSIX rename for SCANFILE.PDF to do an atomic write operation at the end.
It looks like this:
inotifywait -r -m  /var/scan |
    while read file_path file_event file_name; do
           echo ${file_path}${file_name} event: ${file_event}
    done
Setting up watches.  Beware: since -r was given, this may take a while!
 Watches established.
 /var/scan/ event: OPEN,ISDIR
 /var/scan/ event: ACCESS,ISDIR
 /var/scan/ event: ACCESS,ISDIR
 /var/scan/ event: CLOSE_NOWRITE,CLOSE,ISDIR
 /var/scan/ event: OPEN,ISDIR
 /var/scan/ event: ACCESS,ISDIR
 /var/scan/ event: ACCESS,ISDIR
 /var/scan/ event: CLOSE_NOWRITE,CLOSE,ISDIR
 /var/scan/XEROXSCAN003.LCK event: CREATE,ISDIR
 /var/scan/XEROXSCAN003.LCK event: OPEN,ISDIR
 /var/scan/XEROXSCAN003.LCK event: ACCESS,ISDIR
 /var/scan/XEROXSCAN003.LCK event: CLOSE_NOWRITE,CLOSE,ISDIR
 /var/scan/ event: OPEN,ISDIR
 /var/scan/ event: ACCESS,ISDIR
 /var/scan/ event: ACCESS,ISDIR
 /var/scan/ event: CLOSE_NOWRITE,CLOSE,ISDIR
 /var/scan/ event: OPEN,ISDIR
 /var/scan/ event: ACCESS,ISDIR
 /var/scan/ event: CLOSE_NOWRITE,CLOSE,ISDIR
 /var/scan/XEROXSCAN003.PDF event: CREATE
 /var/scan/XEROXSCAN003.PDF event: OPEN
 /var/scan/XEROXSCAN003.PDF event: MODIFY
 /var/scan/XEROXSCAN003.PDF event: MODIFY
 ...
 /var/scan/XEROXSCAN003.PDF event: MODIFY
 /var/scan/XEROXSCAN003.PDF event: MODIFY
 /var/scan/XEROXSCAN003.PDF event: CLOSE_WRITE,CLOSE
 /var/scan/XEROXSCAN003.PDF event: ATTRIB
 /var/scan/XEROXSCAN003.LCK event: OPEN,ISDIR
 /var/scan/XEROXSCAN003.LCK/ event: OPEN,ISDIR
 /var/scan/XEROXSCAN003.LCK event: ACCESS,ISDIR
 /var/scan/XEROXSCAN003.LCK/ event: ACCESS,ISDIR
 /var/scan/XEROXSCAN003.LCK event: ACCESS,ISDIR
 /var/scan/XEROXSCAN003.LCK/ event: ACCESS,ISDIR
 /var/scan/XEROXSCAN003.LCK event: CLOSE_NOWRITE,CLOSE,ISDIR
 /var/scan/XEROXSCAN003.LCK/ event: CLOSE_NOWRITE,CLOSE,ISDIR
 /var/scan/XEROXSCAN003.LCK/ event: DELETE_SELF
 /var/scan/XEROXSCAN003.LCK event: DELETE,ISDIR
The printer deleting that SCANFILE.LCK/ directory is a good moment to start our OCR script (call it for example /usr/local/bin/monitorscan.sh):
! /bin/bash
 inotifywait -r -m -e DELETE,ISDIR /var/scan |
    while read file_path file_event file_name; do
       if [ ${file_event} = "DELETE,ISDIR" ]; then
         if [[ ${file_name} == *"LCK" ]]; then
           suffix=".LCK"
           filename=`echo ${file_name} | sed -e "s/$suffix$//"`.PDF
           /usr/local/bin/fixpdf.sh $filename &
         fi
       fi
    done
Give both scripts 755 permissions with chmod and now you just run screen /usr/local/bin/monitorscan.sh
When your printer was written by good software developers, it will do POSIX rename. That looks like this (yes, also when done over a SMB network share):
inotifywait -r -m  /var/scan |
    while read file_path file_event file_name; do
           echo ${file_path}${file_name} event: ${file_event}
    done
Setting up watches.  Beware: since -r was given, this may take a while!
 Watches established.
 /var/scan/ event: OPEN,ISDIR
 /var/scan/ event: ACCESS,ISDIR
 /var/scan/ event: CLOSE_NOWRITE,CLOSE,ISDIR
 /var/scan/ event: OPEN,ISDIR
 /var/scan/ event: ACCESS,ISDIR
 /var/scan/ event: CLOSE_NOWRITE,CLOSE,ISDIR
 /var/scan/ event: OPEN,ISDIR
 /var/scan/ event: ACCESS,ISDIR
 /var/scan/ event: CLOSE_NOWRITE,CLOSE,ISDIR
 /var/scan/ event: OPEN,ISDIR
 /var/scan/ event: ACCESS,ISDIR
 /var/scan/ event: CLOSE_NOWRITE,CLOSE,ISDIR
 /var/scan/.tmp123.GOODBRANDSCAN-123.PDF event: CREATE
 /var/scan/.tmp123.GOODBRANDSCAN-123.PDF event: OPEN
 /var/scan/.tmp123.GOODBRANDSCAN-123.PDF event: MODIFY
 ...
 /var/scan/.tmp123.GOODBRANDSCAN-123.PDF event: MOVED_FROM
 /var/scan/GOODBRANDSCAN-123.PDF event: MOVED_TO
That means that your parameters for inotifywait could be -r -m -e MOVED_TO and in ${file_name} you’ll have that GOODBRANDSCAN-123.PDF. This is of course better than Xerox’s way with their not invented here LCK things that probably also wouldn’t be necessary with a POSIX rename call.
I will document how to do this to the E-mail feature of the printer with Postfix later.
I first need a moment in my life where I actually need this hard enough that I will start figuring out how to extract certain attachment MIME parts from an E-mail with Posix’s master.cf. I guess I will have to look into CockooMX by Xavier Mertens for that. Update: that article is available now.
.
This is a warning: only do this at home, instead of don’t do this at home. On your local home network that is behind a firewall and/or gateway.
Edit: Philip Paeps sent me a few suggestions to restrict things even more. I have adapted this blog item to mention all of them.
Unfortunately there are companies that make and made printers and then don’t provide firmware upgrades for it.
You end up with a scanner/printer that works perfectly fine. Except you can’t find any SMTP servers without TLS anymore. Because rightfully so has more or less every E-mail provider turned off plain text SMTP.
Now your printer cannot send the scanned documents over E-mail anymore. Firmware upgrade of your scanner/printer? What if there is none?
What to do? Run a unencrypted postfix smtpd on some scrap computer on your local network, that relays your mails with its smtp client to a TLS enabled SMTP server.
apt-get install postfix # and select Internet site
I didn’t want fake security by having authentication on the smtpd side, as there will be no encryption between printer and our local postfix. When somebody listens on your local network they would not only have the PDFs that you scanned with your scanner/printer, they will also have those authentication tokens.
I suppose you can add authentication, but then at least don’t be silly and use usernames and passwords that you use somewhere else. Note that some really old scanners/printers also can’t do SMTP with authentication.
I used these relay_restrictions for smtpd. We will place the printer’s IP address in/within mynetworks, so we will relay for it through permit_mynetworks.
smtpd_relay_restrictions = permit_mynetworks reject_unauth_destination
The mydestination should be as restricted as possible so we’ll just empty it (no local delivery at all):
mydestination =
local_recipient_maps =
local_transport = error:local delivery is disabled
You can now also remove the local delivery agent from master.cf if you want. We restrict the mynetworks of course too. The scanner/printer is with DHCP on 192.168.0.0/24, so add that:
mydestination =
mynetworks = 127.0.0.0/8 192.168.0.0/24
Even better is to have your scanner/printer on a fixed IP address and then use that one IP address:
mynetworks = 127.0.0.0/8 192.168.0.11
In fact, when the scrap computer has a fixed IP address then you can further restrict things by using inet_interfaces of course:
inet_interfaces = 192.168.0.14, 127.0.0.1
And now we configure the relayhost, we will relay to our TLS enabled SMTP(s) server:
relayhost = [smtps.server.org]:587
smtp_sasl_auth_enable = yes
smtp_sasl_password_maps = hash:/etc/postfix/sasl_passwd
smtp_sasl_security_options = noanonymous
smtp_tls_security_level = encrypt
header_size_limit = 4096000
message_size_limit = 524288000
Now make a file /etc/postfix/sasl_passwd to add the username / password. After that of course run postmap /etc/postfix/sasl_passwd
[smtps.server.org]:587 username:password
We now on the printer configure the scrap computer’s local network IP address or DHCP hostname as SMTP server.
Other security considerations that are possible is to place printer and scrap computer on a VLAN or let there be a crossed UTP cable between them. But if you are going to do those things then you also know how to do it yourself. Such things do make sense: your easily hackable LED lamps and even more easily hackable Smart TV don’t need to talk to your printer nor this scrap computer. VLAN everything!
For the people who want to know how to get around the ongoing media bans:
Do a Google search and type in ‘free ssh country‘. Use as ‘country‘ the country where the media is that you want to reach. Take the first hit. Create the SSH tunnel account that is freely available.
In a console (if you don’t have SSH, you can install it with for example Git Bash, Cygwin, etc on Windows. You can also use Putty of course – make a SOCKS tunnel). Note that the username and hostname will be different (the website will tell you).
ssh -D 1337 -q -C -N user-vpnthathost.com@countryNr.thathost.com
For Firefox: Settings->Network Settings [Settings]->Manual Proxy configuration. Type next to SOCKS Host: localhost, and next to Port: 1337. Next check ‘Proxy DNS when using SOCKS v5’. You have equivalent settings in Chrome and Chromium among other browsers.
There are many options as VPN service. You can also search with Tor-browser if you think the secret services want to kill you or something. It’s not very likely, though. But if you are paranoid, then I guess sure.
Tor-browser itself might by the way also work just fine.
Install some software
apt-get install imagej wget imagemagick bash
Get a JSON with all the versions of a image on Wikipedia
Let’s assume you want to watch how the invasion in Ukraine took place. That’s this one:
We only need the URL, so iiprop=|url. If you need the timestamp (when was the image file made) then use iiprop=|url|timestamp. A list of them you can find here.
You can use wget or in your browser just do save file as (use RAW data at the top then, for example in Firefox).
Fetch the images
#! /bin/bash

mkdir svg
cd svg
ITEMS=`cat api-result.json | jq '.query.pages."-1".imageinfo | .[] | .url'`
for a in $ITEMS
do
    wget "$a"
    sleep 1
done
Convert them to PNGs:
Normally they are already in the right order. So no renaming should be needed. Else you have to add to the iiprop of the query ‘timestamp’ and then with jg you extract that from the JSON to for example add it somehow to the filenames.
Or just use touch to change the file’s last modification date after wget fetched it and then here you use UNIX find to loop in the right order, and write PNG files like 0001.png, 0002.png, etc.
#! /bin/bash
cd ..
mkdir png
for a in svg/*
do
    # You can come up with a better translation for the filename
    b=`echo $a | sed s/svg//g`
    convert -density 250 -size 1546x1038 $a png/$b.png
done
Convert PNGs to a movie
Convert into fake-news, propaganda, etc
We are a few years further. A few years in which we all tried to make a difference.
I’m incredibly proud of my achievement of QTBUG-61928. At the time I thought I could never convince the Qt development team of changing their APIs. They did and today in Qt6 it’s all very much part of the package.
I want to thank Thiago and others. But I also think it’s a team effort. It might not be because of just me. But I still feel a little bit proud of having pushed this team just enough to make the changes.
I am now at a new Qt bug report. This time it’s about int64_t. I think that QModelIndex should be completely supporting it. Again, I think a lot. And I have a lot of opinions. But I anyway filed QTBUG-99312 for this.
Qt published its New_Features in Qt 6.0.
Some noteworthy items in their list:
I like to think I had my pirate-hook in it at least a little bit with QTBUG-61928.
Het komt uiteraard van één of ander forum. Maar ik wilde dit dus toch eventjes vereeuwigen in één van mijn fameuze ontzettend belangrijke blog posts. Zodat de ganse wereld het voor goed zou kunnen naslagen.
Het is ook belangrijk voor stel dat je me onder contract neemt. Zo weet je te minste wat deze zagevent continu in je organisatie zal zeggen tegen iedereen als advies hierover.
Dat doe ik dan vooral omdat ik best wel wat ervaring heb in wat niet werkt (dat vooral) en ook in wat wel werkt. Het is me opgevallen dat er erg veel geprobeerd wordt met alles waar ik ervaring in heb en waarvan ik weet dat het niet werkt.
Maarja. Iedere project manager wil bewijzen dat hij of zij dat kan bestieren dat wat bewezen is niet te werken. Op zichzelf is dat prima. Dan factureer ik als freelancer gewoon meer en langer geld uit zijn project-budget. Maar niettemin zal ik dus altijd het volgende adviseren:
Ze zouden misschien beter semver.org hanteren voor hun versie nummers. Dat maakt het voor andere techneuten eenvoudiger om te volgen:
0.0.z wil zeggen dat het eigenlijk nog niet gereleased is, maar nog volledig in ontwikkeling ligt. Die z ophogingen zijn incrementele stappen voor de ontwikkelaars zelf.
0.y.z wil net hetzelfde zeggen. Maar de ontwikkelaars zijn begonnen met het beoefenen van versionering. Je zou ook kunnen zeggen dat iedere y ophoging betekent dat er een test is gebeurd.
1.0.0 wil zeggen dat mensen buiten het eigen ontwikkel en test-team het product in gebruik (kunnen) nemen. Dat het getest is. Dat het werkt. Dat het stabiel is.
1.0.1 wil zeggen dat er 1 enkele bugfix was op 1.0.0 en dat er enkel die bugfix in zit.
1.0.2 wil zeggen dat er 2 zulke bugfixes zijn gedaan. Nadat 1.0.1 uitgebracht was.
1.1.0 wil zeggen dat er 1 extra feature is toegevoegd aan 1.0.0.
1.1.1 wil zeggen dat er 1 extra feature is toegevoegd aan 1.0.0 en dat er in die feature een bug zat. Of dat er een oud probleem in 1.0.0 zat en dat dat hersteld is. Maar dan brengt men naast de 1.1.1 ook een 1.0.3 uit. Die 1.0.3 heeft niet die 1 extra feature van 1.1.0 maar heeft dan wel de fix die 1.1.1 heeft, gebackport voor 1.0.0 (en eigenlijk voor 1.0.2)
2.0.0 wil zeggen dat er iets gewijzigd is aan de 1.y.z reeks dat projecten die afhankelijk er van zijn kan breken. Bv. een breaking API change (of een breaking ABI). Of men heeft iets weggehaald. Er is een grote wijziging geweest.
2.0.1 wil zeggen dat er 1 bug is gefixed in 2.0.0. 2.1.0 wil zeggen 1 feature toegevoegd aan 2.0.z.
Wil je dat nu in een systeem voor versiecontrole allemaal netjes bijhouden waarbij je de wijzigingen commit per commit en branch per branch en versie per versie en auteur per auteur wil kunnen vergelijken en opvragen, voor om het even welk soort documenten, dan gebruik je gitflow.
Na een zware periode waar ik zelf angst heb gehad, bedacht ik me een paar uur geleden:
Niets blijkt moeilijker te zijn dan te accepteren dat er geen gevaar is.
Ik heb besloten dat dit de nieuwe ondertoon van deze blog wordt. Wat dat juist wil zeggen? Dat een tiental van de komende blog artikels dat als lijn gaan aanhouden.
Clowns to the left of me are prevaricating (uitereraard een verwijzing naar de song die in Reservoir Dogs aanwezig was), is geschiedenis.
Wat was het vorige? Toen dacht ik er vast nog niet zo hard over na. Misschien zou ik dat nu beter ook niet doen? Ik denk te veel over ongeveer alles na.
Dus, daarom de nieuwe ondertitel:
Accepteer, dat er geen gevaar is.
Ik heb hem Nederlands gemaakt. Want de enige groepen die zich in mijn blog interesseren zijn a) jullie of b) misschien staatsveiligheid. Die laatste heeft in dat geval een budget om één en ander te laten vertalen en jullie spreken al Nederlands.
Goed ja. Er is wel wat gevaar natuurlijk. Maar we hebben het eigenlijk erg goed onder controle.
MacSlow made us a nice illustrative tool that shows the usefulness of social distancing:
https://macslow.org/epidemic-spread/